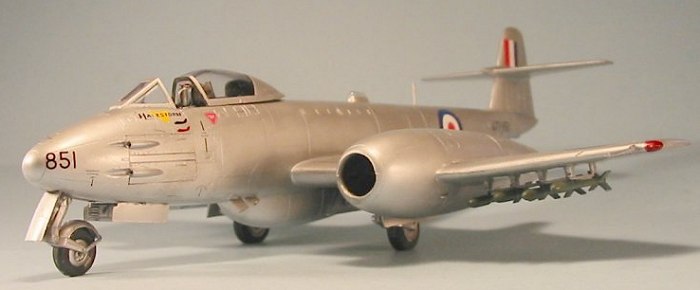
Classic Airframes 1/48 Meteor F.8
|
KIT # |
466 / 467 / 478H |
|
PRICE: |
$49.95 MSRP |
|
DECALS: |
3 options per aircraft |
|
REVIEWER: |
|
|
NOTES: |

|
HISTORY |
By 1947, the Meteor fighter had been in production slightly more than four years, with an airframe that was much the same as the original prototype, other than extensions of the engine nacelles which had been accomplished with the F.Mk.4 and resulted in a significant aerodynamic cleanup of the airframe with a concomitant increase in speed. The Meteor F.Mk.8 was the result of a development program on the part of Gloster Aircraft to extend the life of the Meteor line by raising the limiting Mach number.
To improve the
Meteor's performance, and provide for new equipment made necessary by
changing operational requirements, Gloster embarked on a major redesign
of the airframe while attempting to keep as many F.4 components as
possible. Most prominently, the fuselage of the Meteor 8 was
lengthened by 30 inches, moving the ammunition and weapons forward the
same distance, and allowing an additional 50 gallon fuel tank to be
installed. It was hoped that this would also
 result in the
deletion of the lead ballast carried in the nose of the F.4; Meteor F.4
RA382 had the lengthened nose, but it was discovered that deleting the
lead ballast had the unfortunate effect of shifting the center of gravity
to the rear as ammunition was expended, with increasing airframe
instability.
The solution was discovered almost by accident. Tests were being carried out on the E.1/44 prototype in the Farnborough wind tunnel, where it was discovered that the tail assembly of this airplane would provide the necessary control for the F.8. Once an E.1/44 tail was grafted onto RA382, it handled beautifully without ballast. Other improvements included a new gunsight and the Martin-Baker Mk.2 ejection seat.
The first F.8 prototype, VT150, made its first flight on October 12, 1948. A further change was made when it was discovered that the under-fuselage ejection slots for spent shell casings was scoring the belly tank and rear fuselage; large external chutes were fitted to the slots to carry the shell casings clear. A pair of Rolls-Royce Derwent 8s gave the F.Mk.8 a top speed of 590 m.p.h. Later, the size of the air intakes was increased by 4.5 inches in diameter, which resulted in an extra 200 pounds of thrust for each engine due to the increased air mass available. This resulted in a top speed of around 600 m.p.h.
 The first F.8,
VZ438, was handed over to the RAF on December 10, 1949, while the last -
WL191 - left the assembly line on April 9, 1954. Thirty-two RAF squadrons
and eleven Auxiliary Air Force squadrons would operate the Meteor between
its first appearance on the squadron level in 1950 and its final
replacement by the Hunter in 1958. The F.Mk.8 was also operated by the
air forces of Australia, Denmark, the Netherlands, Belgium, Israel,
Egypt, Syria, and Brazil until as late as the 1970s. The final use of
the F.Mk.8 was as a target drone, under the designation Meteor U.16.
By the time the first Mk.8 flew operationally, the American F-86A Sabre and the Soviet MiG-15 had already become operational with the first units of their respective air forces, making the first-generation F.8 obsolescent if not completely obsolete from the first day of its service. Just how outclassed the Meteor was by these two second-generation fighters would become apparent over Korea within 18 months of its operational debut, when only the quality of the pilots would keep 77 Squadron RAAF from experiencing greater losses at the hands of the MiG-15 than they did.
|
THE KIT |
For a look at what's in the box, please visit the preview.
|
CONSTRUCTION |
Overall, the production quality of this kit is the best yet from Classic Airframes. That said, it is still a limited-run kit, and it is essential to test fit every part before committing to gluing the part in position.
In my case, construction began by cutting all the parts off the trees and cleaning up flash, smoothing the areas around the sprue gates, etc. It is particularly important to be certain you have trimmed off all the flash from the lower wing center section part, otherwise it will not fit to the fuselage; I mention this because the flash is easy to miss along the trailing edge, where it is present just sufficient to completely bugger-up the fit along the trailing edge. It is also essential to cut out all the mold-release pins inside the parts in order for things to fit right.
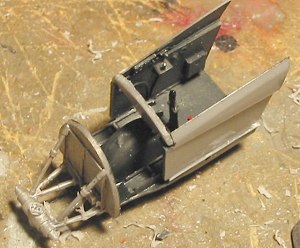 After that, I
proceeded with the cockpits. Fitting the instrument panel is difficult,
and requires some sanding-down of the lower section of the panel where it
attaches to the wheel well in order for it to fit to the rest of the
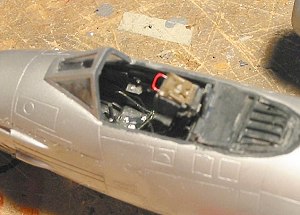
cockpit. The cockpit is very Spartan, and the fact it is painted black
is a good thing.
For the first of the three kits, I did my standard cockpit assembly of gluing the cockpit walls in position to the respective fuselage halves, then assembling the floor, instrument panel and rear bulkhead to one fuselage half, then gluing the fuselage halves together. As it turns out, this is not the way to go about it with this kit, since the result was difficulty in getting the fuselage halves to align correctly, which led to use of more putty along the centerline than would have been otherwise necessary.
For the other
two, I assembled each cockpit completely and separately, without
attaching the rear bulkhead, and attaching the upper parts of the
nose wheel gear. After gluing the fuselage halves together, I then slid
the cockpits into the fuselage through the opening for the wing, and
pushed them into position; this required a bit of sanding-down of the
forward edge of the cockpit walls, so that they could be pushed in far
enough to position the wheel well correctly. Once proper positioning was
achieved, I super-glued the wheel
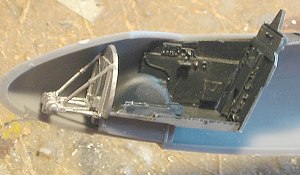 well to the fuselage, and the upper
edges of the cockpit sidewalls. I then attached the rear bulkhead in
position and super-glued it.
Speaking from hindsight, I strongly suggest that you not attach the rear cockpit decking now, because you may very likely need that opening to add more weight to this serious tail-sitter of a model. I know I did, and having to prise that out of position was a nerve-wracking task for which I was very thankful I had used only as little cyanoacrylate glue as I had.
I then filled
the area behind the cockpit with fishweights. Given that about 60
percent of the length of this model comes behind the centerline of the
main wheels, and you do not have the weight of 4
 20mm cannon, 800 rounds
of ammunition, and two Derwent 8s ahead of that line, and the fact that
you cannot put any weight in the extreme nose ahead of the cockpit due to
the position of the nose gear, this model requires a lot of weight in
order to nose sit because of the short moment arm between the weight and
the main gear centerline. I knew that, I put in as much as I could cram
in, and it turned out I still needed weight and had to make the main
wheels quite flat in order to result in nose-sitting. And after all
that, if you tap the surface the models are sitting on, each one will
still rock back onto its tail bumper!
Once the weigh-in was done, I attached the lower center section of the wing to the fuselage. DO NOT assemble the entire wing as a sub-assembly and then attach it to the fuselage, as you will have severe fit difficulties and end up using a lot of putty, once the deep purple air over the workbench clears enough for you to see what you are doing.
The resin bulkhead of the engine face is too large to fit into the
nacelles, so sand it down all around. Don't worry about getting it
too small, there will be no way to see that once everything is assembled.
If you don't get these parts small enough to fit easily, you will give
yourself fits when it comes to attaching the forward sections of the
nacelles, and these are difficult
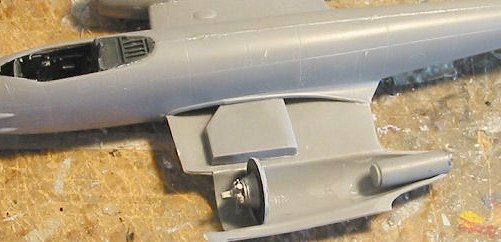 enough if you have
gotten the engine parts sanded down sufficiently. Be certain to
glue in the exhaust at this point, do no think you can stick it in once
the wing is assembled - you cannot do that and get it right.
Once the interior of the nacelles were assembled, I attached the upper center sections of the wing, being careful to get a good match-up with the upper wing and the fuselage joint. Following that, I attached the outer wings. There is nothing in the instructions to tell you this, but the outer wing of the Meteor has a 4.5 degree dihedral. I glued a small piece of sprue into the outer wing at the point of the main spar, to spread apart the upper and lower surfaces sufficiently to get a pretty good attachment of the wing to the nacelle.
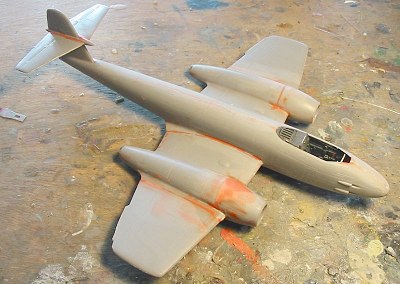 Now comes the
real fun part, attaching the front parts of the nacelles.
I suggest from experience that you glue these parts together at the outset, so you can putty the interiors and let it set up good and hard, so that you can sand the interiors smooth. There are big gaps and shelves in there otherwise, and this sucker really does need to be seamless.
On what became my RAF Meteor, the intakes fit mostly OK to the wing, and I only needed a bit of Mr. Surfacer to deal with the seams and gaps. On what became the Israeli Meteor, the fit required some good Bondo putty underneath Mr. Surfacer to get a good result. There were both the later "wide mouth" intake.
On the RAAF Meteor, which had the early intakes, the right side intake did not fit to the wing without a step of about 1/32-1/16 of an inch! The left side did not fit as well as the intakes on the Israeli Meteor, but did fit much better than its brother. I tried using the other two early right-side intakes from the other kits, with the same problem. I ended up applying a LOT of putty to the upper surface of the intake, sanding it down, applying several coats of Mr. Surfacer 500 and sanding them down, several coats of Mr. Surfacer 1000, and then polishing the daylights out of the area; naturally, this was the model that would be finished in painted aluminum, so there would be nothing to distract a viewer's eye from poor fit and scratches. Fixing this one thing became the hardest part of the entire project.
In retrospect, it might have been easier to take one of the other left-side intakes, sand off the exterior mating surfaces that are "handed" for each wing, attach that and fill in any resulting gaps along the intake-to-wing joints.
With the models rescribed where necessary and polished out, it was time to move to the paint shop.
|
CAMOUFLAGE & MARKINGS |
Painting:
According to
Edward Shacklady in "The Gloster Meteor," the F.Mk.8 was originally
delivered in "high speed silver," an overall aluminum lacquer finish.
When, in 1952-53, squadrons began applying camouflage to the upper
surfaces, this was done in the field, and the aircraft were not painted
according to a particular pattern, though an approximation of similarity
was generally achieved within each squadron. This is shown to be
correct in several air-to-air photos of camouflaged Meteors, where the
patterns are "close," but not exactly the same. The same is true
for the Israeli Meteors, which were also delivered in overall silver and
later camouflaged in the field. Thus, it i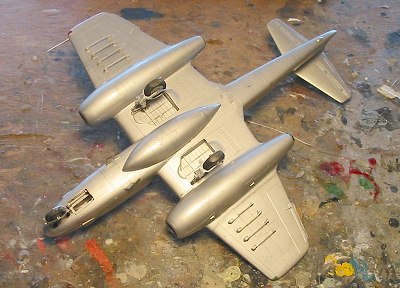 s
not necessary for a modeler to exactly reproduce the camouflage patterns
included in the markings instructions for the RAF and Israeli Meteors.
While the RAF Meteors had a slightly "soft-edge" camouflage, the Israelis
had a "hard edge" to their camouflage, from applying it with a tighter
spray. Thus, I freehanded the camouflage on the RAF Meteor, and did
the Israeli Meteor by cutting out masks from drafting tape, and running
thread around 1/16 inch in from the edge to lift the tape, resulting in a
"hard edge" camouflage without any "ridges" between the colors.
s
not necessary for a modeler to exactly reproduce the camouflage patterns
included in the markings instructions for the RAF and Israeli Meteors.
While the RAF Meteors had a slightly "soft-edge" camouflage, the Israelis
had a "hard edge" to their camouflage, from applying it with a tighter
spray. Thus, I freehanded the camouflage on the RAF Meteor, and did
the Israeli Meteor by cutting out masks from drafting tape, and running
thread around 1/16 inch in from the edge to lift the tape, resulting in a
"hard edge" camouflage without any "ridges" between the colors.
The RAAF
Meteor was first painted overall in SnJ Aluminum, (as was the lower
surface of the RAF Meteor). I then used some Model Master "Aluminum
non-buffing" metalizer paint over various panels to get a different shade
and simulate the weathering of the aluminum lacquer finish, followed by
use of some of the SnJ polishing powder on such items as the gun doors.
Photos of the 77 Squadron Meteors show them to have
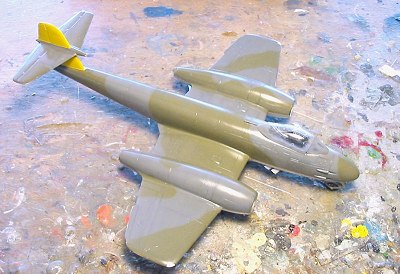 weathered in service,
but to have been very well-maintained and kept quite clean. I don't
really know if the photos show the subtle tonal differences on this
model, but it's there in bright light in person. I then gave the
model an overall coat of Sealer, which gave it the "painted on" aluminum
finish I was looking for.
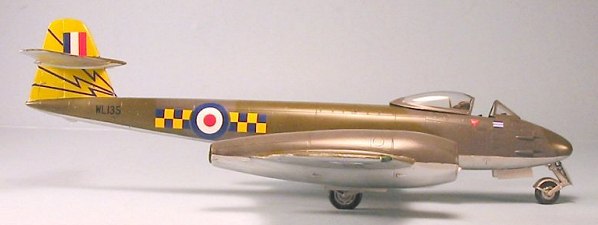
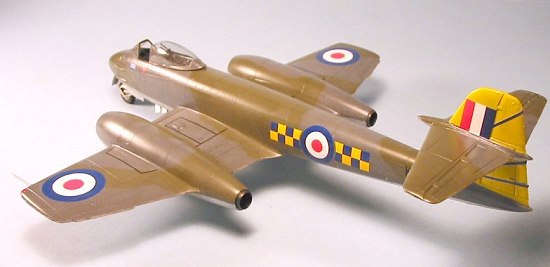
The RAF Meteor camouflage was done with Tamiya XF-24 Dark Grey for the "Dark Sea Grey" and Gunze-Sangyo H-73 RAF Dark Green for the Dark Green. There was little fading done to the paint, since these were well-maintained aircraft. The vertical fin was painted with Tamiya Flat Yellow and masked off prior to painting the camouflage.
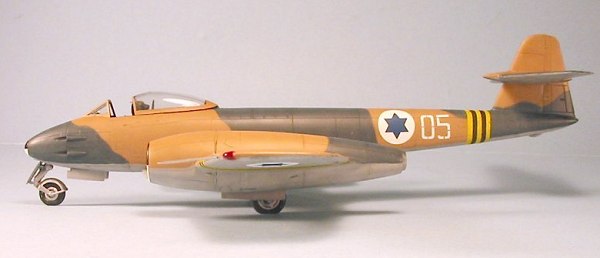
The Israeli Meteor was camouflaged with Gunze-Sangyo "Sky Grey" on the
lower surfaces, and Gunze-Sangyo H-310 Brown FS30219 and H-53 "Navy Blue"
for the Dark Blue. The model was to represent a Meteor flown in the 1956
War, some 2-3 months after the airplanes were first camouflaged, so I did
not do much weathering on the paint. I painted and
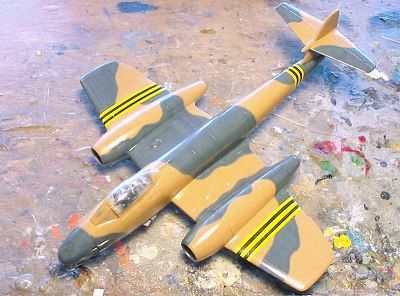 masked the
yellow-and-black Operation Musketeer markings before painting the model.
The black-and-white intake leading edges and the nose cap were also
painted and masked off before applying the camouflage.
Decals:
The RAAF Meteor was done as "Halestorm," the last RAAF Meteor to shoot down a MiG-15 in the Korean War, using the kit decals. These went on without problem.
The RAF Meteor was finished with markings for the CO's aircraft of 245 Squadron, circa 1954, using the Xtradecal sheet available from Hannant's.
The Israeli Meteor was finished with the national insignia from the kit sheet, and numbers from an Isradecals sheet to match a photo of this aircraft during the 1956 War. I did not use the stencil markings, since they were overpainted and not replaced with the first camouflage painting.
All these decals were printed by MicroScale and went down without difficulty.
|
FINAL CONSTRUCTION |
I had painted the seats separately. The early Martin-Baker Mk.2 seat did not use the center-pull handle that is molded into these seats, so I broke them off. I made the overhead-pull handles from wire and painted them red - the black-and-yellow markings did not get into use until after the Meteor left service.
Each seat needed a "boost" from a piece of Evergreen sheet on the bottom so they would sit up high enough in the cockpit. The canopies are thick enough that you can't put the seat as high as it really should be, but the difference is almost too little to measure.
 The main gear
do not fit as designed. I cut off their tabs and glued them where they
should be with cyanoacrylate glue. The door actuating gear is too small
to reach from door to door, so I positioned it so that the main gear
blanked out the one side and insured that the attachment to the inner
door - which can be seen - was correct. These models will never be
turned over again after the lower surfaces were photographed for this
article, and the models sit just fine otherwise.
I used rocket rails from the Hasegawa P-51 kit and rockets from an Accurate Miniatures TBM-3 kit, to provide under wing armament for "Halestorm," which was carrying these rockets on its MiG-killing mission (and all others).
The cockpit canopies were unmasked and positioned open. I personally wish these had been supplied as vacuforms, since they are really too thick and this fact detracts from the look of the model. The canopies are thick enough to have distortion even when Futured, so closing them means you cannot see much of the cockpit detail.
As I said, the main wheels were all flattened more than would be necessary in order to get the models to nose-sit.
|
CONCLUSIONS |
The Meteor 8 may well have been obsolete when it first saw service, but it is a good-looking first-generation jet, and can be made to look really nice with the colorful 1950s squadron markings that come with the kit decals and on the Xtradecal sheet. With my Tamiya F.1 and F.3, and the coming F.4, T.7 and NF.11/13, it will be possible to have a complete collection of the entire line of Meteors. (Editor's Note: The entire family of Meteors has been available in 1/72 scale for over 15 years from various people such as Matchbox, Airfix, Frog and Aeroclub, if your interests are in the smaller scale.) I could definitely see myself doing another one of these. My only complaint is the canopies; if Squadron/Falcon ever release Meteor canopies, I will retrofit them on these models.
Recommended for modelers experienced in building limited-run kits.
March 2004
Copyright ModelingMadness.com
Thanks to Classic Airframes and David Hannant for the review kits.
If you would like your product reviewed fairly and fairly quickly, please contact the editor or see other details in the Note to Contributors.