|
KIT: |
Academy 1/48 Hunter F.5 |
|
KIT # |
2164 |
|
PRICE: |
$25.00 |
|
DECALS: |
See Review |
|
REVIEW & |
|
|
NOTES: |
Conversion |
MODELING THE AIRCRAFT OF
OPERATION MUSKETEER
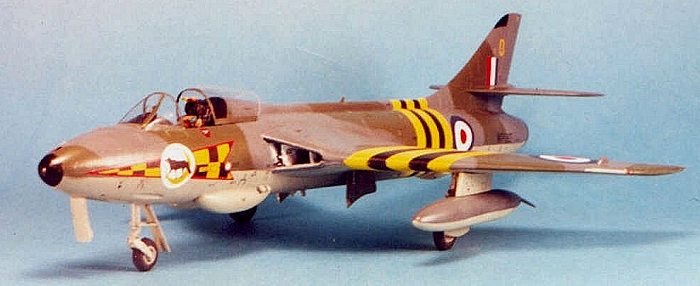
HAWKER HUNTER F.Mk. 5, 34 Squadron, Based on Cyprus
|
HISTORY |
To my mind, the Hawker Hunter is aesthetically one of the best-looking jets ever designed. In that opinion, I am not alone, as many have responded favorably to the flowing lines of Britain's first successful swept-wing fighter. With the first prototype having flown July 20, 1951, the Hunter is one of the longest-serving jets in any air force, with the last of its type retired from the Royal Air Force only in 1996.
Interestingly enough, this most successful of all Britain's post-war military jets was not always considered a success. The early development of the Hunter was plagued with so many problems it seemed likely it would be replaced by the Supermarine Swift until that airplane revealed even more serious design faults. Overcoming the gun firing problems which were causing major problems in engine operation was like dealing with the Hydra: solve one and two more would take its place.
 Hawker Aircraft came
late to jet aircraft, and even later to swept wings. Where the company had had a
30 year run of success with all previous designs, it seemed to lose its footing
with the Hunter. Its immediate predecessor was the straight wing Sea Hawk, a
design that was six years behind its US contemporaries when it finally entered
service with the Royal Navy in 1953. As a design, the Hunter suffered from a
too-extended gestation, which failed to take into account very important
discoveries about jet aircraft that could have led to early modification of the
design: the horizontal stabilizer was not an all-flying type, and was in the
wrong position aerodynamically. Failure of the flaps to operate as effective air
brakes led to extended tests as to the proper location of the ventral dive brake
eventually fitted. There was aileron pitch-up stall which was only cured by the
addition of a sawtooth leading edge to the wing. What would turn out to be the
biggest fault - one shared with all other British post-war designs - was the
extreme lack of range, since the original design called for a point-defense
interceptor.
Hawker Aircraft came
late to jet aircraft, and even later to swept wings. Where the company had had a
30 year run of success with all previous designs, it seemed to lose its footing
with the Hunter. Its immediate predecessor was the straight wing Sea Hawk, a
design that was six years behind its US contemporaries when it finally entered
service with the Royal Navy in 1953. As a design, the Hunter suffered from a
too-extended gestation, which failed to take into account very important
discoveries about jet aircraft that could have led to early modification of the
design: the horizontal stabilizer was not an all-flying type, and was in the
wrong position aerodynamically. Failure of the flaps to operate as effective air
brakes led to extended tests as to the proper location of the ventral dive brake
eventually fitted. There was aileron pitch-up stall which was only cured by the
addition of a sawtooth leading edge to the wing. What would turn out to be the
biggest fault - one shared with all other British post-war designs - was the
extreme lack of range, since the original design called for a point-defense
interceptor.
Eventually, the Hunter emerged from all this development (which included several test flights with extensive criticisms from Chuck Yeager during 1952-53) with handling qualities that became the standard against which other military aircraft would be judged. The airframe was so strong that no Hunter was ever lost to midair structural failure. The firepower of four 30mm cannon was such that any target that got in a Hunter's sights could be shredded with a 2 second burst. 1,972 Hunters were built, of which 400 were later re-manufactured for service with second air forces, and it served with no less than 21 different world air forces, a record only bettered by the MiG-17.
During the early life of the aircraft, marks alternated between power by the Rolls-Royce Avon and Sapphire engines. Production finally centered on the Avon-powered Hunter with the F.6, which came into operational service beginning in 1955.
The Sapphire-powered F.5 equipped 263, 257, 1, 34 and 41 Squadrons of Fighter Command for domestic air defense, since they only had the capability of carrying two underwing tanks and no underwing ordnance.
Service During Operation Musketeer:
 RAF Canberra and
Valiant bombers were based on Cyprus for strikes against Egypt. Since the
Egyptians were known to have received Il-28 Beagle jet bombers from the Soviet
Union the year previously, it was feared that the Egyptians might respond to
allied bombing attacks from Cyprus by sending these bombers to hit Akrotiri air
base. Two Hunter squadrons, 1 and 34 squadrons, which served together at
Tangmere, were sent out from England in late September to operate in the air
defense role.
RAF Canberra and
Valiant bombers were based on Cyprus for strikes against Egypt. Since the
Egyptians were known to have received Il-28 Beagle jet bombers from the Soviet
Union the year previously, it was feared that the Egyptians might respond to
allied bombing attacks from Cyprus by sending these bombers to hit Akrotiri air
base. Two Hunter squadrons, 1 and 34 squadrons, which served together at
Tangmere, were sent out from England in late September to operate in the air
defense role.
Inasmuch as the Egyptians were not operationally ready to carry out missions with their Il-28s, this fear of counter airstrikes never became a reality, and the Hunters did not see combat during the operation, though it has been reported there were several "long moments" where Hunters confronted Grumman Cougars of the U.S. Sixth Fleet, which was shadowing the Anglo-French operation.
|
THE KIT |
 Academy's Hunter was
highly anticipated when it hit the hobby shop shelves in the summer of 1997.
Shortly thereafter, cries came from modelers regarding the accuracy of the model
- the worst of which being a 1/72 scale seat in a 1/48 scale model - and sales
dropped. With the high want-to-buy factor in Great Britain, it was not
surprising that several British aftermarket companies supplied parts to correct
the landing gear, rear fuselage, and incorrect cockpit. Aeromaster also released
several decal sheets for the Hunter in service with several of the various air
forces that flew it over the years.
Academy's Hunter was
highly anticipated when it hit the hobby shop shelves in the summer of 1997.
Shortly thereafter, cries came from modelers regarding the accuracy of the model
- the worst of which being a 1/72 scale seat in a 1/48 scale model - and sales
dropped. With the high want-to-buy factor in Great Britain, it was not
surprising that several British aftermarket companies supplied parts to correct
the landing gear, rear fuselage, and incorrect cockpit. Aeromaster also released
several decal sheets for the Hunter in service with several of the various air
forces that flew it over the years.
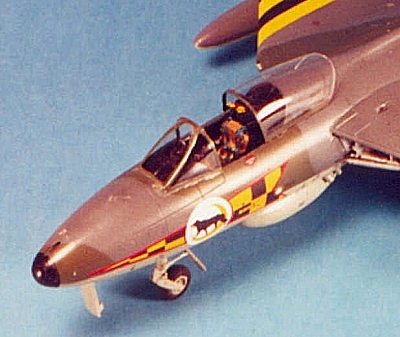
One of these Aeromaster sheets (48-346) depicted the F.5 Hunters of 34 Squadron, operating from Akrotiri, Cyprus, during Operation Musketeer, and this became the basis of my project, along with the correction set from Aeroclub - which includes a correct-size cockpit tub, correct-size gear legs and wheels, correctly-shaped rear fuselage, and an accurately-shaped vacuform canopy. It also included a white metal Martin-Baker Mk.4 ejection seat, but I opted for the better-looking resin seat produced by KMC.
|
CONSTRUCTION |
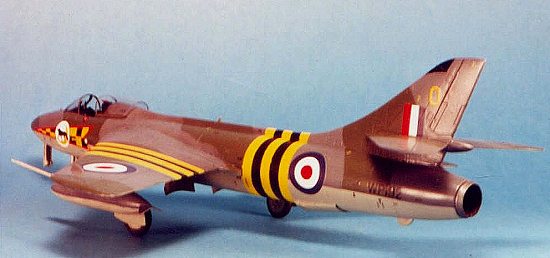
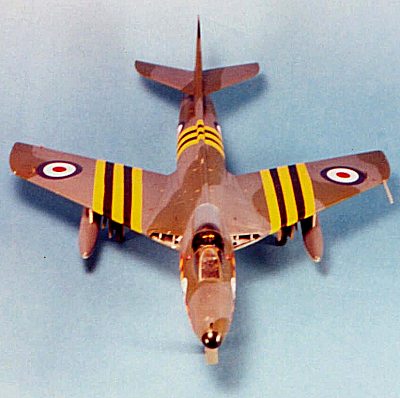
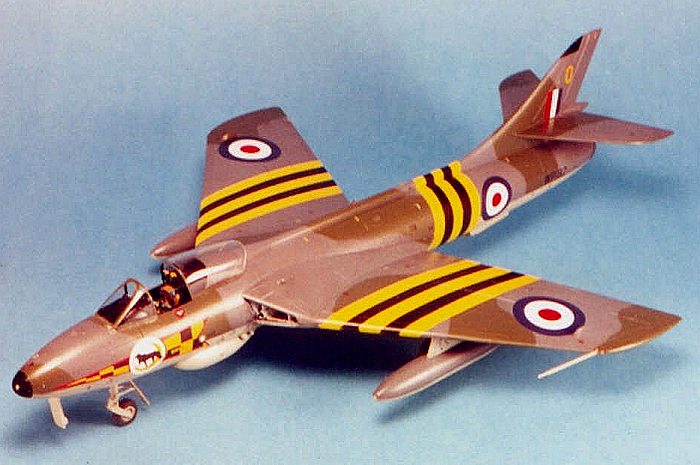
The big conversion for the Mk.5 Hunter was to get rid of the extended leading edge, the very obvious "sawtooth" in the Hunter's outer wing. I accomplished this by cutting out the entire leading edge section back to the first panel line in the outer wing, then cutting the leading edge so that when repositioned it would form a straight leading edge. This only required a very little bit of putty to smooth the new joint in the middle of the leading edge, and the wing was ready for assembly.
The way the wing is attached to the fuselage, it is better to attach the wing to the fuselage half before gluing the fuselage halves together. This way, you can work at that joint from inside and out to get it properly in position without having to use putty.
 While the wings and
fuselage halves were setting up, I commenced work on the cockpit. I painted the
tub flat black, then used several bits and pieces of instrument panel decals
from the decal dungeon to finish off this area. The seat was painted per the
instructions in the KMC set, and resulted in a nice bit of color in the
otherwise-black cockpit, with the yellow seat pads and blue seat belts.
While the wings and
fuselage halves were setting up, I commenced work on the cockpit. I painted the
tub flat black, then used several bits and pieces of instrument panel decals
from the decal dungeon to finish off this area. The seat was painted per the
instructions in the KMC set, and resulted in a nice bit of color in the
otherwise-black cockpit, with the yellow seat pads and blue seat belts.
I then installed the cockpit, and glued the fuselage halves together, having modified the horizontal stabilizers per the instructions in the Aeroclub set so they could be moved forward the 12 scale inches necessary, I attached them in position and attached the "acorn" from the Aeroclub set. The kit fits together well, and I only needed some Mr. Surfacer 500 to get rid of seams along the fuselage centerline.
|
PAINT & DECALS |
Painting:
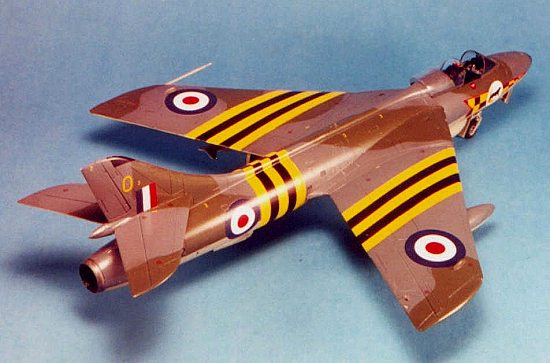
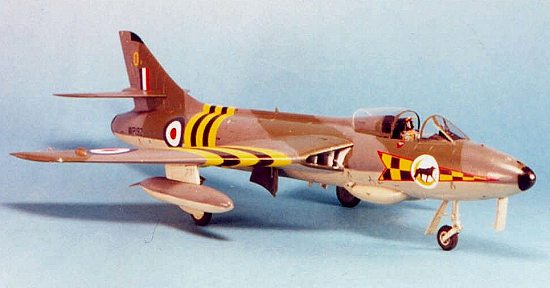
After shadow-shading the panel lines with flat black, the first thing to do was paint the Operation Musketeer ID stripes. These are supposed to be 12 inches wide, in yellow and black. After air brushing the yellow, masking with 1/4" wide tape revealed that the stripes would not be right. After eyeballing some photographs, I determined that the stripes were narrower than called for and did them as 9-inch stripes. These resulted in the stripes fitting exactly the areas of the model they were supposed to. About a month after completing this model, I discovered that the stripes of the aircraft based in Cyprus were most likely not yellow and black, since there had been no yellow paint available on the island in the quantities necessary for all the aircraft based there. The Canberras had been painted in black and white "Normandy" style invasion stripes, and it is likely the Hunters were painted with British Army "Desert Sand." These were also very hurriedly applied by hand, so they would likely have looked far more like the invasion stripes applied for D-Day than the neat-looking stripes on this model. The stripes on this model shall remain yellow-and black.
The rest of the model was painted with RAF camouflage, using Tamiya Flat Aluminum with a bit of Flat White mixed in to get the "sliver-gray" lower surface color, while the upper surface was done with Gunze-Sanyo post-war H-331 "Dark Sea Grey" and H-330 "Dark Green."
 Decals:
After the model had been given a coat of Future, the Aeromaster decals were applied, with the stencils coming from the kit's decal sheet. The blue of the National Insignia in both the Aeromaster and the kit decals is too dark for the post-war "Type D" insignia, but I had no others available. These went down easily. I finished off by giving the model a coat of Future dulled down about 50% with some "Flat Future" - my mix of Future and Tamiya Flat Base - to get a glossy finish that wasn't too glossy, and thereby more realistic.
Final Assembly:
The Aeroclub landing gear fit perfectly, using the kit-supplied gear doors. I attached the drop tanks and their pylons at this point. I posed the canopy in the open position to display that good-looking KMC seat, and the model was finished.
|
CONCLUSIONS |
Out of the box, you can make either an F.6 or FGA.9 Hunter, the two main types produced. This is an easy conversion to make the earlier Hunter, the first of its type to face the possibility of combat.
If you would like your product reviewed fairly and quickly by a site that has over 1,700 visits a day, please contact me or see other details in the Note to Contributors.