
Revell 1/32 Hunter F.6
| KIT #: | ? |
| PRICE: | £24.99 at Hannant’s |
| DECALS: | Four options |
| REVIEWER: | Tom Cleaver |
| NOTES: | Aeroclub Martin-Baker MB3 ejection seat used; Xtradecals X32007 used. |
| HISTORY |
To my mind, the Hawker Hunter is aesthetically one of the best-looking jets ever designed. In that opinion, I am not alone, as many have responded favorably to the flowing lines of Britain's first successful swept-wing fighter. With the first prototype having flown July 20, 1951, the Hunter is one of the longest-serving jets in any air force, with the last of its type retired from the Royal Air Force only in 1996. We have two out at Chino that were flown in a few years ago from Van Nuys, though they haven’t been seen flying out of late.
Interestingly enough, this most successful of all Britain's post-war military jets was not always considered a success. The early development of the Hunter was plagued with so many problems it seemed likely it would be replaced by the Supermarine Swift until that airplane revealed even more serious design faults. Overcoming the gun firing problems which were causing major problems in engine operation was like dealing with the Hydra: solve one and two more would take its place.
Hawker Aircraft came late to jet aircraft, and even later to swept wings. Where
the company had achieved a 30 year run of
 success with all previous
designs, it seemed to lose its footing with the Hunter. Its immediate
predecessor was the straight wing Sea Hawk, a design that was five years behind
its US contemporary - the Grumman Panther - when it finally entered service with
the Royal Navy in 1953. As a design, the Hunter suffered from a too-extended
gestation, which failed to take into account very important discoveries about
jet aircraft that could have led to early modification of the design, most
important of which was that the horizontal stabilizer was not all-flying, and
was in the wrong position aerodynamically for transonic flight. Failure of the
flaps to operate as effective air brakes led to extended tests as to the proper
location of the ventral dive brake eventually fitted. There was aileron pitch-up
stall which was only cured by the addition of a sawtooth leading edge to the
wing. What would turn out to be the biggest fault - one shared with all other
British post-war designs - was the extreme lack of range, since the original
design called for a point-defense interceptor.
success with all previous
designs, it seemed to lose its footing with the Hunter. Its immediate
predecessor was the straight wing Sea Hawk, a design that was five years behind
its US contemporary - the Grumman Panther - when it finally entered service with
the Royal Navy in 1953. As a design, the Hunter suffered from a too-extended
gestation, which failed to take into account very important discoveries about
jet aircraft that could have led to early modification of the design, most
important of which was that the horizontal stabilizer was not all-flying, and
was in the wrong position aerodynamically for transonic flight. Failure of the
flaps to operate as effective air brakes led to extended tests as to the proper
location of the ventral dive brake eventually fitted. There was aileron pitch-up
stall which was only cured by the addition of a sawtooth leading edge to the
wing. What would turn out to be the biggest fault - one shared with all other
British post-war designs - was the extreme lack of range, since the original
design called for a point-defense interceptor.
 Eventually, the Hunter
emerged from all this development - which included several test flights with
extensive criticisms from Chuck Yeager during 1952-53 - with handling qualities
that became the standard against which other military aircraft would be judged.
The airframe was so strong that no Hunter was ever lost to midair structural
failure. The firepower of four 30mm cannon was such that any target that got in
a Hunter's sights could be shredded with a 2 second burst. 1,972 Hunters were
built, of which 400 were later re-manufactured for service with second air
forces, and it served with no less than 21 different world air forces, a record
only bettered by the MiG-17, which was built in substantially greater numbers,
making the Hunter’s achievement even more remarkable.
Eventually, the Hunter
emerged from all this development - which included several test flights with
extensive criticisms from Chuck Yeager during 1952-53 - with handling qualities
that became the standard against which other military aircraft would be judged.
The airframe was so strong that no Hunter was ever lost to midair structural
failure. The firepower of four 30mm cannon was such that any target that got in
a Hunter's sights could be shredded with a 2 second burst. 1,972 Hunters were
built, of which 400 were later re-manufactured for service with second air
forces, and it served with no less than 21 different world air forces, a record
only bettered by the MiG-17, which was built in substantially greater numbers,
making the Hunter’s achievement even more remarkable.
During the early life of the aircraft, marks alternated between being powered by the Rolls-Royce Avon and Sapphire engines. Production finally centered on the Avon-powered Hunter with the F.6, which came into operational service beginning in 1955. While the F.6 would be remanufactured into the FGA.9 for further RAF service, as late as 1984 Hunter F.6s were in use to replace the temporarily-grounded Buccaneers for pilot proficiency.
| THE KIT |
Revell-Germany’s 1/32 Hawker Hunter first appeared in 1998. It was obvious from the way the kit was designed that there was considerable “stretch” to create both the earlier Hunter F.6 with its different tail cone, and the T.7 with its completely different forward fuselage. Unfortunately, the kit seemed to be just ahead of the market curve for 1/32 kits. Nice as it was - and is - the Hunter became something of a “shelf-sitter,”even with several aftermarket decal sheets from Aeromaster and a resin cockpit from True Details that made a nice model even nicer.
In recent years, with the growth in interest for 1/32 kits, the Hunter was rediscovered and re-releases of the kit by Revell-Germany saw it start to achieve respectable sales figures that finally led - nine years after it was first released - to the release of the “classic” Hawker Hunter, the F.6.
 This kit shares much in
common with the earlier kit, as would be expected. Different sprues include the
different tail cone, as well as flaps without the cutout for the 230-gallon drop
tank. Decals include markings for three different RAF squadrons - including 92
Squadron, which means a Blue Diamonds team aircraft could be created - as well
as one each from the Belgian and Netherlands Air Forces serving in the early
1960s just before the arrival of the F-104G. Most importantly, the decals
include an extensive set of stencil markings.
This kit shares much in
common with the earlier kit, as would be expected. Different sprues include the
different tail cone, as well as flaps without the cutout for the 230-gallon drop
tank. Decals include markings for three different RAF squadrons - including 92
Squadron, which means a Blue Diamonds team aircraft could be created - as well
as one each from the Belgian and Netherlands Air Forces serving in the early
1960s just before the arrival of the F-104G. Most importantly, the decals
include an extensive set of stencil markings.
The one place where it can be seen that the kit was originally “produced to a
price” is the cockpit. The seat is OK, and with work to add detail -
particularly seatbelts - can be made to look quite acceptable. The cockpit has
sufficient detail to be all right, t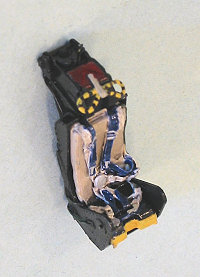 hough
the resin cockpit from True Details (which is no longer in production) provides
much more detail. Given that the cockpit is overall flat black, the lack of
detail is not so important as it might be otherwise, since much of it is not
noticeable once the kit is built.
hough
the resin cockpit from True Details (which is no longer in production) provides
much more detail. Given that the cockpit is overall flat black, the lack of
detail is not so important as it might be otherwise, since much of it is not
noticeable once the kit is built.
However, the one place where the Hunter can really benefit from an aftermarket item is the ejection seat, since that is the most visible item in the cockpit. John Adams at Aeroclub has recently produced a really marvelous pair of Martin Baker Mk.2 and Mk. 3 seats, which are among the best cast-resin ejection seats I have run across, with full seatbelt detail that looks as if the pilot has just climbed out of the cockpit. I highly recommend this seat for anyone building the kit. Another area that the kit needs help in is the decals. Xtradecal 32-007 provides markings for two different Hunters over the course of 30 years of their careers with first-line units, the advanced training unit at RAF Valley in the 1970s, and with 213 Squadron when flown as a Buccaneer replacement in the mid-1980s. Markings are also provided for the team leader of the famous “Black Arrows” of 111 (“Treble-One”) squadron which thrilled audiences across Europe with their large-formation aerobatics in the late 1950s and early 1960s.
| CONSTRUCTION |
Construction is entirely straightforward, and presents no problems.
I differ with the instructions about the assembly sequence for the three fuselage sections and the wings to the fuselage. If you do it my way, you will use only a very little filler throughout the assembly.
 I first attach the wings to the individual main fuselage halves before
assembling the fuselage, since this allows you to work the attachment of wing to
fuselage from both inside and outside, thus assuring good tight fit with no need
of using any filler along the seam.
I first attach the wings to the individual main fuselage halves before
assembling the fuselage, since this allows you to work the attachment of wing to
fuselage from both inside and outside, thus assuring good tight fit with no need
of using any filler along the seam.
I then attach the rear fuselage cone to the forward fuselage before full assembly, so that joint can also be made tight and smooth without recourse to filler.
Given the design of the intake trunks, the only way the forward fuselage halves could be joined to the central fuselage before full assembly is to cut the intake trunks in half back at the engine face. Given one cannot really see back there that far, I found this to be a good idea, since I was then able to attach the intake trunking inside the wing and get good fit before attaching the forward fuselage halves to the main fuselage halves, where I was also able to work the joint from inside and outside.
Once all this was done, I painted and assembled the cockpit, then glued cockpit and nose wheel well in position, and then glued the fuselage together. This way, the only place I had to worry about a seam was on the fuselage centerline. I used Mr. Surfacer 500, then rescribed panel lines where necessary once it had been sanded smooth and then polished out. The final bit of main assembly was to attach the horizontal stabilizers and the cockpit windscreen.
| COLORS & MARKINGS |
Painting:
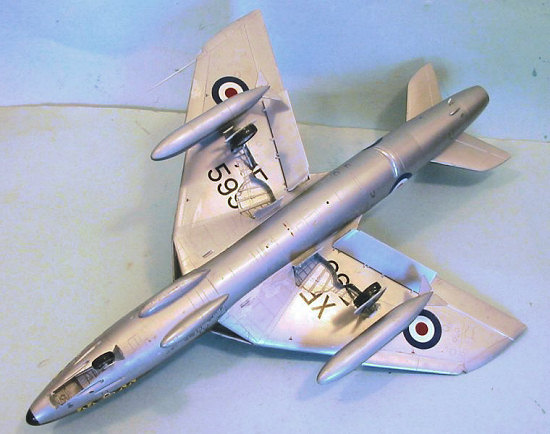
The lower surfaces were painted with the new Talon metalizer acrylic paint. This is thinner than paints like SNJ or Alclad, and has to be slowly “misted” onto the surface. When finished, it looks as good as Aluminum paint from either SNJ or Alclad, and can be masked with no fear of lifting the paint. It also dries to the touch in about 20 minutes.
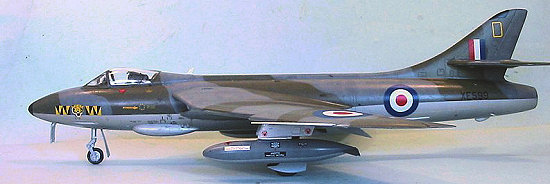
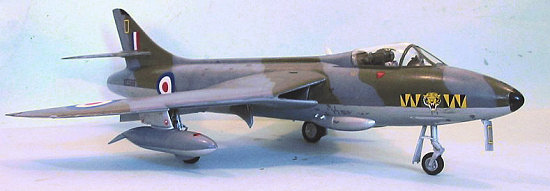
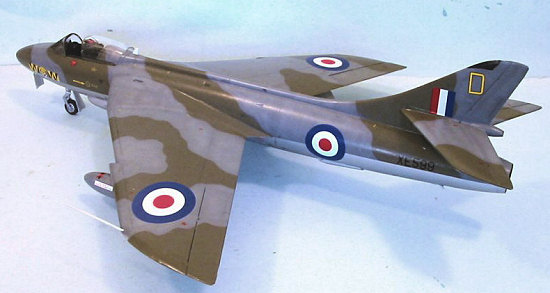
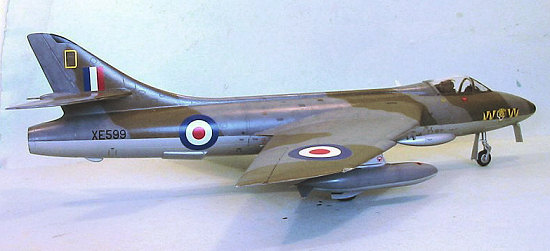
 The upper surfaces were
given the standard Hunter camouflage of Dark Sea Grey and NATO Dark Green, using
Xtracrylix “Dark Sea Grey” and a 50-50 mixture of Xtracrylix “RAF Dark Green”
and “Olive Drab” to get the more olive drab shade of the mid-50s camouflage
color. One thing that is nice about using Xtracrylix is that once I had painted
the Dark Green, I could hand-paint the outline of the camouflage pattern, since
Xtracrylix doesn’t leave brush marks and dries the same shade whether applied
with a brush or an airbrush. Not having to mask the whole model to get the
pattern was a real time-saver.
The upper surfaces were
given the standard Hunter camouflage of Dark Sea Grey and NATO Dark Green, using
Xtracrylix “Dark Sea Grey” and a 50-50 mixture of Xtracrylix “RAF Dark Green”
and “Olive Drab” to get the more olive drab shade of the mid-50s camouflage
color. One thing that is nice about using Xtracrylix is that once I had painted
the Dark Green, I could hand-paint the outline of the camouflage pattern, since
Xtracrylix doesn’t leave brush marks and dries the same shade whether applied
with a brush or an airbrush. Not having to mask the whole model to get the
pattern was a real time-saver.
When all this was dry, I gave the model a coat of Xtracrylix Gloss Varnish.
Decals:
I used the Xtradecals 32-007 sheet to do a Hunter flown by 74 “Tiger” Squadron in 1957. I used the kit decals for the national markings and the stencils.
Aftermarket:
I obtained a review copy of the new Aeroclub Martin-Baker M.3 seat, and painted it according to the instruction sheet. The two part seat assembles easily and looks most impressive when placed in the cockpit.
| FINAL CONSTRUCTION |
Once the decals had set, I gave the entire model a coat of Xtracrylix Satin Varnish, which gives a nice “scale” look to the gloss finish for this airplane. The lower surfaces were also painted with the varnish, because that was “Speed Silver” lacquer, not a natural metal surface.
I then attached the landing gear, flaps, and drop tanks, and unmasked the canopy. I didn’t weather the model further, since photos in the Squadron “Hunter In Action” book show these airplanes were well-maintained and didn’t collect a lot of “dings.”
| CONCLUSIONS |
Further proof that Revell’s big Hunter is definitely the nicest and most accurate kit available of this beautiful second-generation jet. Now if they’d just do the trainer...
May 2007
Copyright ModelingMadness.com. All rights reserved. No reproduction in part or in whole without express permission.
If you would like your product reviewed fairly and fairly quickly, please contact me or see other details in the Note to Contributors.