| KIT #: | 02850 |
| PRICE: | 2800 yen at www.hlj.com |
| DECALS: | Three options |
| REVIEWER: | Tom Cleaver |
| NOTES: |
| HISTORY |
The Spiteful was the result of work initiated in 1942 to
improve the critical Mach number of the Spitfire wing, utilizing a laminar flow
airfoil and creating a wing planform that was less burdensome on the production
process than the pure elliptical wing of the original design, which was the most
labor-intensive wing of any aircraft mass produced during the war.
 As work progressed, Specification F.1/43 was issued for
a single-seat fighter with a laminar flow wing.
It was decided to adapt the wing to the Griffon-powered
Spitfire XIV, and a contract was issued for the prototype, which was a straight
adaptation of Spitfire XIV NN660 with the new wing, which also featured
inward-retracting wide-track undercarriage to deal with the single worst part of
the original design, the narrow-track landing gear.
NN660 first flew on
As work progressed, Specification F.1/43 was issued for
a single-seat fighter with a laminar flow wing.
It was decided to adapt the wing to the Griffon-powered
Spitfire XIV, and a contract was issued for the prototype, which was a straight
adaptation of Spitfire XIV NN660 with the new wing, which also featured
inward-retracting wide-track undercarriage to deal with the single worst part of
the original design, the narrow-track landing gear.
NN660 first flew on
The design was further refined with a redesign of the
Spitfire fuselage to give the pilot better view over the nose, and provide
better directional stability by a larger vertical fin and horizontal stabilizer,
since this had become a problem since the introduction of the Griffon engine and
the 5-bladed propeller.
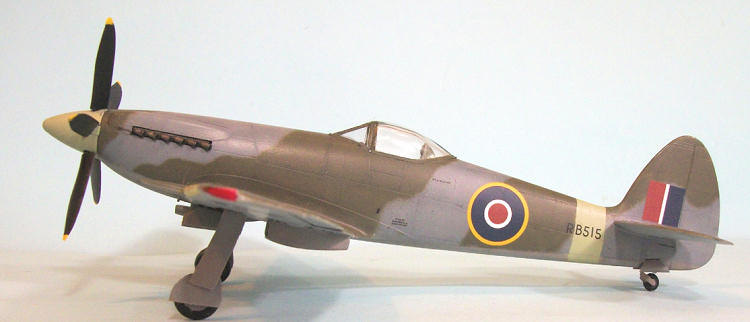
150 Spiteful F.XIV were ordered in November 1944, with the first, RB515, flying in the summer of 1945, with a Griffon 85 engine providing 2,375 h.p. All were originally produced with a carburetor intake similar to that seen on the Spitfire XIV, then several, if not all, were modified later with an extended intake similar to that seen on the Seafire F.R.47.
The Spiteful didn’t fly as nicely as the Spitfire, and the new jets provided superior performance. After 17 were produced, the contract was canceled. A navalized version, the Seafang F. Mk. 32, was even less successful, demonstrating a nasty stall characteristic when landed aboard a carrier. The wing of the Spiteful was used in the further development of the Supermarine Attacker, the first jet fighter used by the Royal Navy.
| THE KIT |
There is a 1/48 vacuform Spiteful kit that was released by Falcon Models in the
late 1980s, that can be assembled in either the original configuration with the
short intake or in the later configuration with the different carburetor intake.
It can also be built as a Seafang. This kit is still available in both versions
from Falcon. In 1/72 scale, there was a limited run plastic kit released in
 differing
“what if” versions by AZ Models and a resin kit from CMK, and there was a
limited-run 1/72 plastic kit from Pegasus. There was also a truly dreadful 1/48
limited-run injection-molded kit from “Silver Wings,” an offshoot of
Pegasus/Blue Max, that most people unfortunate enough to get one found to be
truly “unbuildable” with so many problems there isn’t sufficient bandwidth here
to record them. This 1/48 kit from Trumpeter is the first mainstream
injection-molded kit of the Spiteful in any scale.
differing
“what if” versions by AZ Models and a resin kit from CMK, and there was a
limited-run 1/72 plastic kit from Pegasus. There was also a truly dreadful 1/48
limited-run injection-molded kit from “Silver Wings,” an offshoot of
Pegasus/Blue Max, that most people unfortunate enough to get one found to be
truly “unbuildable” with so many problems there isn’t sufficient bandwidth here
to record them. This 1/48 kit from Trumpeter is the first mainstream
injection-molded kit of the Spiteful in any scale.
The
kit is produced in the original configuration of the Spiteful with the short
Spitfire-like carburetor intake. It provides decals for RB518. Additionally
there are “what-if” decals for a Dutch and a Finnish version.
| CONSTRUCTION |
 I have never seen a photograph or a drawing of the
Spiteful cockpit, and none of the “boffins” I know has either. Thus, any cockpit
configuration is conjectural.
That said, there are some “educated guesses” one could
take, and the most likely would be that the cockpit was “Spitfire-like” in
configuration, considering where it came from.
That was the suggestion of Falcon with their kit, and
Silver Wings provided
a poor white-metal Spitfire cockpit with their kit.
The designer of the Trumpeter kit has imagined the
cockpit to be something on the order of the Martin-Baker M.B.5, the result of
which is a cockpit a 1/72 pilot figure would find to be tight quarters.
However, if one is building the kit OOB, this doesn’t
particularly matter, given that the bubble canopy is about 1/32 inch thick, with
the clarity of the bottom of an original Coke bottle, i.e., you can only see
there is “something in there” through it.
The poor design of the canopy means it won’t sit right
if you try to pose it open, and the kit is in fact designed for it to be
assembled closed.
I have never seen a photograph or a drawing of the
Spiteful cockpit, and none of the “boffins” I know has either. Thus, any cockpit
configuration is conjectural.
That said, there are some “educated guesses” one could
take, and the most likely would be that the cockpit was “Spitfire-like” in
configuration, considering where it came from.
That was the suggestion of Falcon with their kit, and
Silver Wings provided
a poor white-metal Spitfire cockpit with their kit.
The designer of the Trumpeter kit has imagined the
cockpit to be something on the order of the Martin-Baker M.B.5, the result of
which is a cockpit a 1/72 pilot figure would find to be tight quarters.
However, if one is building the kit OOB, this doesn’t
particularly matter, given that the bubble canopy is about 1/32 inch thick, with
the clarity of the bottom of an original Coke bottle, i.e., you can only see
there is “something in there” through it.
The poor design of the canopy means it won’t sit right
if you try to pose it open, and the kit is in fact designed for it to be
assembled closed.
Spiteful Cockpit: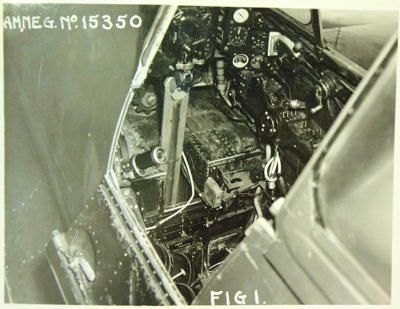 Here
are late-arriving photos of the Spiteful cockpit (thank you Edgar
Brooks). As I stated above, this is a "Spitfire-ish" cockpit. A modeler
planning to scratchbuild a c Here
are late-arriving photos of the Spiteful cockpit (thank you Edgar
Brooks). As I stated above, this is a "Spitfire-ish" cockpit. A modeler
planning to scratchbuild a c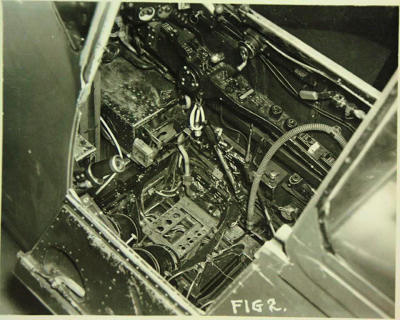 ockpit
for this kit should note the following: you need to sand off the side
detail inside the fuselage completely. Use the panel line of the side
flap to show you where things should go, specifically, the rear of the
seat and the rear of the cockpit should be in line with the rear of the
side flap, like the Spitfire cockpit. This involves moving the rear
bulkhead forward about 1/8 - 5/32 inch. The cockpit is also deeper than
the kit provides, like the Spitfire cockpit, and the floor looks to be
just about 1/4" above the upper surface of the wing (these measurements
are just "eyeballing" the photos and comparing them with my model). I do
think with these photos and a vacuformed canopy, a modeler can create a
very nice model from this kit. Note that there is no seat installed in
either of these photos. ockpit
for this kit should note the following: you need to sand off the side
detail inside the fuselage completely. Use the panel line of the side
flap to show you where things should go, specifically, the rear of the
seat and the rear of the cockpit should be in line with the rear of the
side flap, like the Spitfire cockpit. This involves moving the rear
bulkhead forward about 1/8 - 5/32 inch. The cockpit is also deeper than
the kit provides, like the Spitfire cockpit, and the floor looks to be
just about 1/4" above the upper surface of the wing (these measurements
are just "eyeballing" the photos and comparing them with my model). I do
think with these photos and a vacuformed canopy, a modeler can create a
very nice model from this kit. Note that there is no seat installed in
either of these photos. |
You will then need to vacuform or smash-mold a canopy so
you have something thin enough to pose open, or pose closed with the ability to
see the interior.
Perhaps it will be possible for Falcon to release their
very nice vacuform canopy for use here.
| COLORS & MARKINGS |
| FINAL CONSTRUCTION |
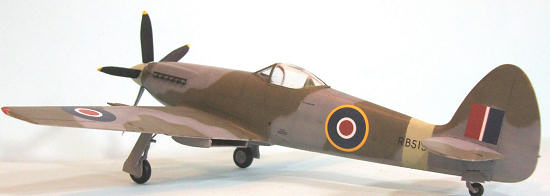
I unmasked the canopy, attached the exhausts and landing
gear, and attached the prop.
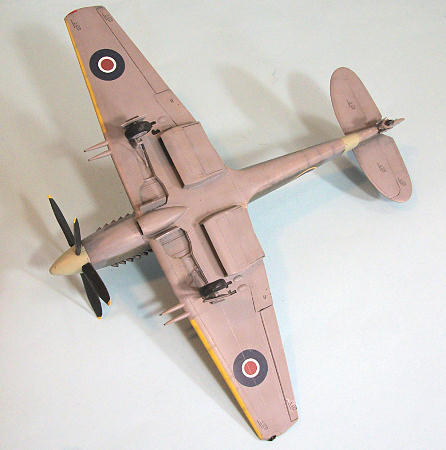
I did not use the oleo scissors, since there are none
shown in photos of the airplane on the ground and a bit of fiddling with the
gear shows there would be no place for them with the gear retracted, another
failure of Trumpeter’s “research.”
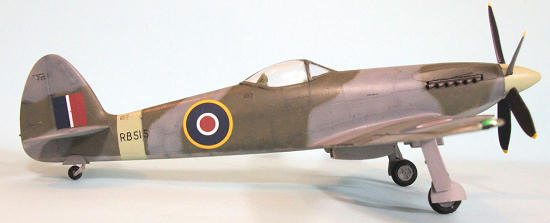
I also didn’t use the antenna mast, since that was
really a wire “whip” antenna. I left the airplane clean, since the original
never accumulated enough hours to get dirty.
| CONCLUSIONS |
 For those Spitfire fanatics who want to have one example
of everything from the Mark I to the end of the line, this kit is a valuable
addition, and is the best Spiteful available in mainstream injection plastic.
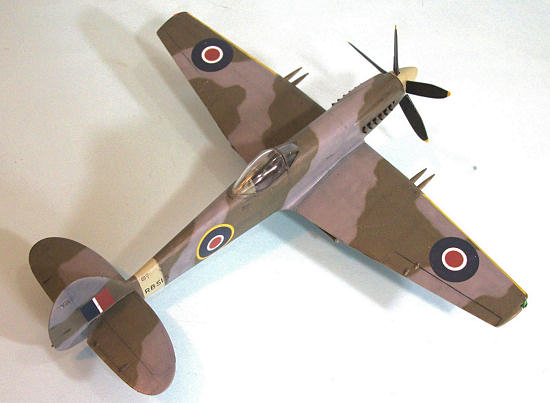
It looks nice when finished and appears accurate in
shape outline from comparison with photos and my Falcon vacuform model.
The fixes to bring it up to an acceptable standard are
not hard to do, and one cannot really fault designers who knew nothing about the
subject matter for making a wrong choice about the cockpit.
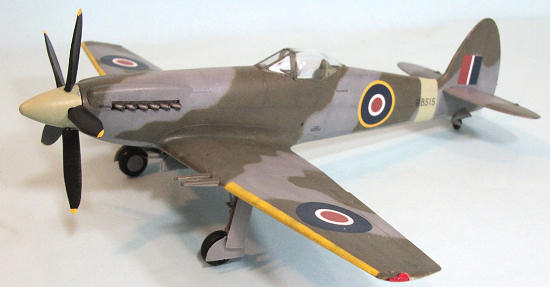
The kit overall is a simple project for any modeler and
will look nice sitting next to the other Spitfires in your collection.
For those Spitfire fanatics who want to have one example
of everything from the Mark I to the end of the line, this kit is a valuable
addition, and is the best Spiteful available in mainstream injection plastic.
It looks nice when finished and appears accurate in
shape outline from comparison with photos and my Falcon vacuform model.
The fixes to bring it up to an acceptable standard are
not hard to do, and one cannot really fault designers who knew nothing about the
subject matter for making a wrong choice about the cockpit.
The kit overall is a simple project for any modeler and
will look nice sitting next to the other Spitfires in your collection.
If you would like your product reviewed fairly and fairly quickly, please contact the editor or see other details in the Note to Contributors.