
| KIT: | Classic Airframes 1/48 Westland Wyvern |
| KIT #: | 491 |
| PRICE: | $59.95 |
| DECALS: | Three options |
| REVIEWER: | Tom Cleaver |
| NOTES: | Limited run kit with resin parts |
| HISTORY |
One major change in naval aircraft during the Second World War was the development of a single-seat strike fighter that could take on both the role of dive-bomber and torpedo-strike. In the U.S. Navy, this development led to the Douglas Skyraider, one of the most successful naval aircraft ever built; in the Royal Navy it resulted in the Westland Wyvern, surely one of the most frustrating naval aircraft ever built, an airplane that took ten years to bring to fruition, that was declared obsolete within four years of its initial arrival on British decks.
W.E.W. “Teddy” Petter began development of what would become the Wyvern as his last project at Westland before leaving for English Electric where he would design his masterpiece, the Canberra jet bomber. Petter’s objective was to develop a long-range carrier-based day fighter with the ability to carry a torpedo or bombs as appropriate for a secondary role as an anti-shipping strike aircraft. The original design would have had the engine mounted amidships, a layout that had been tried for the Westland F.7/30 prototype of 1934. The favored engine at this point was the Rolls-Royce Eagle, a 24-cylinder liquid-cooled “H” type like the Napier Sabre, designed for an ultimate output of 3,500 horsepower. Further development was made official when the Naval Staff issued specification n.11/44, written around the Westland proposal. A mockup with the mid-mounted engine and nose-mounted cockpit found little support from the service pilots who would fly it, so a second mockup was created with the engine in the nose and the cockpit atop a significant hump in order to obtaina15-degree angle of view over the nose for deck landing. By June 1944, the design was known as the W.34, though it was officially known as the N.11/44 until the adoption of the name “Wyvern” in 1947.
 By August 1944,
Westland began investigating the possibility of changing the powerplant to
a turboprop. However, six Eagle-powered prototypes were ordered in November
1944. The planned turboprop was the Rolls-Royce RB.39 Clyde, which
Rolls-Royce expected to deliver in December 1945.
By August 1944,
Westland began investigating the possibility of changing the powerplant to
a turboprop. However, six Eagle-powered prototypes were ordered in November
1944. The planned turboprop was the Rolls-Royce RB.39 Clyde, which
Rolls-Royce expected to deliver in December 1945.
The N.11/44 prototype, which was the biggest British single-seat naval fighter type at the time, required a double fold of the wing with the tips folding down in order to have clearance on the hangar decks of RN carriers. In order to launch from a deck, the airplane required a contraprop, which was developed by Rotol (8-blade) and DeHavilland (6 blade). This in turn led to a very large vertical fin to provide directional stability.
With the end of the war, Rolls-Royce was directed to cease further development of the Eagle and concentrate on gas turbine development. A pre-production batch of 20 N.11/44s would be Eagle-powered (these would become the Wyvern Mk.1), and all further development was to be for turboprop powerplants.
The first prototype N.11/44 flew on December 16, 1946. Six other prototypes appeared in 1947-48, with the pre-production Wyvern Mk.1s produced in 1949. Useful work with the Mk.1s resulted in spring-tab control surfaces that greatly improved maneuverability. Only five Mk.1s were used for this work.
The first Turboprop Wyvern, the N.12/45 prototype flew on January 16, 1949, powered by a R-R Clyde. While the Clyde exceeded initial performance estimates, it suffered from a variety of problems; with Rolls-Royce committed to other engine projects, the Armstrong-Siddeley Python was the only turboprop of the necessary size that could be used for the Wyvern. This decision added at least two years to the development cycle as the engineers struggled to create a throttle control that would allow the engine to be rapidly throttled back for a carrier landing, or rapidly throttled up to make a go-around, the solution being an inertia control unit that was unfortunately mechanically complex.
The Wyvern finally appeared from development as the S.Mk.4, which began to be delivered to RNAS Ford in May1953 for use by 813 Squadron. These aircraft did not have the definitive engine control unit and thus were not carrier-compatible until these units were installed in the summer of 1954. The first operational Wyverns went aboard HMS Albion in September 1954. The problems were not over, as there were a series of flameouts during catapult launch as a result of fuel starvation under high-g loading while the aircraft were with Albion during a Mediterranean cruise. The Wyverns were offloaded at Hal Far, Malta, and remained there until March 1955 when they returned to England. A final design of the ICU/ECU unit solved the flameout problem.813 and 827 Squadrons embarked aboard HMS Eagle in May 1955 for a second Mediterranean cruise, which gave the Wyverns some 1,500 operating hours and 1,000 landings, after which the aircraft was considered proven.
 The final
modification of the S.Mk.4 - which appeared in early 1956 - was visually
identifiable by the removal of the curved windscreen over the flat armored
glass, a strengthened canopy, and dive brakes added under the wing center
section, resulted in an airplane that still didn’t provide the performance
that was needed, and only continued on into operations due to the fact
there was no alternative. The airplane was so short-ranged that it needed
a large centerline fuel tank in addition to the wing tanks, which meant it
could not carry a torpedo, and when it was carrying enough fuel to have an
adequate range, it could not get off a carrier deck even with a catapult
while carrying its maximum ordnance load.
The final
modification of the S.Mk.4 - which appeared in early 1956 - was visually
identifiable by the removal of the curved windscreen over the flat armored
glass, a strengthened canopy, and dive brakes added under the wing center
section, resulted in an airplane that still didn’t provide the performance
that was needed, and only continued on into operations due to the fact
there was no alternative. The airplane was so short-ranged that it needed
a large centerline fuel tank in addition to the wing tanks, which meant it
could not carry a torpedo, and when it was carrying enough fuel to have an
adequate range, it could not get off a carrier deck even with a catapult
while carrying its maximum ordnance load.
813 and 827 Squadrons decommissioned in November 1955, replaced by 830 and 831 Squadrons which activated in January 1956. 830 Squadron went aboard HMS Eagle that May, and would be destined to be the only unit to fly the Wyvern in combat, when their nine aircraft participated in six days of strikes against Egyptian military targets in the Suez Canal Zone in October-November 1956 as part of Operation Musketeer, the Anglo-French intervention in the Sinai War. 813 recommissioned in October 1956. With the decommissioning of 830 and 831Squadrons in January and February 1957, 813 was the last Wyvern operational unit, embarking on HMS Eagle in July 1957 for a tour that lasted until March 1958. 813 decommissioned at Ford on March 29, 1958, which marked the end of active service for the Wyvern. 33 had been lost to all causes during its operational life. The survivors were all melted down during 1959, and the only Wyvern in existence today is the Wyvern Mk.1 VR137, which never actually was flown.
The Westland Wyvern suffered an extended developmental period due to the fact it was one of the first aircraft to use the then-new turboprop. Almost all of the basic technological development that would make later turboprops efficient and reliable was accomplished in this program, which may be the Wyvern’s greatest contribution to aeronautical development.
| THE KIT |
The Wyvern has been a favorite of mine ever since as a wee young aeronut I picked up “The Aircraft of the World” by William Green and Gordon Swanborough at the local library. The book was an eye-opener: the first I had found with detailed information and photographs of airplanes, and some of them even had detailed three-view drawings; thus was I introduced to good technical aviation history by two of the best writers ever (one of whom I would work for 25 years later). And one of the airplanes deemed deserving of those newfangled three-view drawings was something called the Westland Wyvern. I didn’t know a thing about it; I just liked its look. I still do. And I laugh every time I think of the Very Well Known Modeler who took a look at one of my Wyvern models at the 1988 IPMS Nats and proclaimed it a “what-if” model that didn’t belong in the 1/48 Naval Aircraft category since something that looked like that could never have been actually produced. So much for Model Gods.
 In 1/48, there
have been two previous kits of the Wyvern, both vacuforms. One was a very
primitive vacuform that expected the modeler to create everything past the
basic shape, produced by ID Models, while the other was a very advanced
vacuform that provided everything a modeler needed to create a beautiful
model, produced by Dynavector. In fact, Dynavector’s Wyvern has been their
best-seller for the ten years since its first release. With the addition of
the Compass Rose resin cockpit designed by Roy Sutherland, it’s a kit
that’s hard to beat.
In 1/48, there
have been two previous kits of the Wyvern, both vacuforms. One was a very
primitive vacuform that expected the modeler to create everything past the
basic shape, produced by ID Models, while the other was a very advanced
vacuform that provided everything a modeler needed to create a beautiful
model, produced by Dynavector. In fact, Dynavector’s Wyvern has been their
best-seller for the ten years since its first release. With the addition of
the Compass Rose resin cockpit designed by Roy Sutherland, it’s a kit
that’s hard to beat.
And yet, it has been beaten. The new Classic Airframes Westland Wyvern is the most accurate kit so far released of this strangely-beautiful airplane. I didn’t realize this fact until I got this kit and compared it with my Dynavector model, but the Dynavector kit has the fuselage at the original length before it was cut back for cooling purposes early on in the development of the Mk. 4, with the spinner the length it should be for the late version with the cut-back forward fuselage. The result of this is that the Dynavector kit is 12 scale inches too long - for those of you who have the kit and intend to build it, this is not an insoluble problem if you do the exact same thing Westland did. However, Classic Airframes got it completely right, scaling out with an overall fuselage length of 42 feet, 1/4 inch - dead-on.
The kit builds up as the definitive late-production S.Mk.4, with the added-on dive brakes on the lower wing center section, the wing fences inboard of the ailerons to prevent aileron snatch, the late production windscreen with the flat armor glass, and the late canopy with the metal framing for strength. Given all this, it will not be possible to make the kit up as the early-version S.Mk.4, VZ794, of 827 Squadron aboard HMS Eagle in 1955, for which decals are provided, without removing the dive brakes, the wing fence and changing the windscreen. There is, however, no problem in doing the other two aircraft for which decals are provided - and it is likely that the overwhelming majority of modelers will go for the 830 Squadron Wyvern with its “Suez stripes” from Operation Musketeer. The decals are by MicroScale and are excellent.
| CONSTRUCTION |
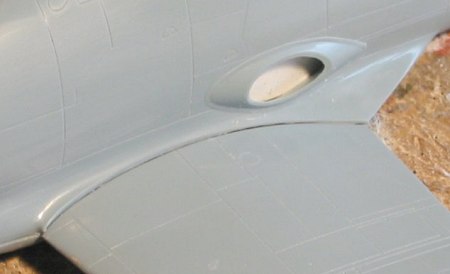 As with most limited-run kits, there are some fit problems with this Wyvern
model. These are primarily with the fit of the wing sub-assembly to the
fuselage sub-assembly. The wing as assembled per instructions is
approximately 1/32" too thin to fit exactly with the fuselage. I solved
As with most limited-run kits, there are some fit problems with this Wyvern
model. These are primarily with the fit of the wing sub-assembly to the
fuselage sub-assembly. The wing as assembled per instructions is
approximately 1/32" too thin to fit exactly with the fuselage. I solved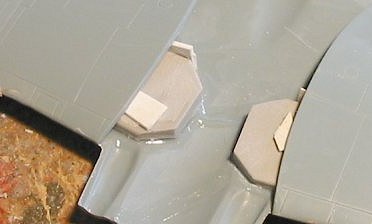 this with some 20-thou Evergreen sheet, cut to make braces that I shoved
into the wing immediately behind the wheel wells, and some 15-thou sheet
shoved into the space between the roof of the wheel wells and the upper
wing half. This increased the wing thickness and modified the airfoil so
that it fit perfectly to the fuselage. I also had to modify the fore and
aft joints of the lower wing and the rear joint of the fuselage to get a
good fit. A bit of Mr. Surface 500 cleaned up all these joints. The other
problem was with the vertical fin, which is attached to the fuselage with a
joint that runs through an area where there are no panel li
this with some 20-thou Evergreen sheet, cut to make braces that I shoved
into the wing immediately behind the wheel wells, and some 15-thou sheet
shoved into the space between the roof of the wheel wells and the upper
wing half. This increased the wing thickness and modified the airfoil so
that it fit perfectly to the fuselage. I also had to modify the fore and
aft joints of the lower wing and the rear joint of the fuselage to get a
good fit. A bit of Mr. Surface 500 cleaned up all these joints. The other
problem was with the vertical fin, which is attached to the fuselage with a
joint that runs through an area where there are no panel li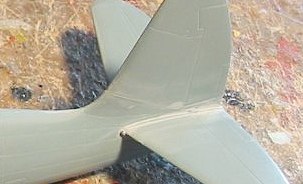 nes.
I filled that seam with cyanoacrylate glue, sanded it down, and then needed
two coats of Mr. Surfacer 500 and a further coat of Mr. Surfacer 1000 to
finally hide this seam.
nes.
I filled that seam with cyanoacrylate glue, sanded it down, and then needed
two coats of Mr. Surfacer 500 and a further coat of Mr. Surfacer 1000 to
finally hide this seam.
Other than this, there was no problem in the construction. I suggest that you attach the inner main gear doors - which are fully retracted after the main gear is lowered - before proceeding further to glue the upper wing halves to the lower wing part. This way, you can trim the doors to fit the wheel well easily, and get a good solid joint by gluing from the interior surface.
As provided in the kit, the main gear legs will assemble so that they stick straight down. This is wrong! The Wyvern gear has about a 20-degree forward angle, so that the axles are just ahead of the leading edge of the wing when viewed from directly above when in the down position. I test-fit and modified the base of the gear leg to get a solid joint without any real problem.
I also cut the resin prop spinner and re-glued it so that the contraprop blades would not be directly in line with each other, since this was something the airplanes only displayed when the blades were turned manually on the ground.
| COLORS & MARKINGS |
Painting:
The model was painted entirely with Xtracrylix acrylic paints.
Given that the usual tempest-in-a-shot-glass that seems to erupt hourly over at That Other Place overflowed this past week regarding my statements about the plastic used in this kit and the possible adverse effects when painting the model, allow me to fully state a few things:
 I did not “make
it up as I went along” regarding the oil in the plastic. When I
experienced the total paint failure on my Classic Airframes Defiant model
(it wouldn’t cling, it rubbed off under finger pressure, and then lifted
under drafting tape, to the point I had to strip it down and start
over, and the paint came off completely under only one application of paint
remover) I immediately put out an SOS to experienced people I know, to try
and understand what had happened. Several of these people brought up the
possibility of excessive oil in the plastic.
I did not “make
it up as I went along” regarding the oil in the plastic. When I
experienced the total paint failure on my Classic Airframes Defiant model
(it wouldn’t cling, it rubbed off under finger pressure, and then lifted
under drafting tape, to the point I had to strip it down and start
over, and the paint came off completely under only one application of paint
remover) I immediately put out an SOS to experienced people I know, to try
and understand what had happened. Several of these people brought up the
possibility of excessive oil in the plastic.
Several others also mentioned that there was a possibility of too much mold-release agent on the plastic, which would prevent the paint from having a surface to grab onto.
David Hannant took this information to his old friend, the head of production at Airfix, and has informed me that his friend says the problem is due to excessive mold-release agent on the surface.
I am one who has washed his plastic kits before assembly for so long I no longer consider it a separate part of the process. However, recently, it seems there is more mold-release agent on the plastic. Merely washing the parts in dishwashing liquid isn’t enough - one needs to use something like “409" (which I use) and really do some scrubbing to be sure the plastic is clean. “Scuffing” the surface with 600-grit wet-or-dry sandpaper will also give a surface the paint can cling to.
Whether the cause is too much oil or too much mold-release agent is irrelevant - follow the ideas presented in the paragraph above and all will be well.
There. See? Those who equate critical statements by me about a kit as being some sort of personal attack on the person who produced the kit need to quit getting their knickers in a knot (since it constricts the flow of blood to your brain) and learn to actually read what I write.
(Your editor would like to toss in his few cents and touch on a few possibilities not mentioned. First off, mold release agents are not uncommon with limited run kits. Same with oily plastic. Those of us who build these kits see these things all the time. I can recall when I did the ICM 1/48 Yak-9 that there was so much oil on it that you could see it pooled inside the plastic bag, and they are not really considered a short run kit maker.
 I had no problem with
my Defiant kit in regards to paint lifting or coming off easily. Though I
don't usually wash my kits prior to painting, I do tend to spend a lot of
time sanding the parts to make sure that seams are fully filled and this
may well remove any mold release agents or oils present. I also use
generally use enamels thinned with lacquer for paint and the superior
'bite' of this combination could well overcome the oils. It could also be
that the phenomena is not consistent with some batches having more of these
agents present than others.
I had no problem with
my Defiant kit in regards to paint lifting or coming off easily. Though I
don't usually wash my kits prior to painting, I do tend to spend a lot of
time sanding the parts to make sure that seams are fully filled and this
may well remove any mold release agents or oils present. I also use
generally use enamels thinned with lacquer for paint and the superior
'bite' of this combination could well overcome the oils. It could also be
that the phenomena is not consistent with some batches having more of these
agents present than others.
Generally, if your kit looks like it has 'stuff' on the plastic or smells a bit odd, then it is probably mold release agent or oil. Bottom line is that the situation is easily curable. As Tom said, take the extra minutes to fully clean yours prior to painting if you feel it necessary. We now return to your regularly scheduled program! Ed)
To continue with the report about the painting of the model:
I used the Xtracrylix with their designed-for-the-purpose thinner - something I have not done with other paints - and got beautiful flow control and a great look to the painted surfaces when fully dry. As I have said before, these are the most accurate colors I have found. I have four color photos of Wyverns in my research, and the Xtracrylix “Sky” color is dead-on to the color in those photos, more accurate than either the Sky color produced by Tamiya or Gunze-Sangyo.
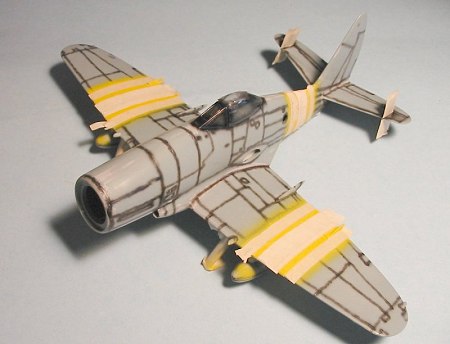 After pre-shading the model with black, which included painting the areas
of the ID stripes, I masked the black stripes (they are 12" wide on the
real thing) and then painted the areas of the “Suez Stripes” yellow. When
that was dry, I masked over the stripes and painted the Extra Dark Sea
Grey, which was then masked and the “Sky” area was painted. I painted the
spinner and the finlets black, because one of the color photos I have is of
Fleet Number 238 of 830 Squadron (the airplane in the decals), the week
before the Suez Stripes were applied, and those areas are black, not
maroon.
After pre-shading the model with black, which included painting the areas
of the ID stripes, I masked the black stripes (they are 12" wide on the
real thing) and then painted the areas of the “Suez Stripes” yellow. When
that was dry, I masked over the stripes and painted the Extra Dark Sea
Grey, which was then masked and the “Sky” area was painted. I painted the
spinner and the finlets black, because one of the color photos I have is of
Fleet Number 238 of 830 Squadron (the airplane in the decals), the week
before the Suez Stripes were applied, and those areas are black, not
maroon.
None of the paint pulled up when the drafting tape was removed from the model, which demonstrates I got it right about surface preparation and use of the correct paint thinner.
The aluminum of the rear section of the prop spinner, and the landing gear and gear wells, was applied using Floquil Old Silver.
Decals:
The kit decals were used to do the Operation Musketeer airplane. One thing to note is, the fleet number - 238 - was originally on the fuselage directly aft of the national insignia. This number was overpainted when the ID stripes were applied. The number was not repainted on the nose until after the Operation Musketeer operations. The ID stripes remained on the aircraft until 830 Squadron decommissioned back in the UK in February 1957.
| FINAL CONSTRUCTION |
After a final coat of Future when the decals were fully set up, I applied
two coats of Xtracrylix “Satin Finish” varnish. This results in a
toned-down gloss  finish
which is far more accurate in representing what a full-size airplane that
has been painted gloss looks like after a few months of operations. Too
often, the gloss finish many of us use results in a model that is way too
glossy. I have before toned down gloss finishes by adding in some flat
finish varnish, with mixed results. This varnish “gets it right” every
time, and I plan to use it exclusively in the future.
finish
which is far more accurate in representing what a full-size airplane that
has been painted gloss looks like after a few months of operations. Too
often, the gloss finish many of us use results in a model that is way too
glossy. I have before toned down gloss finishes by adding in some flat
finish varnish, with mixed results. This varnish “gets it right” every
time, and I plan to use it exclusively in the future.
When that was dry, I attached the eight underwing rockets, the wheels of the landing gear and the prop blades. I unmasked the canopy and attached it in the open position. I did not ding the model further, since photos show these airplanes were well-maintained and clean.
| CONCLUSIONS |
As I said above, the Wyvern has long been one of my favorites. Classic Airframes has caught the look of the real thing perfectly with this well-designed and accurate kit, that makes up into a very good-looking model without a lot of difficulty in construction. Highly recommended.
January 2005
Review Kit Courtesy of Hannant’s
If you would like your product reviewed fairly and quickly by a site that has nearly 300,000 visitors a month, please contact me or see other details in the Note to Contributors.