Classic Airframes 1/48 Gloster Metero NF.11
| KIT #: | ? |
| PRICE: | $54.95 MSRP |
| DECALS: | Three options |
| REVIEWER: | Tom Cleaver |
| NOTES: |
| HISTORY |
Following the conclusion of the Second World War, the RAF’s night and all-weather fighter squadrons were equipped with the latest versions of the excellent Mosquito night fighter, which had demonstrated its ability to deal effectively with piston-engine bombers. However, within a few years there was a proliferation of prototypes for jet-powered bombers with performance well in advance of anything used in the war already flying, and it was obvious that the Mosquitos would soon be outperformed by their opponents.
The Air Ministry had already issued Specification F.44/46, calling for a two-sat, twin-jet powered, all-weather fighters. None of the original submissions met the Air Ministry’s requirements. Eventually, DeHavilland would develop the D.H.110 that became the Sea Vixen, and Gloster would develop the Javelin, but these aircraft were ten years in the future and there was a need for something immediately to fill the gap. Developments of existing jet aircraft were considered. The trainer versions of the de Havilland Vampire and Venom would be developed into night fighters, as would the trainer version of the Gloster Meteor. The Meteor night fighter was in fact the most important British night and all-weather fighter of the 1950s in terms of numbers produced and operated.
 Armstrong
Whitworth, which was involved in the production of the Meteor, was
entrusted with the development of a night fighter based on the Meteor
airframe to specification F.42/48. Tests had already been made with F.3 and
F.4 Meteors equipped with radar, which showed the Meteor could be adapted
for night fighting.
Armstrong
Whitworth, which was involved in the production of the Meteor, was
entrusted with the development of a night fighter based on the Meteor
airframe to specification F.42/48. Tests had already been made with F.3 and
F.4 Meteors equipped with radar, which showed the Meteor could be adapted
for night fighting.
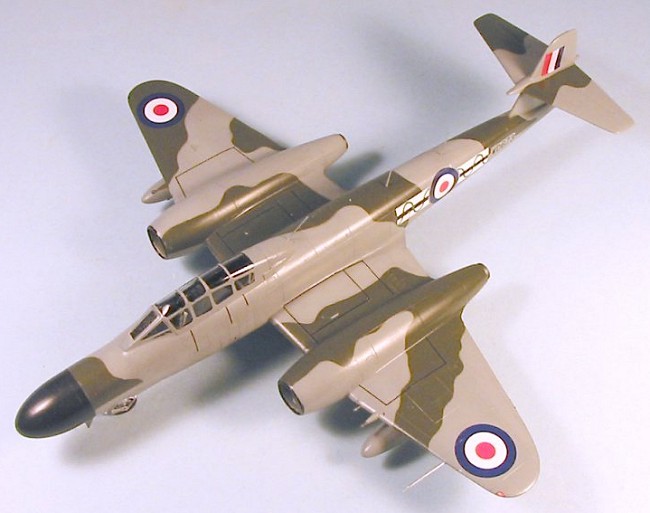
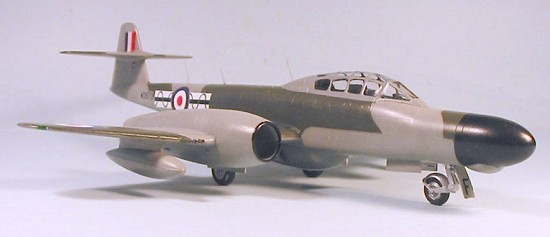
The aerodynamic configuration of what was designated the Meteor M.F.11 was built onto and flight tested on the fourth production T.7 trainer in September 1949. The first true prototype, WA546, made its first flight on May 31, 1950. The night fighter differed from the T.7 by the use of the original-span wings of the F.1 and F.3, an extended nose for the radar, and an F.8 rear fuselage with a five-foot extension in overall fuselage length. The night fighter used only the two-seat cockpit and forward fuselage of the trainer. The standard armament of four 20mm cannon were removed from the fuselage and located in the wings immediately outboard of the engines.
Production delivery of the N.F.11 began in October 1950 with the first
airplane being delivered to 29 Squadron in early 1951. After production of
338 N.F.11s, the last one left the factory in May, 1954. Fourteen RAF
squadrons and two OCUs operated the fighter, with the type remaining
operational until the early 1960s, while several were delivered to the
French, Belgian and Danish air forces. 40 very-similar tropicalized
N.F.13s were produced, and these were the only Meteors in the
 RAF to come close to
firing their guns in anger when they were used for the defense of Cyprus
during the 1956 Suez intervention in the expectation the Egyptians might
attack the island with their new Il-28 jet bombers.
RAF to come close to
firing their guns in anger when they were used for the defense of Cyprus
during the 1956 Suez intervention in the expectation the Egyptians might
attack the island with their new Il-28 jet bombers.
The only combat use of the Meteor night fighter came when the Israelis used one to intercept and shoot down an Il-14 transport flying from Damascus to Cairo in 1956 that it was believed the commander of the Egyptian Air Force was aboard (he wasn’t) just at the outbreak of the 1956 war.
Following their departure from first-line service, many N.F.11s were modified as target tugs with the designation T.T.20, and served in this role with both the RAF and FAA, as well as several other air forces, into the late 1970s. At least one came to the United States in the mid-1970s, where I saw it at Mojave Airport in 1976, and was privately operated for a few years.
| THE KIT |
The only other 1/48 kits of Meteor night fighters released were the
multi-media Meteors by Aeroclub in the 1990s. These were excellent kits (I
built the N.F.14, which is reviewed here
at M2) and are still 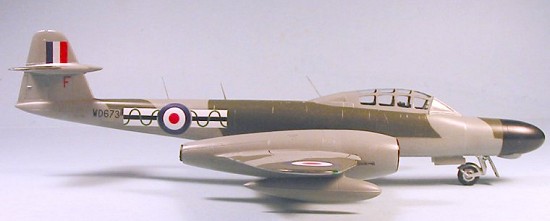 very
nice if you run across one. This kit by Classic Airframes completes their
release of the Meteor series. (Your editor seems to think that there is an
NF 12/14 still to come unless the appropriate nose and canopy bits are
included in the kit for these variants. Ed) The kit comes with the major
airframe parts in injected plastic - including the cockpit canopy - and the
interior detail parts for the cockpit, engines and main wheels in resin.
Decals are provided for three aircraft - two from the RAF including an
N.F.13 used in Operation Musketeer, and one from the opposing Egyptian Air
Force. I’ll also note here that Xtradecal has released a very
comprehensive decal sheet with unit markings and serial numbers for seven
different RAF N.F.11s and one N.F.13, a Fleet Air Arm target tug T.T.20
conversion and an N.F.11 flown by the Danish air Force. These are really
excellent decals and were used on my model.
very
nice if you run across one. This kit by Classic Airframes completes their
release of the Meteor series. (Your editor seems to think that there is an
NF 12/14 still to come unless the appropriate nose and canopy bits are
included in the kit for these variants. Ed) The kit comes with the major
airframe parts in injected plastic - including the cockpit canopy - and the
interior detail parts for the cockpit, engines and main wheels in resin.
Decals are provided for three aircraft - two from the RAF including an
N.F.13 used in Operation Musketeer, and one from the opposing Egyptian Air
Force. I’ll also note here that Xtradecal has released a very
comprehensive decal sheet with unit markings and serial numbers for seven
different RAF N.F.11s and one N.F.13, a Fleet Air Arm target tug T.T.20
conversion and an N.F.11 flown by the Danish air Force. These are really
excellent decals and were used on my model.
| CONSTRUCTION |
Other than the extended nose, which makes getting sufficient weight to insure nose-sitting a breeze, the kit is very similar to the previous kits when it comes to construction. As with all the other Classic Airframes Meteors, fit is a bit of a problem and you will use putty or Mr. Surfacer on all the seams and joints. Test-fit everything.
As with the other kits, it is useful to insert a piece of plastic inside the outer wings to insure they are the same depth as the stubs on the outer side of the engine nacelles. Failure to do this will result in the atmosphere over the workbench taking on a nice purple shade as one slathers on putty and sands it down to get a smooth fit, then rescribes all the lost detail.
 It’s also useful to
attach the engine intake halves to their respective wing halves before
further assembly, since it is easy at that point to get a good fit of the
intakes to the rest of the nacelle without a lot of putty or Mr. Surfacer
to mar the surface detail, while there is no detail to lose filling and
sanding the joint between the upper and lower halves when the wings are
assembled.
It’s also useful to
attach the engine intake halves to their respective wing halves before
further assembly, since it is easy at that point to get a good fit of the
intakes to the rest of the nacelle without a lot of putty or Mr. Surfacer
to mar the surface detail, while there is no detail to lose filling and
sanding the joint between the upper and lower halves when the wings are
assembled.
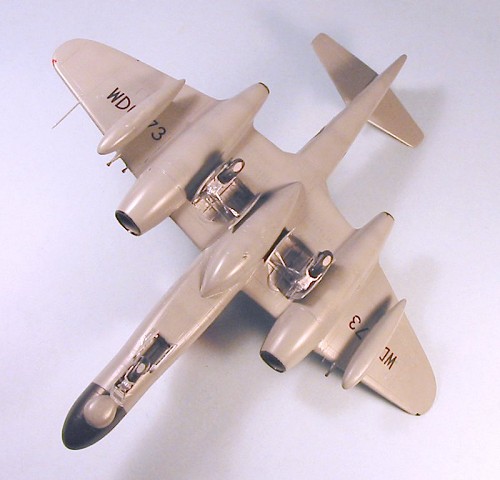
I glued the nose cone halves to their respective fuselage halves before further assembly, so I could run some thin Evergreen sheet plastic inside the butt joint to strengthen it. I then assembled the fuselage and got rid of the seams before installing the cockpit. After the fuselage was assembled, I dropped 3 medium-sized fishweights into the nose and super-glued them. These were more than adequate to insure nose-sitting when the model was finished. I also attached the horizontal stabilizer at this point.
The cockpit is very nice with lots of good detail, most of which isn’t all that visible when complete, due to the fact the cockpit is painted black. I assembled each separately, then slid them into position inside the fuselage. I used instrument panel decals to bring out the detail in both cockpits. Do remember to sand down the diameter of bulkhead at the rear of the nose gear so you can be sure to push the front cockpit in far enough for the gear well to mate to the opening.
After the fuselage was finished, I attached the lower center section of the wings. This requires test-fitting, because the rear joint of the fuselage needs to be trimmed back to get a correct fit. I then attached the wheel wells, the engine plugs, the exhaust tubes, and the wing leading edge to the interior of the intake. The engine plug needs to be sanded down around the edges to get a good fit of the upper and lower wing parts.
 I test fitted the
upper wings and trimmed the area that attaches to the fuselage to get a
good fit, then glued them in position. I wrapped the assembly with rubber
bands at this point to get a good strong joint for the upper
wing-to-fuselage attachment.
I test fitted the
upper wings and trimmed the area that attaches to the fuselage to get a
good fit, then glued them in position. I wrapped the assembly with rubber
bands at this point to get a good strong joint for the upper
wing-to-fuselage attachment.
After the kit had set up right, I attached the outer wing panels, which only needed some C-A glue in the seam to get a good fit, having inserted plastic to insure the outer wing was the correct thickness to fit to the nacelles.
After sanding down all the seams and rescribing panel lines where necessary, I glued the canopy in the closed position. For me, the 2-seat Meteor just doesn’t look good with the canopy open to the side. With the canopy Futured, it’s easy to see enough of the cockpit when completed.
| COLORS & MARKINGS |
Painting:
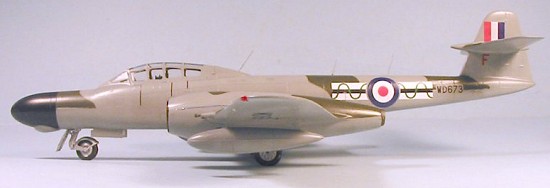 I pre-shaded the
model with flat black, which was also used on the radar cone. I masked the
nose off and then used Xtracrylix RAF Medium Sea Grey and RAF Dark Green
for the camouflage. Since it was a “hard edge” camo according to photos, I
used drafting tape to mask over the grey for the application of the green,
with thread run along the edge to lift it and avoid a “paint ridge”.
Letting the Xtracrylix paint dry overnight to cure assured me that none of
the paint lifted when the masks were removed.
I pre-shaded the
model with flat black, which was also used on the radar cone. I masked the
nose off and then used Xtracrylix RAF Medium Sea Grey and RAF Dark Green
for the camouflage. Since it was a “hard edge” camo according to photos, I
used drafting tape to mask over the grey for the application of the green,
with thread run along the edge to lift it and avoid a “paint ridge”.
Letting the Xtracrylix paint dry overnight to cure assured me that none of
the paint lifted when the masks were removed.
The interiors of the wheel wells, doors and landing gear were painted aluminum.
Decals:
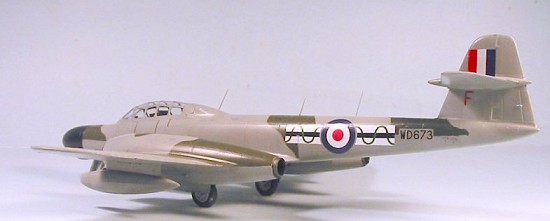
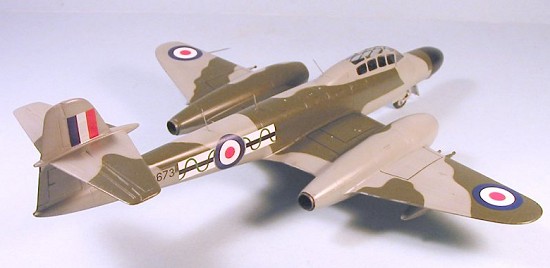
The kit decals were used for the national insignia and stenciling, with the
Xtradecals used to create a model of an N.F.11 operated by 87 Squadron in
Germany in 1957.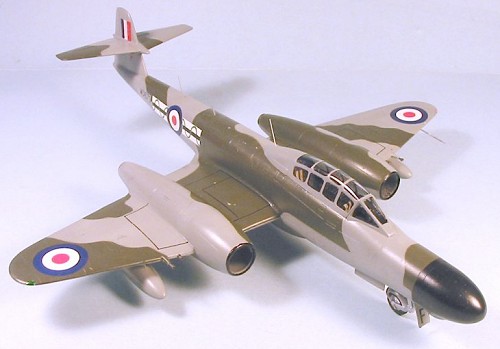
| FINAL CONSTRUCTION |
The Meteor night fighters were all maintained in a very clean condition during their operational service. I gave the model a final coat of Xtracrylix Satin Varnish to give it a “gloss but not too much gloss” finish, then unmasked the canopy and attached the wheels to the landing gear. I used some stretched sprue to make the various whip antennas shown on the profile for this particular airplane.
| CONCLUSIONS |
The Meteor N.F.11 formed the backbone of the British all-weather fighter force for most of the 1950s. With the addition of this model to the F.4, F.8, and T.7 kits from Classic Airframes and the F.1 and F.3 from Tamiya, it is now possible to have the whole range of the major sub-types of this important airplane in your collection. The kit is fiddly in construction, but if you take your time to test-fit everything, the result is a good-looking model.
July 2005
Copyright ModelingMadness.com. All rights reserved. No reproduction in part or in whole without express permission from the editor.
If you would like your product reviewed fairly and fairly quickly, please contact the editor or see other details in the Note to Contributors.
Back to the Review Index Page 2024