Revell 1/48 Learjet 35A
| KIT #: | 04213 |
| PRICE: | Currently OOP; Can be found for around $25-30 or so. |
| DECALS: | Four Options |
| REVIEWER: | Michael Presley (no e-mail provided) |
| NOTES: | A reboxing of the Hasegawa kit |
| HISTORY |
The Learjet began when Bill Lear
bought the design of a failed Swiss ground-attack fighter aircraft, the FFA
P-16, which had begun development in 1952 with prototypes ordered in 1953 and
taking flight in 1955. Production of 100 was canceled after the crash of the
third prototype in 1958 and prototypes were ordered the next year. Lear saw the
basic structure of the P-16 as a good starting point for the development of a
business jet. The wing with its distinctive tip fuel tanks and landing gear of
the first Learjets were nearly identical to those used by the fighter
prototypes. Tooling for the aircraft was purchased and moved to Wichita, Kansas
in 1962. In 1963, the company was renamed the Lear Jet Corporation. Learjet
became a subsidiary of Bombardier
 of Canada
in 1990, where it is marketed as the "Bombardier Learjet Family."
of Canada
in 1990, where it is marketed as the "Bombardier Learjet Family."
Production of the Model 35/36 ceased in 1994, but the aircraft remains one of the most popular and recognizable small corporate aircraft in the world.
| THE KIT |
 Although
Hasegawa hasn't produced the Falcon or Citation in many years, they will
occasionally reissue the Lear in a military guise, sometimes with an added part
or two, with new decals. A recent offering was a colorful Japanese Air Self
Defense Force maritime surveillance version.
Although
Hasegawa hasn't produced the Falcon or Citation in many years, they will
occasionally reissue the Lear in a military guise, sometimes with an added part
or two, with new decals. A recent offering was a colorful Japanese Air Self
Defense Force maritime surveillance version.
In 1993 Revell-Germany reissued all
three of Hasegawa's nifty "Bizjets" under license, with 3 or 4 all-new decal
options per kit, in current (i.e., within the decade) schemes. The molds and
plastic colors, etc. were identical to the original Hasegawa offering. All three
feature crisp molding, without undue flash, and the fit is very good.
The interior is nice, if Spartan. They can be easily dressed up, but will be nearly impossible to see, even if the cabin doorway stairs, and overhead hatch are opened, which is an option.
| CONSTRUCTION |
In my case, this project is
actually a funny "Back to the Future" story. In 1982, I bought several of the
relatively-new Learjet kits. I modified the first one, building it as a Model
28/29 with the extended wing and winglets to create a "Longhorn Wing", as it was
initially marketed. I used the kit's one decal option, that of Gates' Model 35
Demo aircraft, N351GL (green, & yellow stripes over white), with the tiptank
stripes used on the winglets as Lear's factory standard.
I then started building a stock
Model 35A, which I intended to be pretty much out of the box, merely switching
the tail numbers around. I managed to get the airframe assembled, minus
horizontal tail and engines completed, but then set it aside. A few years later,
I moved from Dallas to Austin, leaving my models, unbuilt kits, etc. in my
brother's attic, and basically quit the hobby for roughly 20 years.
 I retired in 2002 and moved back to
the Dallas area, where I slowly took up the hobby again. My brother still had
many of my old airplane models in his case. We set up a display case in my condo
and I started adding new airplanes to the "fleet". Sadly the bashed Model 28 was
not a survivor, but it wouldn't meet my current standards anyway (few of the old
ones do, and are relegated to the “back row”).
I retired in 2002 and moved back to
the Dallas area, where I slowly took up the hobby again. My brother still had
many of my old airplane models in his case. We set up a display case in my condo
and I started adding new airplanes to the "fleet". Sadly the bashed Model 28 was
not a survivor, but it wouldn't meet my current standards anyway (few of the old
ones do, and are relegated to the “back row”).
I had seen the reissued Learjets in hobby shops and
online catalogs, but put off buying one...so many goodies, so little time/money.
Finally, I decided to order one from GreatModels Webstore. OH NO, it was OUT OF
STOCK...OUT OF PRODUCTION! Fortunately, Stephanie Cummings at GreatModels
managed to track down a kit for me. When it arrived, my brother said, "Why don't
you save yourself some time and finish the old one?" Then he came up with the
box containing the old Lear kits, spare parts, and the near completed airframe.
I looked over the model. The
interior was painted to match the green, & yellow Hasegawa kit decals, which
were no longer useable, but you really couldn't tell through the tinted
windshield and cabin windows anyway...the basic build was sound...what the hell?
I began cleaning up the airframe
using 3600 grit polishing cloth. Now back to those raised panel lines. A full
size Learjet's fit/finish is so tight - moreso than most of the General Aviation
fleet - with the majority so well cared for that the airframe seams are
invisible unless you are within a few feet of the aircraft (and I mean close
enough to touch). I've been around many of these airplanes and that is almost
always the case, no matter when the example was manufactured. The seams that are
visible consists of a few inspection covers, control surfaces, trim tabs,
landing flaps, spoilers, cowl panels, avionics bay in the nose, and the cabin
door. Almost all of these happen to be recessed on the model, as well. Therefore
you can pretty much sand polish off the majority of the raised lines with
impunity. You might want to lightly scribe the nose avionics bay hatches before
you start. Also take care to not sand off the vortex generators on the top of
the wing in front of the ailerons. A thin piece of tape over these will help.
One case where the airframe panel lines would be more pronounced and visible
would be on some of the military examples from smaller air forces, which weather
more since they are not hangared. I have seen aftermarket decals for some of
these aircraft.
 Online
reference is abundant, especially from Airliners.Net (http://www.airliners.net/
). This site is particularly useful for the seemingly endless variations of
antenna arrangements. Another that is excellent for closeup details is ARC's Jet
Walk Arounds ( http://s96920072.onlinehome.us/walk-jet.htm ), which features one
of the aforementioned flat-painted, pseudo-military aircraft - in this case,
Phoenix Air's N32PA, which is used to test weapons, and for weapon system
training for U.S. armed forces . This site has terrific closeups of wheels,
brake lines, etc.
Online
reference is abundant, especially from Airliners.Net (http://www.airliners.net/
). This site is particularly useful for the seemingly endless variations of
antenna arrangements. Another that is excellent for closeup details is ARC's Jet
Walk Arounds ( http://s96920072.onlinehome.us/walk-jet.htm ), which features one
of the aforementioned flat-painted, pseudo-military aircraft - in this case,
Phoenix Air's N32PA, which is used to test weapons, and for weapon system
training for U.S. armed forces . This site has terrific closeups of wheels,
brake lines, etc.
As I had an abundance of spare
parts, I decided to install model railroad CV lenses for the tip-tank and main
gear landing lights. On the kit, these are merely raised hemispheres on the main
gear legs and a recessed line on the nose of the tip-tanks. You are instructed
to paint these hemispheres silver to simulate the lights. I drilled and hollowed
out the concave opening of the light housing on the main gear until they
accepted an appropriately sized lens (sorry, I don't recall the exact size). For
the tanks, I decided to try something a little more ambitious. Taking a spare
wing, I glued the halves together and sawed off the tip from the wing leading
edge forward, and turned the removed portion into a mold. I glued a nail into
the opening so I could clamp it into a vise, & pull heated, clear vac material
over it, making the clear bullet fairing. This turned out to be more difficult
than I thought. It took about 20 attempts, with various thicknesses of material
before I got satisfactory bullets. I then sawed off the tips of the tanks on the
airframe, a bit behind the recessed line, glueing the CV lenses into the
opening. I painted the seam and tank tip flat black. Knowing there world be a
LOT of filling, finishing, sanding, and polishing of the bullet-tank overlap I
elected to fill the inside of the clear bull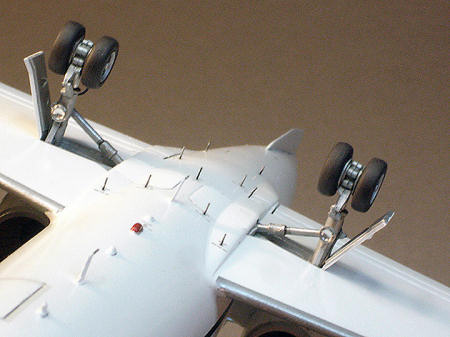 et
with epoxy, which I carefully slid over the CV Lens, & tank tip (making sure
there were no trapped air bubbles inside...although I'm not exactly sure what I
would've done, had there been any).
et
with epoxy, which I carefully slid over the CV Lens, & tank tip (making sure
there were no trapped air bubbles inside...although I'm not exactly sure what I
would've done, had there been any).
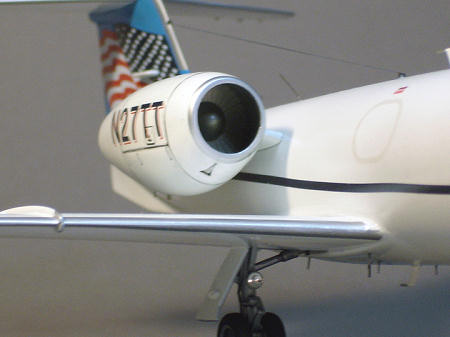
Not content with that pain in the
rear, I decided to do a similar treatment of the clear tail cone/nav-light at
the top of the vertical stab. I slapped together some spare fuselage halves and
cut the top of the tail off for another "bullet mold". If the tank tip had been
troublesome, the tail cone proved to be a titanic struggle. Let's just say, I
finally got ONE cone that I could work with. I sawed the tip of the airframe
tail off and installed two tiny stainless wires to serve as the tail nav light
filament wires. Then I did the epoxy operation again. At this point, I drilled
out the holes in the underside of the fuselage for the many drainage tubes.
These are actually indicated by small raised line circles, which now have
stenciling decals on the new Revell sheet (none were provided on the original
Hasegawa sheet). I puddled Mr. Surfacer 500 around the seams of the epoxied
clear fairings and all other seams, and set the model aside for several days to
allow the epoxy to harden completely, while I turned my attention to the engine
nacelles, landing gear, and other sub-assemblies. These parts, in addition to
the horizontal stab/elevators, were taken out of the new Revell kit.
When the airframe was judged ready
for smoothing, it was time for the sanding sticks. Doing the tail, and tank-tips
was a long back-and-forth operation which lasted several days. The results look
nice, but whether or not an easier solution would have been sufficient - and a
better expenditure of time - is in the eye of the beholder...or the guy with the
blisters.
I gave the model a coat of Alclad
Gray Primer/Microfiller, which is a lacquer based primer, much like a very thin
Mr. Surfacer, but a superior overall prep for a gloss paint. It polishes out
like glass and absorbs gloss paint - or any paint I've tried - perfectly.
| COLORS & MARKINGS |
Painting:
I had four markings choices offered
by the Revell-Germany kit. These selections were:
Learjet 35 - C-GIRE, Skyservice Aviation (charter),
Toronto Canada.
Learjet C-21A - 84-0109, 76th Airlift Squadron, USAF,
Ramstein AFB-Germany.
Learjet C-21A - 84-0075, 375th Air Mobility Command,
USAF, Scott AFB-USA.
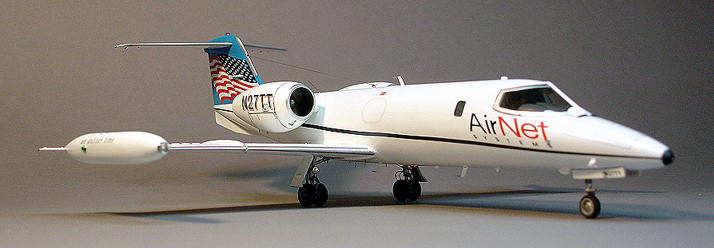
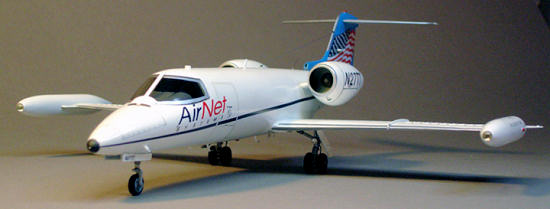
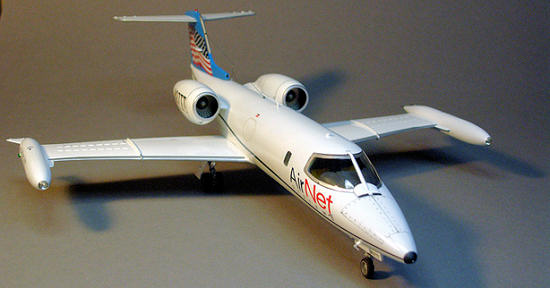
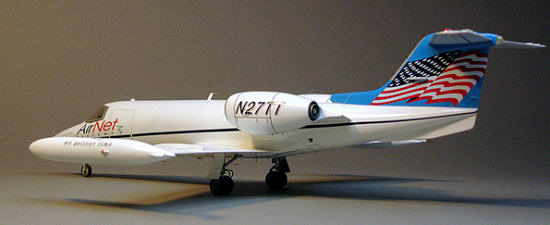
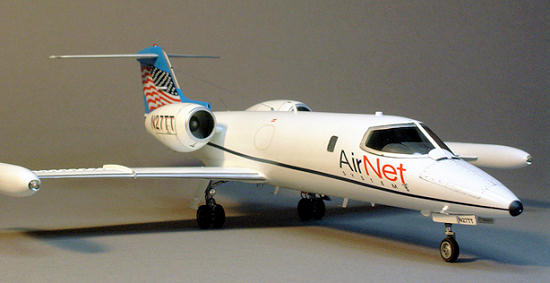
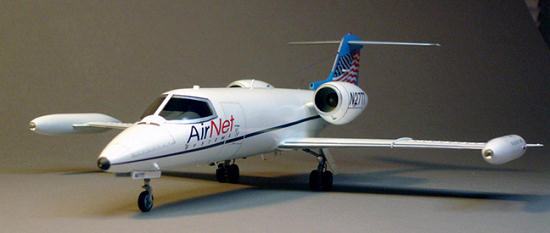
Learjet 35A -N-27TT, AirNet Express "Remembering
9-11", Columbus Ohio, USA.
I didn't particularly like the
Canadian markings (purely a matter of personal taste), having one in military
markings rather defeats the idea of having a Learjet in your case to begin with.
I had already elected to go with the AirNet freighter, and had sealed up all the
cabin windows except the starboard front, opposite the cabin door. Some basic
online research revealed that AirNet
 provides
high speed transfer of cash for the Treasury Dept. and the U.S. Banking
industry. I'm sure business has been good lately. Coincidentally, my brother,
who works for Associated Air at Dallas Love Field observed N27TT land, defreight,
and depart Love, only last month.
provides
high speed transfer of cash for the Treasury Dept. and the U.S. Banking
industry. I'm sure business has been good lately. Coincidentally, my brother,
who works for Associated Air at Dallas Love Field observed N27TT land, defreight,
and depart Love, only last month.
I masked of the leading edges of
the wings, & tail, which would be eventually painted chrome silver, and laid
down several very light, thinned coats of Testors Gloss White with an hour
between coats. This took the better part of a day. The gear doors, engine
nacelles, and horizontal stab/elevators were also sprayed separately with an
equal amount of coats. Then all these elements were left alone for 3 days of
undisturbed drying.
In the meantime, I painted the
wheels and detailed the landing gear struts with brake lines, etc. I also dipped
the large windshield in Future; after an overnight drying period, I masked and
sprayed the polished silver frame.
There is also a white nose and splitter section, which
must be masked and painted separately.
After the airframe and other gloss
white components had dried, the leading edges of the wings and tail were masked
and
sprayed Testors Chrome Silver to simulate the polished aluminum areas of
the real aircraft. The wheel wells & inside of the gear doors were painted with
a mix of Testors Aluminum and Steel. These areas were given two days to dry,
especially the leading edges, which then got a light coat of Tamiya gloss clear
to inhibit finger printing during final assembly.
The large American flag decal on
the tail has a bright blue background shaped like the tail. I could see big time
trouble all over this one. First, there's the polished aluminum leading edge
that would have to be trimmed out, then trying to get the edges to lay down
around several complex curves, etc. etc. I found that Tamiya's Bright Blue gloss
acrylic matched the decal color almost perfectly. So I masked off the tail, &
painted it, then trimmed the blue off the decals.
I then applied a wash of thinned
Tamiya acrylic black and liquid soap, brushing it into the seams of the landing
flaps, ailerons, elevators, rudder, trim tabs, & cowling seams. After this
mixture dries, the excess wash can be swabbed away with a damp Q-Tip
 (I have
just bought a bottle of black Pro Modeler Weathering wash which would seem to be
a consistent, commercial bottling of some similar ingredients, with the same
properties -can't wait to try it).
(I have
just bought a bottle of black Pro Modeler Weathering wash which would seem to be
a consistent, commercial bottling of some similar ingredients, with the same
properties -can't wait to try it).
After that was cleaned up, I
sprayed a very thin coat of Testors Glosscote varnish over the airframe, before
applying the decals.
Decals:
The decals...the sheet says
"printed in Italy for Revell AG.."...First the good news - they are crisply
registered and very thin. Now the bad news - they are too thin and have a
tendency to "bite" on first contact with almost no willingness to be
repositioned! I found this out trying to apply the long multi-stripe down the
side of the fuselage. Within 30 seconds of trying to adjust the position, it was
in tatters. Quite beyond salvation.
Here I had to deviate from a completely accurate model of N27TT and use the thick blue single stripes from the USAF schemes. However, I first went into my “bag o' tricks,” and mixed up a spray bottle of water and liquid dishwashing soap, as a positioning media for the decals. I tried some of the smaller decals first and although they were still contrary, it was a vast improvement. I managed to get the rest on, without another major mistake. That included the tail flags, which went on exactly as planned. I gave the decals a day to cure and began final assembly.
| FINAL CONSTRUCTION |
 The static trailing edge whips were
made of a plastic bead thread, with the antenna cable from Bobe's EZ-Line. I had
the correct aftermarket etched brass antennas for the fuselage underside and
used stainless wire for a topside whip. Once again, the antenna variations on
Learjets are apparently as endless as the choices of color schemes and cabin
material. The selection in the hundreds of photos on Airliners.Net will astound
you.
The static trailing edge whips were
made of a plastic bead thread, with the antenna cable from Bobe's EZ-Line. I had
the correct aftermarket etched brass antennas for the fuselage underside and
used stainless wire for a topside whip. Once again, the antenna variations on
Learjets are apparently as endless as the choices of color schemes and cabin
material. The selection in the hundreds of photos on Airliners.Net will astound
you.
I heated a box cutter blade and
"weighted" the tires the old fashioned way. The remaining nav lights and strobes
were painted silver, then overpainted with clear acrylic red, or green. I used a
3mm pencil to accent the avionics bay hatches, and the
fasteners on the nose. There is also almost a white
nylon 'nipple' on the small, black, nose radome...time for the tiny brush. The
drain tubes on the fuselage underside were made of the plastic bristles of a
hairbrush, snipped to the proper length after being glued into its pre-drilled
hole. I then glued the angle of attack indicator and pitot tube into the nose.
And that is pretty much the story of my "Back to the Future Lear 35A".
| CONCLUSIONS |
In my opinion, and that of many
others, the Learjet is one of the most important aircraft in history; one is on
display at the National air and Space Museum. It is also one of the enduringly
lovely machines ever made, along with the Staggerwing, Spitfire, Mustang, and
Sabre.
The Hasegawa-Minicraft/Revell-Germany 1/48 Learjet
35A, although dated and perhaps a little difficult to find right now, is the
best Learjet kit ever put on the market - it is infinitely better than the
ancient AMT-Testors Model23-24D. It makes the perfect, contrasting stablemate to
the Lockheed Vega, MiG-15, Piper Cub, and
X-1 it sits among on its shelf in the display case.
I do have the Revell reissue of the
Citation, and an original Hasegawa Falcon 10 in my inventory. I plan to build
them someday...hopefully not 20 years from now.
| REFERENCES |
"The Great Planes" , & "The Flier's World" by James
Gilbert
"Blowtorch for Six", Air Progress Magazine, Oct. 1970
by Budd Davisson
November 2008
If you would like your product reviewed fairly and quickly, please contact me or see other details in the Note to Contributors.