Entex 1/144 Dornier Do.X
| KIT #: | 5618 |
| PRICE: | $? |
| DECALS: | One option |
| REVIEWER: | George Oh |
| NOTES: | A well engineered kit |
| HISTORY |
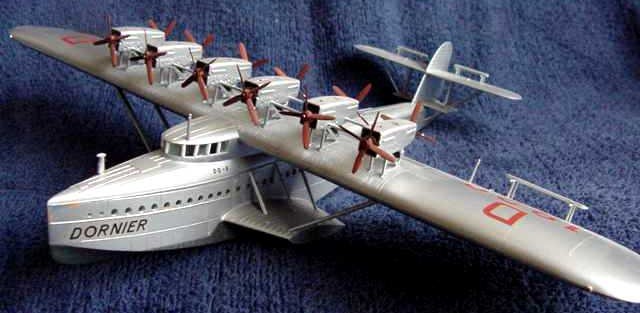
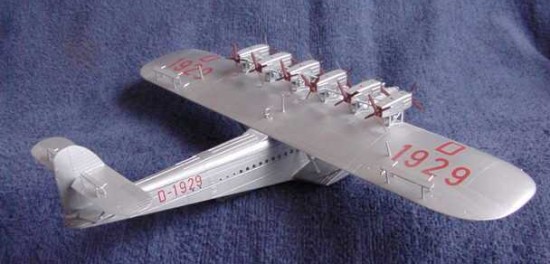
In the 1920’s & 30’s Germany struggled to recover from WWI & the Great Depression, and to pull itself from out of an out-of-control economy. This was the Golden Age of Travel. To compete, Germany offered passengers the choice of travel by ocean liner, lighter-than-air airship or heavier-than-air aircraft. Part of the approach to the latter was the gigantic (for its time) Dornier Do.X Flying boat. Why a flying boat? No need to build hardened runways in remote places.
 This aircraft still holds the
Guiness Book of Records place for the
greatest number of propulsion engines on a single aircraft – it had
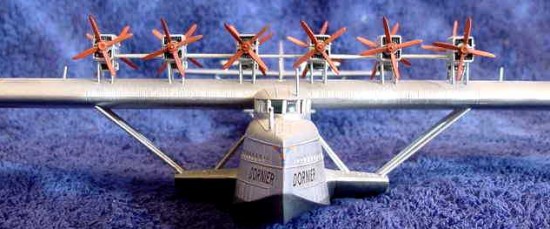
twelve. They were mounted above the wing, positioned in
This aircraft still holds the
Guiness Book of Records place for the
greatest number of propulsion engines on a single aircraft – it had
twelve. They were mounted above the wing, positioned in
Dr Claudius Dornier’s favourite configuration of a tractor engine backed by a pusher engine. This lay-out gave him the propulsion from two engines, with the drag of only one.
I can’t remember how (or why) this model came to be in my collection of unbuilt kits. But in 2002, my Melbourne model club decided to put-on a display at the 2003 Model Expo entitled “A Century of Flight” and published a list of their required/nice-to-have models, which included the Do.X. Among the several models that I volunteered to supply was the Do.X. The only problem was that I had only six months in-which to commence building it, and to complete it.
| THE KIT |
The model came in a large robust box in 127 parts of which only five (quite
sturdy pieces) were dedicated to the fuselage and wings. Most of the
multiple struts (36) had the small but obvious step that signifies that the
moulds weren’t properly aligned
 when the model was produced. Otherwise
the fit of the parts was great. The only other problem was a bit of
flash. There is nothing inside the fuselage at all.
when the model was produced. Otherwise
the fit of the parts was great. The only other problem was a bit of
flash. There is nothing inside the fuselage at all.
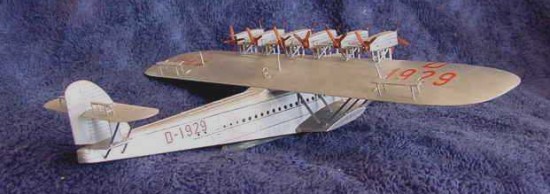
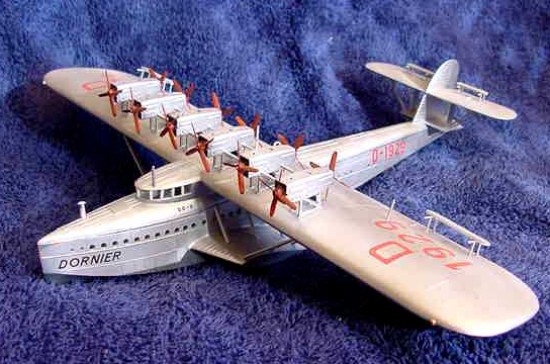
There was only one set of markings –those for the aircraft that was flown around the world (in about 10 months and after a few repairs). The decals were a decal-makers dream, because only one marking
(a tiny two-colour Company logo) needed to be in register, and it was. The rest were of single colours. The instruction booklet was very comprehensive as it warned the builder of problems and provided advice to young modellers.
| CONSTRUCTION |
As the fuselage had nothing inside to be detailed, I had the wing, water
sponsons and tail attached to the fuselage in nothing flat – and that was
the basic airframe completed. I avoided the use of filler by flexing the
parts into place & by gluing in sections, or with a little trimming. I
was helped by the fact that the fuselage spine piece met the sides at a
raised rim. The only real problem was that one of the water sponsons had
a profile that was larger than the attachment point. This was fixed by
sanding the halves (they were split horizontally) and test-fitting a lot
till it was just right. I didn’t put any window (port
 hole?) clear parts
in (from inside the fuselage) because I wanted to avoid later masking &
painting problems. I’d use Krystal Kleer* later for the windows.
hole?) clear parts
in (from inside the fuselage) because I wanted to avoid later masking &
painting problems. I’d use Krystal Kleer* later for the windows.
At the same time, I worked on the 6 x engine pairs. The instructions draw your attention to the fact that some of the engines are slightly stepped back from their neighbours, so it was important to note which engine half went with which, and which engine assembly went where. I cheated by numbering them inside with a felt-tipped pen before removing them from the sprues. To play safe, I removed the locater pins from inside of ALL of the engine halves to get the tops of the engines perfect (the undersides are less visible). If you want to avoid a fight, ensure you insert the radiators under the engines before joining the halves. I brush-painted the radiator fronts, drybrushed them, then masked them prior to fitting them. The assemblies were cleaned-up and attached to the top of the wing by their parallel runners that fitted into corresponding slots. A ruler rested across the top of the engines ensured that each was vertical, and that they were all set at the same height. Scraping the bottom of some runners was required to get them all right. I left off the propellers and side-mounted oil coolers for later attachment as they were to be painted a different colour from the rest of the plane.
| COLORS & MARKINGS |
 After filling &/or sanding the myriad of struts (most had to be sanded back
into an aerofoil shape), I sprayed the whole lot (airframe and parts still
on the sprue) with a high-gloss enamel silver from a spray can (Galmet
brand metal paint). Naturally, this revealed a few flaws that needed
fixing and respraying. After a week of drying (I was busy) I masked-off
the sides of the fuselage with 6mm-wide tape, and brush-painted the belly.
I figured that the brush-marks could be taken as weathering - well, the
belly is the area that smacks down on the water, and at high speed, water
‘aint soft. More drying time later, and I applied the decals. They didn’t
need any setting solutions – just close trimming to minimise the carrier
film, and a good pressing down to conform with a few contours and
grooves. I applied them over several sessions to avoid accidentally
removing any with my (relatively) fat fingers.
After filling &/or sanding the myriad of struts (most had to be sanded back
into an aerofoil shape), I sprayed the whole lot (airframe and parts still
on the sprue) with a high-gloss enamel silver from a spray can (Galmet
brand metal paint). Naturally, this revealed a few flaws that needed
fixing and respraying. After a week of drying (I was busy) I masked-off
the sides of the fuselage with 6mm-wide tape, and brush-painted the belly.
I figured that the brush-marks could be taken as weathering - well, the
belly is the area that smacks down on the water, and at high speed, water
‘aint soft. More drying time later, and I applied the decals. They didn’t
need any setting solutions – just close trimming to minimise the carrier
film, and a good pressing down to conform with a few contours and
grooves. I applied them over several sessions to avoid accidentally
removing any with my (relatively) fat fingers.
With most of the painting done, I brush-painted the engine fronts and the oil coolers with Testors flat black., and drybrushed them. The propellers were brushed-painted with Testors brick red. I would have liked to give them all a (painted) metal edge, but didn’t have a reference to OK it.
| FINAL CONSTRUCTION |
First I attached the lateral struts between the engines, and fortunately, they lined-up beautifully.
This tells me that it is a well-engineered kit. Next, the oil coolers went on, followed by all of the struts. Be careful with the struts because they are in pairs and the pairs differ in length. And ensure that the sharp edge of the aerofoils face the tail. Twelve struts sprouted from the top of the water sponsons.
 For ease, I positioned the middle ones first – and the inner sets first.
The struts above & below the lower tailplane also lined-up beautifully – I
said that this was a well-engineered kit.
For ease, I positioned the middle ones first – and the inner sets first.
The struts above & below the lower tailplane also lined-up beautifully – I
said that this was a well-engineered kit.
I couldn’t get the cockpit window piece into place as it had to be positioned before the wing was attached, so I got around the problem by gluing short posts where they were supposed to go, and using a bit of Krystal Kleer* to build the windows. Here, I suspended work on the model, ‘cos I was thinking ahead. Oh, I built the 4-piece stand ‘cos I didn’t have anything else to put it on..
After transporting this model from Sydney to Melbourne, I fitted the balancing planes, the twelve propellers (they won’t turn), the four antennas, and she was done. If I’d fitted these pieces earlier, no doubt they would have broken-off in transit. They all survived the trip home.
| CONCLUSIONS |
I built this model as is because it was requested as a small part of a large display. It isn’t a competition entrant, let alone a winner. However, the Do.X is an unusual subject, and mine is the only one that I have seen – completed or otherwise. This model has a few large pieces and lots of small fiddly ones, so I would recommend it to any modeller with patience. The only addition I might have added to this model is a tiny propeller on the wind-speed indicator. If I was to build this model again at my leisure, I might try to scratch-build some guts to the fuselage – except that I’m pretty sane and not masochistic (ask anyone who knows me).
One book I have reckons that the Luftwaffe was interested in employing a fleet of Do.X’s as their standard long-range maritime reconnaissance aircraft. Can you imagine one of these in war-paint? As it happens, they used FW. 200 Condors. Incidentally, the pilot of this Do.X discovered that he could get more range from the fuel if he flew the Do.X very low over the sea. In short, he stumbled on the “ground effect”.
*PS. For the uninitiated, Krystal Kleer is a honey-like white liquid that dries clear. Its density allows it to fill a hole (See instructions on the bottle) with a thin film - like detergent in a bubble-blowing ring. This film dries clear (= a window). It can also be used to join parts temporarily, attach clear parts or as a gap filler. Any excess can be removed with a damp sponge.
November 2004
Copyright ModelingMadness.com. All rights reserved.
If you would like your product reviewed fairly and fairly quickly, please contact the editor or see other details in the Note to Contributors.