|
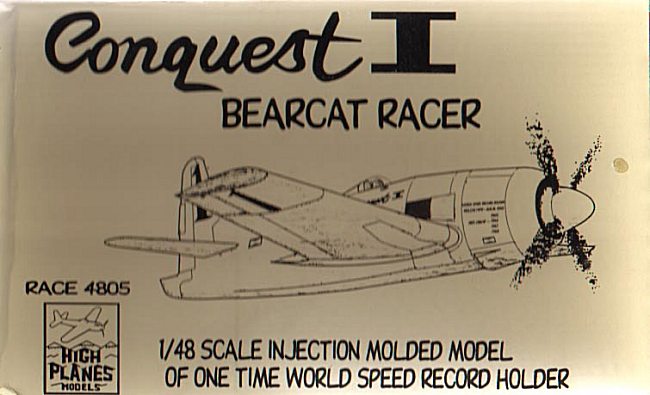
KIT: |
High Planes 1/48 Conquest I |
|
KIT # |
4805 |
|
PRICE: |
$40.00 |
|
DECALS: |
One aircraft |
|
REVIEW & |
Steve Mesner |
|
NOTES: |
short run plastic. |
|
HISTORY |
Darryl Greenamyer’s “Conquest I” Bearcat is unquestionably one of the most historically significant racing aircraft of all time. It was the most winning Unlimited racer of the first decade of the Reno Air Races, 1964-1975, and was the national champion in 1965, ‘66, ‘67, ‘68, ‘69, and ‘71. Today this historic Grumman resides in the Paul Garber facility of the National Air and Space Museum, awaiting public display at the upcoming Museum Annex at Dulles Airport sometime (hopefully!) in the next decade.
|
THE KIT |
Until now, if you wanted to model Greenamyer’s fast ‘Cat in
1/48, you had to start with a Hawk/Testor or Hobbycraft Bearcat, sacrifice a
Skyraider kit for the propeller, a Mustang for the prop spinner, and then be
prepared to do some scratchbuilding, most notably of the Formula-1 type bubble
canopy. (Various conversion kits have been offered for sale over the years, but
I’ve never owned one and so can’t comment on them.) Australian limited-run
kitmaker High Planes has just changed all that with the release of three
versions of "Conquest I."
 MM Mainstay and all-round good guy Tom Cleaver knew of my passing interest in
Unlimited class racers and my downright love affair with the Grumman Bearcat, so
when he offered me the opportunity to do a build review of High Planes’ new
“Conquest I” or “American Jet” kits--or both--it took me about two
seconds to say yes. And it didn’t take much longer than
MM Mainstay and all-round good guy Tom Cleaver knew of my passing interest in
Unlimited class racers and my downright love affair with the Grumman Bearcat, so
when he offered me the opportunity to do a build review of High Planes’ new
“Conquest I” or “American Jet” kits--or both--it took me about two
seconds to say yes. And it didn’t take much longer than
that for me to recruit West Coast modeler Mark Gran, my “brother from another
mother,” to review the second kit. I chose to do “Conquest I,” due to the
greater freedom of markings I’d have with it, while Mark agreed to take on the
flamboyant yellow 1975-only scheme of “American Jet.” I’ll be building
mine as close to out-of-the-box as I can live with; Mark likes to add his own
refinements here and there. We’ll have the full-build reviews for you in a few
weeks (we don’t work as fast as Cleaver, but then, who does?).
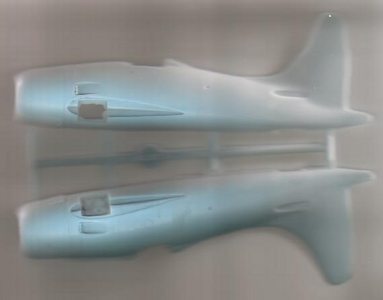
In the meantime, here’s a quick look at what you get in the High Planes box.
(Please excuse the crude images. I’m not set up for photography at the moment,
so I just stuck the sprues in my scanner. Better pictures will accompany the
full build, I promise!)
The High Planes product is shipped in a very sturdy cardboard box--a carton, really--and the three main sprues come packaged in a Zip-Lock type plastic bag, a nice touch. The white metal main landing gear legs and the vac canopy are packaged separately in their own plastic bag. Except for the instruction sheet markings and the decals, the contents of both kits is identical: 40 pieces, injection-molded in light blue, on three sprues. Unlike some other limited-run kits I’ve owned, the plastic is readily soluble in common Testor liquid cement. It should present no gluing problems.
 My initial impression was that the moldings were quite crude,
but this was only because of the thick sprues and sprue gates, and many parts
have a good deal of flash. A closer look, however, shows the main parts to be
quite accurate in shape. Panel line detail is recessed, straight, very even, and
very delicate. It’s among the best I’ve ever seen from any manufacturer, in
fact! I can’t yet comment on fit, but I was pleased to see that the engine
cowling--molded integrally with the fuselage halves--is more much more accurate
in shape than those in either the Hawk/Testor or the Hobbycraft Bearcat kits.
Well done, High Planes!
My initial impression was that the moldings were quite crude,
but this was only because of the thick sprues and sprue gates, and many parts
have a good deal of flash. A closer look, however, shows the main parts to be
quite accurate in shape. Panel line detail is recessed, straight, very even, and
very delicate. It’s among the best I’ve ever seen from any manufacturer, in
fact! I can’t yet comment on fit, but I was pleased to see that the engine
cowling--molded integrally with the fuselage halves--is more much more accurate
in shape than those in either the Hawk/Testor or the Hobbycraft Bearcat kits.
Well done, High Planes!
The fuselage comes with the T-33-like dorsal fin fillet molded in; this was
added to Greenamyer’s Bearcat in 1969 and remains on it to this day. The wings
are clipped to correct length and the flaps are (correctly) filled in; the
instructions tell you to “file” a concave shape into the wingtips. Good luck
with that; sandpaper over a sensitive fingertip might work better! The
horizontal stabilizer comes in two pieces, not the single “straight-through”
part seen on many Bearcat kits. One of the four fuselage halves I examined had
some sink marks or casting flaws along its lower side; these will require some
minor filling and smoothing. (Having both “Conquest I” and “American
Jet” kits on hand, I swapped the fuselages and shipped the
“bad”one to my good friend Mark in his “AmJet” kit. I justify this
little bit of treachery by saying that Mark’s a much better modeler than I am,
and I need the handicap to keep up!)
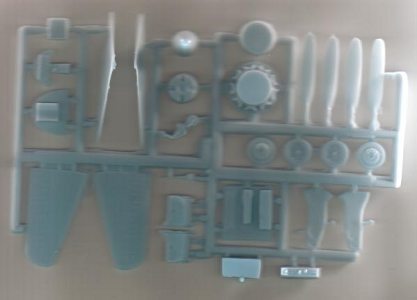 There’s a rudimentary seven-piece cockpit assembly (though the instruction
sheet does not show the joystick). I’ll work with what’s here, but the
“Gran-Man” has already told me he’s going to “noodle” with the gut in
his. The wings have some nicely molded gear well details, but not so the
fuselage; empty holes is all you get for wheel wells. The instruction sheet
There’s a rudimentary seven-piece cockpit assembly (though the instruction
sheet does not show the joystick). I’ll work with what’s here, but the
“Gran-Man” has already told me he’s going to “noodle” with the gut in
his. The wings have some nicely molded gear well details, but not so the
fuselage; empty holes is all you get for wheel wells. The instruction sheet
suggests mounting the inner gear doors up to hide this, and hints that this was
the way the airplane was normally seen on the ground. I did manage to find ONE
photo of “Conquest I” on the ground and unmanned with the inner doors up, so
it’s not entirely impossible, but in most photos, these doors are down, just
like a normal Bearcat’s.
The main gear doors have nice inner detail, and the white metal main gear legs
are gorgeous. The two-piece wheels look a bit crude under magnification, but are
probably usable; if they’re not good enough, you can always use True Details
wheels or pirate a pair from a Hobbycraft Bearcat.
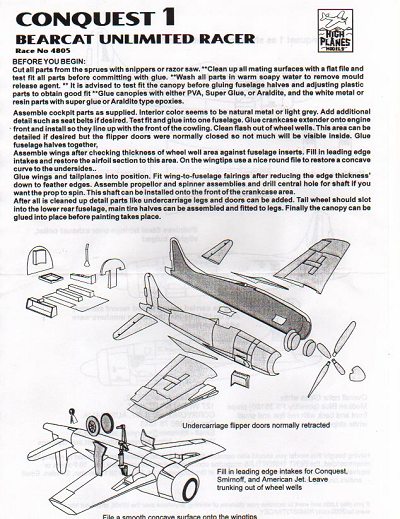 Up front, the R-2800 engine is represented by no more than the
very ends of the cylinders peeking out from a massive spinner mounting boss.
There is no provision for the propeller to rotate; it’s meant to be glued
solid, though the instruction sheet suggests ways to fabricate your own rotating
mounting system. (I’d suggest you do this, as in my experience, the first
Up front, the R-2800 engine is represented by no more than the
very ends of the cylinders peeking out from a massive spinner mounting boss.
There is no provision for the propeller to rotate; it’s meant to be glued
solid, though the instruction sheet suggests ways to fabricate your own rotating
mounting system. (I’d suggest you do this, as in my experience, the first
thing any non-modeler wants to do when you show him a new model airplane is spin
the prop. This will result in broken prop blades if your prop doesn’t rotate.
Modelers are different: The first thing a modeler will do with your new model is
pick it up to look at the wheel wells, breaking off guns, pitots, and antennas
in the process.) The four prop blades are separate items and they’re suspect
at this time. The real “Conquest I” was fitted with a larger Skyraider prop
in 1965 (which necessitated takeoffs and landings in three-point attitude; there
was negative prop clearance when the airplane was level on the main gear), but
the kit blades closely matched the Hawk/Testor Bearcat prop I compared it to,
and were a bit short when compared to a 1/48 Skyraider prop (from the Matchbox
A-1E, the first thing that fell readily to hand). I’ll let you know more about
this in the full build review.
“Conquest I” got some swoopy extended wing root fillets during an airframe
cleanup in 1968, and these are represented (wisely) by separate kit pieces. The
sprues also contain six parts not mentioned in the instructions. Two appear to
be alternative wingtips (for another racing Bearcat, perhaps); the other four
might be some type of ducting. The instructions tell you to fill the wing
root oil cooler inlets, but don’t provide a filler part. It shouldn’t be too
much trouble to whittle something suitable out of the kit’s massive
sprues.
Take a GOOD look at the vac canopy before you cut it--part of the fuselage
decking is molded integral with it. (A look at the fuselage and the instruction
sheet will show you what you’re looking for.)
The instruction sheet consists of a couple of exploded diagrams (shades of an old Hawk or Aurora kit!) and some helpful written text. It should be adequate to the task at hand. Its backside contains very complete decal placement diagrams.
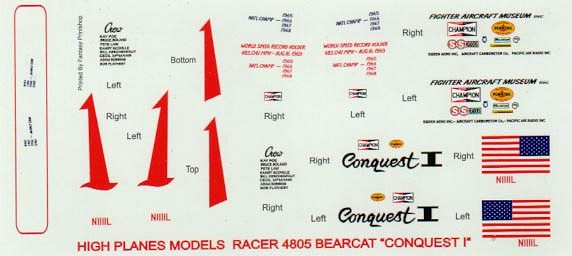
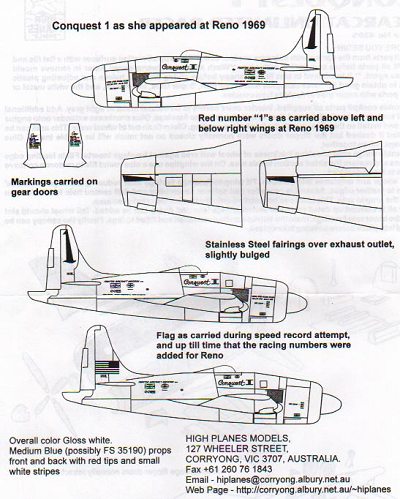 Decals are included for two variations of “Conquest I’s” all-white1969
paint scheme, with alternatives for both the aircraft’s world speed record
flight and its appearance at Reno that year. They’re in-register and
beautifully printed, and readable--under an Opti-visor! (Decals scanned and
reproduced here at other than 100% as a courtesy to High Planes.)
Decals are included for two variations of “Conquest I’s” all-white1969
paint scheme, with alternatives for both the aircraft’s world speed record
flight and its appearance at Reno that year. They’re in-register and
beautifully printed, and readable--under an Opti-visor! (Decals scanned and
reproduced here at other than 100% as a courtesy to High Planes.)
Nice as they are, the decals are my main complaint with this kit. The airplane remained in this basic configuration from 1969 through 1974, although the paint details varied from year to year, and it eventually was painted silver before its all-yellow 1975 swan song as “American Jet.” I’d like to have seen decals for all markings ‘69 through ‘74, as this would allow you to build a slightly different model from your buddy’s. Maybe someone in the aftermarket will step up and do us a full set. (I still haven’t ruled out the possibility of trying to cobble together the markings to do one of the silver finishes. We’ll see what my research turns up.)
All things considered, though, the High Planes “Conquest I” looks at this stage to be a most buildable and interesting project, and I look forward to bringing you a full build review as soon as possible.
Review kit courtesy of High Planes
If you would like your product reviewed fairly and quickly by a site that averages over 2,600 visits a day, please contact me or see other details in the Note to Contributors.