Heller 1/72 Constellation
|
KIT # |
314/382 |
|
PRICE: |
£14.99 MSRP |
|
DECALS: |
One aircraft |
|
REVIEWER: |
|
|
NOTES: |
Though they are large they are easy to build. |
|
HISTORY |
The Lockheed Constellation was developed as a result of Howard Hughes’ desire for his Transcontinental and Western Airline to acquire a thoroughly modern pressurised airliner – just before WW2. The competition was shaping up as the Douglas DC-4 for Eastern Airlines, and the pressurised Boeing Stratoliner.
Lockheed came up with a design by Kelly Johnson and Hall L Hibbard at the then staggering cost of $425,000 per plane - which was way beyond the means of the financially strapped TWA, until Hughes stepped in with his own money.
The design involved four 2,000hp Wright R-3350 engines, a streamlined teardrop fuselage, and a scaled up P-38 Lightning wing in an airframe weighing 24,000Kg. This design was able to carry 44 passengers.
To reduce the height of the tail – enabling use of existing hangars, a triple tail arrangement was designed.
To keep
the tails out of the turbulence of the wing – the rear fuselage was swept
upwards. 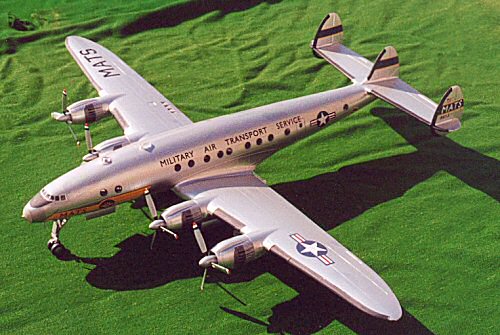
To keep the nose gear to a reasonable length – and keep the tail low whilst on the ground, the forward fuselage was swept downwards.
Thus through a series of compromises the unmistakable shape of the Constellation was born.
The first flight was delayed by wartime production pressures, and did not take place until January 1943, and then all aircraft were commandeered for the US Army as C-69 transports.
After the war the airlines began to receive their aircraft – and Lockheed build new improved versions, each new variant with greater capacity and more powerful engines.
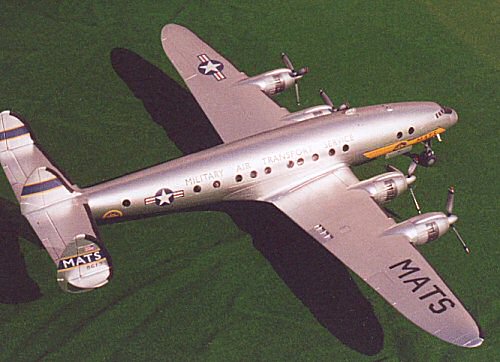
The C-121A, which is the version for my MATS model is equivalent to an L-749 with four 2,700hp engines and carrying 81 passengers in high density. The kit depicts 48-613 immediately after delivery, during the Berlin Airlift, and is one of 10 C-121A received by the USAF. Later it was converted to a VIP transport, and was named Bataan for the use of General McArthur. It was probably at this point that a weather radar was fitted, which lengthened the nose by 3 feet. 48-613 is currently stored at the Planes of Fame facility in Grand Canyon, Arizona, awaiting restoration. Another C-121 has been restored to flying condition and visited the 1998 RIAT at RAF Fairford.
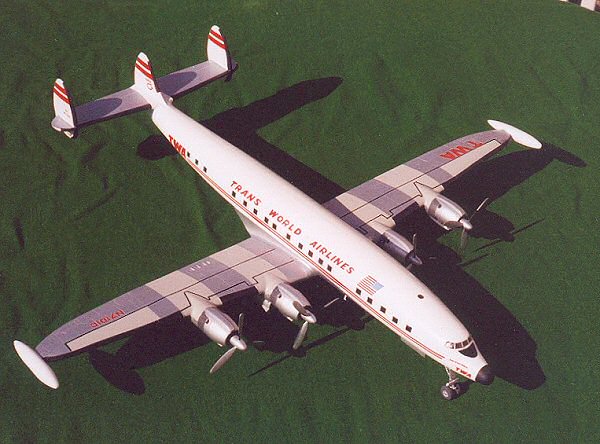
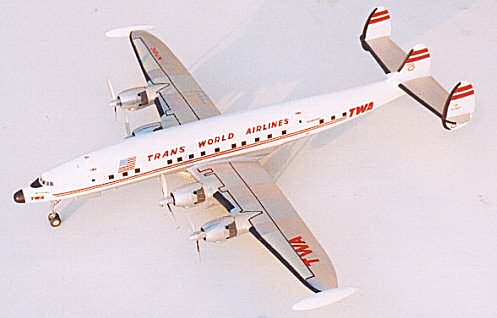
A few iterations later came the model L-1049 Super G Constellation, subject of my TWA model. This featured turbo-compound engines of 3,250hp and carried 95 passengers, and a much larger fuselage with square windows. It also had removable wingtip fueltanks of 600 gallons each. This aircraft represents the Golden Era of airlines, just before the jet age.
Another serious development was the L-1649 Starliner which had the fuselage of the Super G, and a new wing optimised for transatlantic range. Unfortunately this variant has never appeared in model form.
My own interest in Connies probably originated from seeing the TWA painted L-749 at the Science Musuem, Wroughton, Swindon.
|
THE KITS |
 These
kits have been around for some time – but I can find no clue to their
true vintage. (Your editor remembers buying one around 1983/4 so
they are probably from that time period; the golden era of Heller kits.) Moulded in softish grey plastic they share many common
parts. The only real differences are the fuselage and windows, and
engine cowlings. The Super G’s outer wings are from the same masters
with tiptanks moulded into the lower surfaces and new parts for the top.
Ironically my Super G was second-hand from a model-show, and the previous
owner had butchered off these parts, planning to finish the kit as the
Blue Angels support aircraft!
These
kits have been around for some time – but I can find no clue to their
true vintage. (Your editor remembers buying one around 1983/4 so
they are probably from that time period; the golden era of Heller kits.) Moulded in softish grey plastic they share many common
parts. The only real differences are the fuselage and windows, and
engine cowlings. The Super G’s outer wings are from the same masters
with tiptanks moulded into the lower surfaces and new parts for the top.
Ironically my Super G was second-hand from a model-show, and the previous
owner had butchered off these parts, planning to finish the kit as the
Blue Angels support aircraft!
Both kits lack door apertures, and any form of interior – other than a cockpit that can’t be seen!
Surface detail is raised and crude, these kits are NOT modern – and probably not intended for beginners, requiring considerable gap-filling magic – but they are the only way to get an injection Constellation kit in 72nd scale.
Each kit contained decals for one scheme only, but both have been released in various colour schemes. The masters for the Super G have been used for the US Navy WV-2 AEW radar plane.
|
CONSTRUCTION |
Construction for both kits starts with the engines, having similar breakdowns. I installed the prop retaining pins, but left to props off - to avoid transit damage. The C-121 engine cowlings are handed, whereas the Super G engines are all identical – but all required lots of attention to fill and level the surfaces. All were painted with tyre grey engines, and silver cowlings. Exhaust areas were painted in darkening shades of gunmetal and aluminium.
Next stage is the cockpits, these consist of floor, bulkhead, seats, control columns and instrument panel, mounted onto the undercarriage bay. Instruments are decals – which can’t be seen. I painted my cockpit interiors black as instruction, with brown seats and sliced masking-tape harnesses. The seats are the only visible part of the interior – just!
The undercarriage components can be assembled and left until painting is completed – to avoid handling damage.
 Next
stage is the tails and fins, which interlock together quite well – if you
excuse the gaps.
Next
stage is the tails and fins, which interlock together quite well – if you
excuse the gaps.
Next the fuselage can be assembled – and filled. I ignored the passenger windows – preferring to use Clearfix later. I installed lots of ballast in the Super Connie to avoid tailsitting, but as the MATS version was planned to hang in my model-lab I didn’t bother with that – it’s sitting on a couple of Tic-Tac boxes for the photos.
Cockpit glazing in both cases consists of the front windows and roof, and requires considerable filling and blending-in to achieve a satisfactory result.
Both aircraft included highly vulnerable aerial masts, which I removed so that repairs would not compromise the paint finish.
Wings consist of lower centre-section to just outboard of engines, upper sections and lower sections, and are assembled to the fuselage at the same time as the tails. Again gaps and filler!
As I said, my Super Connie was missing the tip-tanks – which I wanted! I scaled up a diagram to find the length and diameter of the tanks, then began a search of my spares box – nothing!
Nearest was the 700 gallon tanks that I had fitted to the Academy RB-50G Superfort – these had the same dimensions, but a slightly different shape. No matter, I made resin copies, and modified the profile with my DIY drill and sandpaper.
|
COLORS & MARKINGS |
I used a Humbrol 11 silver aerosol overall on the MATS Connie. My only reference for this kind of Connie was a photo in the Fairford programme, which showed a different nose – with a slightly different shade of aluminium – so I handpainted the nose section with polished aluminium for contrast.
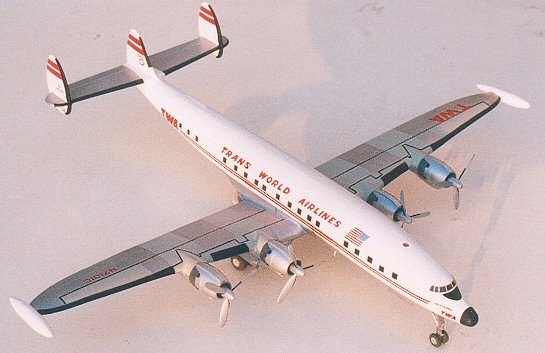 The TWA
Connie was a little more complex. I aerosolled the upper fuselage with
Halfords Appliance White acrylic, and when thoroughly dry I masked and
airbrushed the lower fuselage and wings with diluted Wilkinson’s silver
acrylic paint (never again!). When this was thoroughly dry - I
handpainted the grey upper wing sections with Humbrol 129 light grey.
The TWA
Connie was a little more complex. I aerosolled the upper fuselage with
Halfords Appliance White acrylic, and when thoroughly dry I masked and
airbrushed the lower fuselage and wings with diluted Wilkinson’s silver
acrylic paint (never again!). When this was thoroughly dry - I
handpainted the grey upper wing sections with Humbrol 129 light grey.
In both cases I masked the cockpit glazing area, and revisited the framing afterwards by hand.
Raised panel lines of colossal proportion – which made masking impossible, delimit de-icer boots on the wings. I handpainted them with Humbrol 33 black, as carefully as I could.
Some masking is possible on the horizontal surfaces. The fins have slightly raised panel lines to follow – but the fins are all curves. I used masking tape at the ends to give me squared corners and painted the rest freehand. These models are best not scrutinised too closely!
Both models were given a thin coat of Johnson Klear over the non-white bits in preparation for decal application.
The TWA Connie decals were browned, and soft. I applied them over a blob of wet Klear to avoid silvering, but they frequently broke as I rubbed them down. The fuselage stripes and wing walkways were very difficult, and needed revisiting with a paintbrush afterwards. The brown of the ageing is still visible to the trained eye. Overall – not for a beginner
The MATS Connie had matt, brittle decals reminiscent of those from Revell, and had minor problems with register. They went on, without silvering, over a blob of wet Klear – I don’t think they would stick properly without it! However they took longer than usual to bond to the model, and still have a slightly matt finish after another coat of Klear to seal them. Again – not for beginners.
|
FINAL CONSTRUCTION |
Both models had passenger glazing with Humbrol Clearfix. These windows are a bit big for this method – but it is possible.
Then I fitted the undercarriages, and remaining pitots and aerials. I painted the bays and legs aluminium with silver oleos, aluminium wheels with Aeromaster Tire Grey tyres.
Propellers were painted silver with black de-icer boots. My diagram showed no tip colour for TWA, so they’re finished. My photo of the MATS plane showed Red-White-Blue tips, but NO SPINNERS! The same article said that 8609 was also a VIP transport, and I had no spinnerless props available, but thought ‘go for it’. The tips were painted white, then masked and had the red and blue applied – all Humbrol.
Remaining transparencies, this included the nose of the C-121, were carefully fitted with Klear – to avoid damaging any paint.
|
CONCLUSIONS |
Crude,
little detail, difficult to make well, dubious accuracy – probably
compromised through too many shared parts, should I have expected
anything else? Well, no, not if I wanted a pair of very different
Connies in my 72nd scale collection. Would I build another in
72nd scale? YES, when an L-1649 Starliner is released (by
Hasegawa or Academy please)!
What I have not mentioned previously, is that I had already built the PanAm L-749 version and given it to a friend’s son before building either of these two, so I knew exactly what to expect – and still carried on!
However on the balance side is the interest these models generate, amongst people who remember the real thing - whenever they’re taken to IPMS events. This makes these models very rewarding to have in my collection.
In days when most of my model fleet is in boxes in my loft, the MATS Connie is on permanent airlift duties in my model lab, whilst the Super G flies Golden Age routes around my son’s bedroom.
|
REFERENCES |
For the purposes of review completeness, I measure models to establish their accuracy, multiplying my measurements by 72 and comparing with the quoted dimensions.
I have slightly differing dimensions from different sources for the - for both versions, so we’ll see which fits best!
C-121A - MATS
Span 526mm x72= 37.872M Quoted 37.49M Difference +382mm
Length 408mm x72= 29.376M Quoted 29M Difference +376mm
Height 104mm x72= 7.488M Quoted 7.21M Difference +278mm
L-1049G - TWA
Span 540mm x72= 38.880M Quoted 38.47M Difference +410mm
Length 496mm x72= 35.712M Quoted 35.42M Difference +292mm
Height 119mm x72= 8.568M Quoted 7.54M Difference +1,048mm!
The figures don’t fit either – well nothing else has, so no difference there! But do they look like Connies – YES!
I’ve no conclusive reference material for either aircraft, but would rather suspect the figures than blame the kits - so I’ll stop there.
My research for the C-121 turned up a B+W photo of 48-613 on a Dutch website, posing as the VIP transport. In this role it had the lengthened nose, white upper fuselage, and dayglo tail – but my props looked right!
For the benefit of anybody wanting to complete their model as 48-609, which visited Britain, here are the differences, which I noticed:
New nose including weather radar, porthole in crew door, different layout of passenger windows, no prop spinners, decorated tips, fuselage MATS legends etc are sloped backwards (there is a decal set for this plane, which I hope corrects all this). Doesn’t have that glass thing behind the astrodome, but does have a red beacon at mid-fuselage.
July 2003
If you would like your product reviewed fairly and fairly quickly, please contact the editor or see other details in the Note to Contributors.