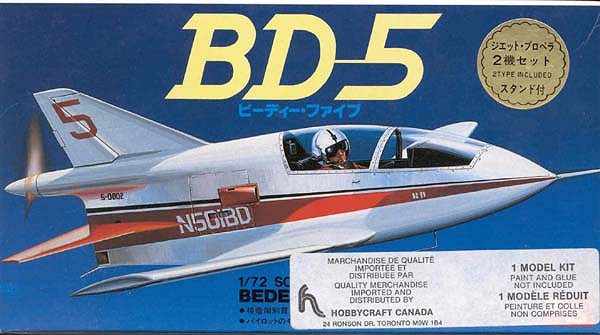
LS 1/72 BD-5
|
KIT # |
L4 (A194) |
|
PRICE: |
@C$2.38 in the 70's |
|
DECALS: |
2 versions for each plane |
|
REVIEWER: |
|
|
NOTES: |
two planes in each box |
|
HISTORY |
Back in the 1970s, James Bede designed a homebuilt plane that could fly over 200 mph using just a 40hp engine, and offered to sell the plane kit to individuals for a basic price of US$2,100 complete. Construction time was optimistically estimated to be half a year to a year of nights and weekends, but others have reported an average of 3000+ hours of work. Design initially started in 1967 with the prototype BD-5A flying in 1971 with a 40hp 2-cylinder engine powering a pusher propeller. The BD-5J was to be the top of the line model equipped with a turbo-jet engine and a shorter span wing than the BD-5. The control stick for all BD-5s was mounted on the right hand side and was controlled by wrist action, rather than the conventional stick in the middle of the cockpit. Unfortunately, the original Bede aircraft company went bankrupt in 1979. An unaffiliated company called BD Micro Technologies Inc now sells the BD-5 airplanes. The James Bond ban may remember that a BD-5 appeared in the movie Octopussy. (Your editor would like to add that the engine for the BD-5J is often the APU [Auxilliary Power Unit] from the Concorde!)
|
THE KIT |
 LS produced both a BD-5J (kit L3) and a BD-5 (kit L4)
boxings, although both L3 and L4 boxings each contain parts and decals to build
both the propeller (BD-5) and the jet (BD-5J) versions. In other words, the only
difference is the box art. Luckily, the side of the box shows the box tops for
the other BD-5 boxing. As an aside, LS also produced 1/72 scale Pitts S-2A
civilian aerobatic biplanes, one with Rothman’s markings and the other with
Canadian Reds SKIL Power Tools markings, in this series of non-military
aircraft.
LS produced both a BD-5J (kit L3) and a BD-5 (kit L4)
boxings, although both L3 and L4 boxings each contain parts and decals to build
both the propeller (BD-5) and the jet (BD-5J) versions. In other words, the only
difference is the box art. Luckily, the side of the box shows the box tops for
the other BD-5 boxing. As an aside, LS also produced 1/72 scale Pitts S-2A
civilian aerobatic biplanes, one with Rothman’s markings and the other with
Canadian Reds SKIL Power Tools markings, in this series of non-military
aircraft.
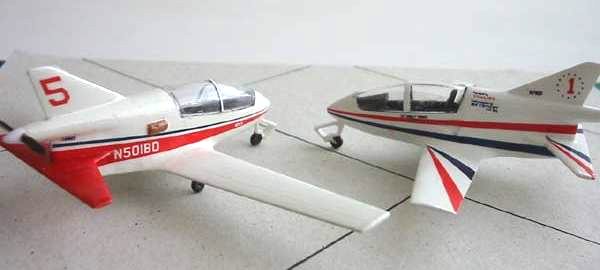
Being such a small plane in real life, the model kit naturally contains only a few parts. The BD-5 contains 10 white parts and 1 clear part while the BD-5J contains 8 white parts and 1 clear part. The cockpit consists of a seat molded to a floor board and what looks to be a control column. No instrument panel is provided. The propeller for the BD-5 can be assembled to spin. The main wheel wells are blocked off but the nose gear only has a single hole and not have a well. The main landing gears are molding very simply as one piece consisting of the tire and what looks like a strut. One (yes, only one) stand is provided. Surface detail consists of very fine scribed lines, especially for the control surfaces. The surface of the BD-5 looked a bit pebbly, while the BD-5J looked smooth.
Because the surface detailing is very fine, the engraved lines can easily be sanded away even with a worn piece of 1000 grit sandpaper, or can be lost under a heavy coat of gloss paint. If you plan on doing any sanding of the surface, or if you think you will need to apply heavy coats of paint to get the glossy finish, I strongly recommend that you deepen the engraved lines, especially around areas where you will be sanding, before you start construction. I didn’t and found it very difficult to rescribe the lines once all the parts were glued together.
 The decals are in very good condition and have not
yellowed with age. The registry of US insignia’s red bar is slightly off. The
red of the decals have a white backing, which is a nice touch (even though the
aircraft is overall white) so the red will remain vibrant once applied to
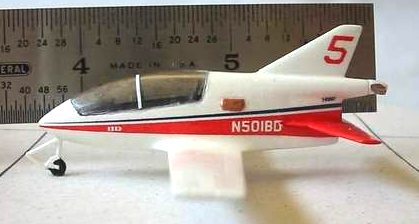
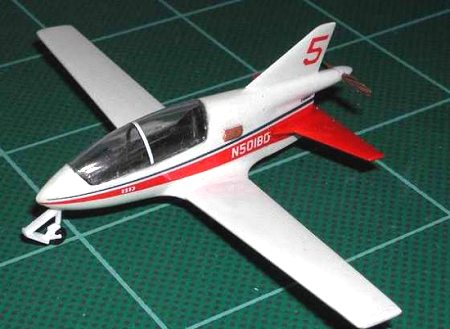
the model. For the BD-5, you get markings for the test prototype N501BD and for
a (fictitious?) USAF aircraft. The only complaint I have is that the
instructions do not show how to apply markings for the USAF version. For BD-5J,
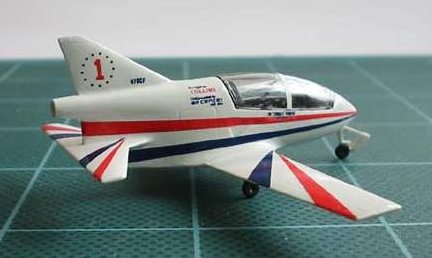
you get markings for a leader (plane #1) and wingman (plane #2) aircraft,
supposedly for a 2 plane acrobatic team. I could not find pictures on the
Internet of the BD-5J, so I suspect the BD-5J was never completed so these
markings are probably fictitious. Instructions for applying the markings for
both BD-5J leader and wingman are given.
The decals are in very good condition and have not
yellowed with age. The registry of US insignia’s red bar is slightly off. The
red of the decals have a white backing, which is a nice touch (even though the
aircraft is overall white) so the red will remain vibrant once applied to
the model. For the BD-5, you get markings for the test prototype N501BD and for
a (fictitious?) USAF aircraft. The only complaint I have is that the
instructions do not show how to apply markings for the USAF version. For BD-5J,
you get markings for a leader (plane #1) and wingman (plane #2) aircraft,
supposedly for a 2 plane acrobatic team. I could not find pictures on the
Internet of the BD-5J, so I suspect the BD-5J was never completed so these
markings are probably fictitious. Instructions for applying the markings for
both BD-5J leader and wingman are given.
The instruction sheet is in English and Japanese with paints called out using Gunze paint numbers and with the name of the colour. Each of the 3 assembly steps has exploded drawings showing how each part attaches. The instructions thoughtfully reminds you to add ballast to the nose, something which you must do as these planes are tail sitters. The sheet also has a diagram showing the parts with the part numbers (something one doesn’t seem often with newer kits anymore).
|
CONSTRUCTION |
 I started building the BD-5 first, but the steps apply
equally to the BD-5J. The seat/floor/stick and the sides of the fuselage were
brushed Humbrol satin black instead of the flat black (just as an experiment to
see if it replicates a “black hole” better) and then the seat was glued to the
fuselage sides. I mistakenly glued the propeller shaft to the fuselage side
which then caused the shaft to be off center. If you don’t want the propeller to
spin, leave off the shaft. The propeller hub is a bit larger than the tail
portion so you will have to slightly sand down the hub. The fit of the fuselage
halves were quite good and use of Mr Surfacer should remove the seam lines. Mr
Surfacer was also used on the joint line between the vertical fin and the right
fuselage half (the vertical fin and rudder are molded onto the left fuselage
half).
I started building the BD-5 first, but the steps apply
equally to the BD-5J. The seat/floor/stick and the sides of the fuselage were
brushed Humbrol satin black instead of the flat black (just as an experiment to
see if it replicates a “black hole” better) and then the seat was glued to the
fuselage sides. I mistakenly glued the propeller shaft to the fuselage side
which then caused the shaft to be off center. If you don’t want the propeller to
spin, leave off the shaft. The propeller hub is a bit larger than the tail
portion so you will have to slightly sand down the hub. The fit of the fuselage
halves were quite good and use of Mr Surfacer should remove the seam lines. Mr
Surfacer was also used on the joint line between the vertical fin and the right
fuselage half (the vertical fin and rudder are molded onto the left fuselage
half).
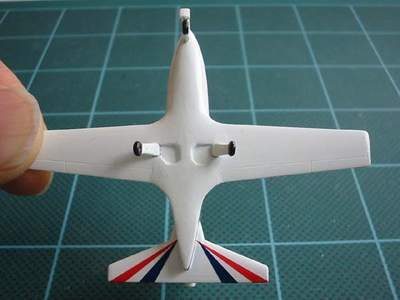
Next was the one piece horizontal tail plane which fits onto the bottom of the rear fuselage. Here the fit requires some sanding to align properly. There will still be seam lines where the tail plane joins the fuselage, with 2 of them just above the tail planes themselves (one of either side of the fuselage). Removing the seam lines will require careful work as the plane is very small. I used a combination of white glue, then Mr Surfacer to remove the seam lines, but wasn’t satisfied with my work (big fingers).
 Next was the one piece wing, which proved to be a major
challenge to attach properly. The wing to fuselage joint has a noticeable gap
and step, which can be reduced by giving the wing sufficient dihedral. Only
problem was I didn’t know how much dihedral the real plane had. For the BD-5, I
gave the wings as much dihedral as needed to minimize the gap/step. Some
Milliput was used to smooth the root joint. Underneath, some more Milliput was
needed near the leading edge to fair in the wing to the fuselage. Then lots of
sanding to reshape the curved belly to match the flat wing undersurface.
Next was the one piece wing, which proved to be a major
challenge to attach properly. The wing to fuselage joint has a noticeable gap
and step, which can be reduced by giving the wing sufficient dihedral. Only
problem was I didn’t know how much dihedral the real plane had. For the BD-5, I
gave the wings as much dihedral as needed to minimize the gap/step. Some
Milliput was used to smooth the root joint. Underneath, some more Milliput was
needed near the leading edge to fair in the wing to the fuselage. Then lots of
sanding to reshape the curved belly to match the flat wing undersurface.
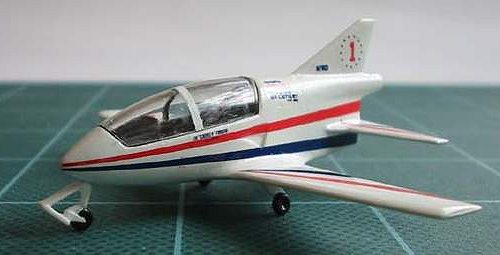
For the BD-5J, I gave the wings less dihedral by matching the wing tops with the wing root as much as possible by sanding down the fuselage surface where the wings joined (thereby moving the wings up). Stretched sprue and Mr Surfacer was used to fix the wing root joint and was only successful with the left wing as the right wing still had a noticeable step. The belly required a lot more filling to recontour the flat wing undersurface so that they matched the contours of the curved fuselage belly (recall on the BD-5, I recontoured the fuselage to match the wings!). Eventually the recontouring and sanding and smoothing were “good enough” to move on to painting!
|
PAINTING & MARKINGS |
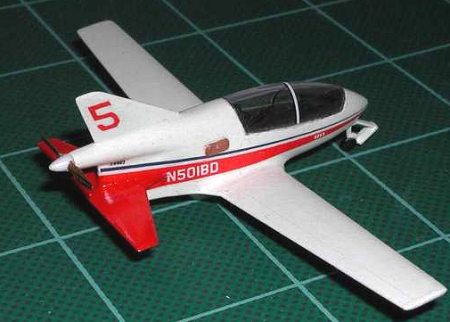
Painting these 2 planes should be very simple – they are overall gloss white. For the BD-5, I sprayed the old formula Model Master insignia white, which had really good coverage and dried to a semi-gloss finish. Only trouble was that it now had a slight yellow tinge wasn’t really noticeable until it was compared to the colour of the white sprue. The tail plane was then masked off and sprayed PollyS caboose red, which dried to a very flat red.
 Since the white colour was semi-gloss, I applied the
decals for N501BD directly to the finish. Some trimming of the red stripe that
goes underneath the tail plane was needed to make it fit properly. Some touching
up of the red decal with red paint was needed. Other than that, the decals
settled down well with Decalset. Once dried, unthinned Future was brushed all
over the plane to give everything an even gloss finish.
Since the white colour was semi-gloss, I applied the
decals for N501BD directly to the finish. Some trimming of the red stripe that
goes underneath the tail plane was needed to make it fit properly. Some touching
up of the red decal with red paint was needed. Other than that, the decals
settled down well with Decalset. Once dried, unthinned Future was brushed all
over the plane to give everything an even gloss finish.
The propeller was painted a slightly lightened Model Master leather colour. Then I tried to simulate wood grain by taking a fine tipped brown pen and drawing wood grain lines. From 4 feet away, it looks okay, but certainly does not look like a well painted WWI propeller blade. The instructions say to paint the side air vents an orange-yellow colour, but pictures from the Internet of this same aircraft show the side air vents were painted the same white colour as the rest of the plane. In the end, I just followed the instructions and painted the orangey colour. In hindsight, I should have left it as white.
For the BD-5J, I sprayed Tamiya gloss white in 5 or 6 thin coats which eventually covered up the grey Mr Surfacer. As a side note, if you are spraying white, ensure your airbrush is absolutely clean. Mine apparently was not as a few specks of old red paint appeared on the freshly painted surface. This required a few more passes of the white to cover up as I couldn’t rub the red specks off the surface. The gloss white is dried to the touch in seconds and can be handled to some extent a few hours later but I do recommend that you let the gloss white cure for about a week before doing any serious handling. I didn’t and ended up having to respray the plane twice to fix up marred surface caused by heavy handling before the paint fully cured.
As an aside, I found that the paint surface could be buffed up to a higher shine by very gently buffing with a dried, hardened piece of tissue paper or Q-tip bud, followed by buffing with the soft bud of a new Q-tip. Careful handling was required as this buffing was done to the paint before it had fully cured. This buffing won’t remove any “orange peel” on the paint surface, though.
The canopy for the BD-5J had been tacked on to the fuselage and sprayed the same gloss white while the inside was masked and the frame painted black. Strangely, the frame looked wider than the frame for the BD-5, although in both cases, I tried to follow the outlines of the frame molded onto the clear part. It was probably my masking mistake.
 Next up were the BD-5J decals. I was extremely impressed
by the forethought that went into these decals. First, the red stripes have a
white backing (why didn’t Superscale do this with their decal films??). Next
thing that impressed me was that for the fuselage stripes, a notch has been
removed from the decal film where the tailplane would be, thereby eliminating
the need for the modeler to do that. Nice touch! The decals are also fairly
strong, but thin enough to conform to the surface details.
Next up were the BD-5J decals. I was extremely impressed
by the forethought that went into these decals. First, the red stripes have a
white backing (why didn’t Superscale do this with their decal films??). Next
thing that impressed me was that for the fuselage stripes, a notch has been
removed from the decal film where the tailplane would be, thereby eliminating
the need for the modeler to do that. Nice touch! The decals are also fairly
strong, but thin enough to conform to the surface details.
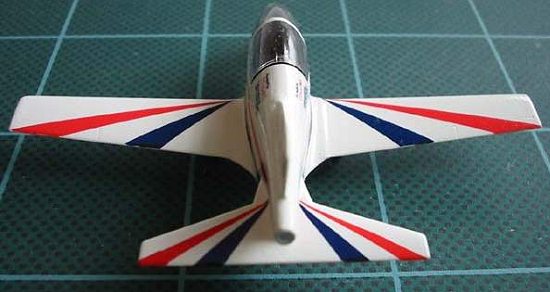
Having chosen plane #1 (the leader), the “1”, aircraft serial number and the “Collins” decals were applied to both sides of the fuselage, taking care to line things up on both sides. Next I applied the fuselage strips. The instructions do not tell you whether the red or the blue should be on top, so you will need to refer to box art, which shows the red is above the blue for the fuselage, and the red is in front of the blue for the horizontal surfaces. When applying these stripes, I strongly recommend that you remove all the carrier film around the outside and in between the colour stripes. This is not necessarily to eliminate silvering, (the clear film disappears over the gloss white surface), but to allow you to wiggle the stripes a bit to have them lie down properly over the complex curves of the fuselage extremities (nose and tail). This is especially useful for the upper tailplane where I found the stripes to be a bit long. Seems like they were sized for the lower tailplane. I would recommend applying the stripes for the lower tailplane first, then the upper tailplane. For the upper tailplane, I suggest applying the red and the blue stripes individually so that they start and end on the horizontal surface, taking care to line up with the lower tail plane at the trailing edge of the elevators. If you just apply them without doing this, the top stripes merged to a point onto the fuselage instead of on the tail plane. Once dried, and the trailing edges for the tailplane and fuselage stripes were touched up with paint (Humbrol gloss red and Gunze USAF Thunderbirds blue), and then the decals were sealed with Future brushed over them. No decal setting solution was used this time, as none was really needed.
|
FINAL ASSEMBLY |
The main gears and nose gear was attached. The hole for the nose gear was too small for the tab on the gear strut, so the hole was enlarged ever so slightly with a drill bit. On the BD-5, a strip of white Superscale decal film was cut and applied to the outside of the BD-5 canopy. The canopy was then attached with tacky glue. The BD-5 N501BD plane should have a pitot tube at the nose as shown in the box art, something which I had forgotten to scratch-build. The pitot tube that was molded to the kit was broken off long time ago. Since I was unable to find photos of the BD-5J, one can speculate that it should also have a pitot tube at the nose. The BD-5J kit has a pitot tube molded to the fuselage.
|
CONCLUSIONS |
 These
diminutive 1/72nd scale planes (smaller
even than the Polikarpov I-16s I bet!) with the bright stripes are extremely eye
catching. I was able to keep my 2 month old baby’s attention for 15 minutes
while my decaled BD-5J circled around him upside down (the plane, not the baby).
The kits have very few parts so can be assembled very quickly. Polishing the
white finish to give an airline quality finish to these little airplanes would
make them really stand out, even for their size.
These
diminutive 1/72nd scale planes (smaller
even than the Polikarpov I-16s I bet!) with the bright stripes are extremely eye
catching. I was able to keep my 2 month old baby’s attention for 15 minutes
while my decaled BD-5J circled around him upside down (the plane, not the baby).
The kits have very few parts so can be assembled very quickly. Polishing the
white finish to give an airline quality finish to these little airplanes would
make them really stand out, even for their size.
While the part counts were few, the kit was not a shake and bake kit. I found eliminating the major seam lines satisfactorily to be very troublesome. A more patient modeler, however, should be able to do a much better job. Either way, use of putty will be needed. The areas where one can add details are the large cockpit, the nose gear well, the main gear well and the landing struts.
Another completed blissful project from the “kits that go eeeewwww!” aisle of my inventory (unfortunately without any FBNP funding :0) ).
|
REFERENCES |
http://www.bd5.com - all sorts of great information on the BD-5 aircraft, including reference photos of the cockpit and landing gears. Other possible schemes for the BD-5 are also shown.
http://www.sml.lr.tudelft.nl/~home/rob/home.htm - Rob de Bie’s web page where he has in progress shots of his LS 1/72 BD-5 with cockpit and wheel well details being added!
http://home.regent.edu/ruthven/bd-5.html - Jon Ruthven’s BD-5 homebuilt aircraft project web page which has some good pictures of the BD-5, including cutaways and in progress build pictures. And I thought the 1/72 scale version was troublesome!
Copyright ModelingMadness.com. All rights reserved.
If you would like your product reviewed fairly and fairly quickly, please contact the editor or see other details in the Note to Contributors.
Back to Reviews Page 2020