MPM 1/72 Lockheed Vega variants
| KIT #: | ? |
| PRICE: | around $25.00 |
| DECALS: | See Review |
| REVIEWER: | Joel Hamm |
| NOTES: |
| HISTORY |
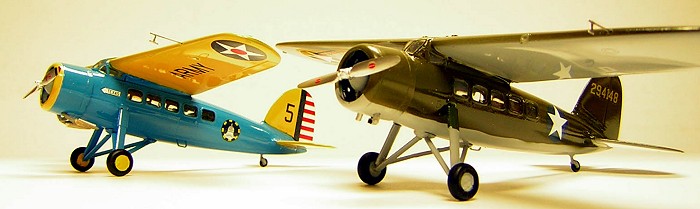
Best place for a detailed bio on both planes is the USAF Museum site, which is the first place Google will get you to. Briefly, the UC101 was a standard 1930’s wooden hulled Vega, similar to Wiley Post’s, impressed into wartime transport duty. The YC12 was a one time purchase of the metal fuselage version. The reason for the various designations was the merry-go-round transfer of the company form Lockheed to Detroit Aircraft, to Consolidated Aircraft, and back to Lockheed.
| THE KIT |
 MPM squeezed 4 Vega
versions out of one set of molds. The other two are the Winnie Mae / Lady
Lindy Aircraft, and a civilian airliner on floats. I bought the UC101 to
add to a shelf-full of drafted civilians wearing olive drab over neutral
grey; but when they released the YC12 I had to spring for one of those
too. Something about the blue and yellow paint scheme that hooks me. Maybe
it’s my wife’s blond hair and blue eyes.
MPM squeezed 4 Vega
versions out of one set of molds. The other two are the Winnie Mae / Lady
Lindy Aircraft, and a civilian airliner on floats. I bought the UC101 to
add to a shelf-full of drafted civilians wearing olive drab over neutral
grey; but when they released the YC12 I had to spring for one of those
too. Something about the blue and yellow paint scheme that hooks me. Maybe
it’s my wife’s blond hair and blue eyes.
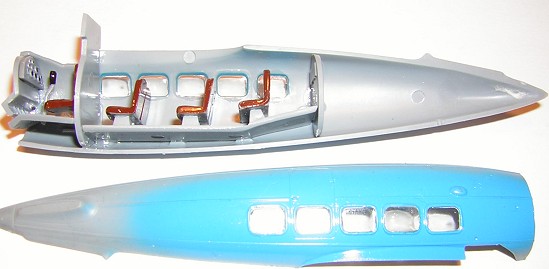
These kits are hawked as “High Technology” long run releases cast in metal molds, as opposed to their short run series squooshed into molds made of butylene fortified ear wax. The difference is apparent on opening the boxes (which haven’t changed from the squashable end-opening flimsy cardboard). Parts are sharp, free of flash, and most noticeable - attached by minute sprue gates, usually in the least offensive locations. Oh yes, the canopies and windows are injected rather than sucked. No resin or etched brass bits are provided. They are not needed. Engine cylinder fins and similarly fine engravings are adequately rendered in injected styrene.
 Everything fits together
just fine. There are still no situating slots, tabs, pins, or holes, but
the inner surfaces of the fuselage have locating ridges for the multiple
bulkheads and floorboards. Those inside surfaces also have the door
outline scribed into them, should the modeler choose to cut it open. Since
separate pieces are supplied for the doors, it would have been simpler to
cast the doorway open; but who can plumb the mind of an East European mold
maker?
Everything fits together
just fine. There are still no situating slots, tabs, pins, or holes, but
the inner surfaces of the fuselage have locating ridges for the multiple
bulkheads and floorboards. Those inside surfaces also have the door
outline scribed into them, should the modeler choose to cut it open. Since
separate pieces are supplied for the doors, it would have been simpler to
cast the doorway open; but who can plumb the mind of an East European mold
maker?
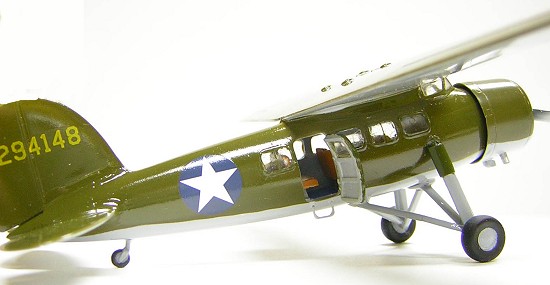
The “One set of sprues fits all variants” philosophy means each kit contains an assortment of landing gear, vertical fins, and even fuselage halves. Reason for the last is that the metal fuselage had longitudinal strakes that reinforced the butt joints. Don’t sand them off. No rivets are embossed, though the box art, and the few available Web photos, depict them as prominent. With the exception of a few access plate outlines, the wood wings and fuselages are smooth and free of all panel lines – as they were in real life. Control surface scribing can benefit from being deepened a dab. Make sure you pick the right parts for the desired version. The door location seems to have migrated from starboard to port side during the molt to metal skin.
 The four kits from one
mold technique also induces some errors. All fuselage halves have two
bumps. The forward one is where the main gear strut mounts. The rear one is
only used with the floatplane version, and must be removed. On the YC12 it
snuggles pretty close to the midline strake, so sanding it clean is a bit
of a tickle. Another error is the rearmost cabin window. On the YC12,
possibly also on the UC101, it is supposed to be square, rather than
rectangular. Ordinarily this would be a simple fix of just painting over a
millimeter or two of clear pane. The prominent surrounding frames
complicate matters. Since I discovered the glitch after the projects were
done, I have no suggestions to offer. Accuracy buffs will want to research
several other appurtenances. The UC101 has a carburetor intake duct poking
out of the cowl underside. The Instructions for the YC12 don’t show this
step. The parts locator map shows the duct, part 6, on the sprue, but it
just ain’t there. Figuring engines need a breathing nostril somewhere, I
Dremeled one from a snippet of resin pour block.
The four kits from one
mold technique also induces some errors. All fuselage halves have two
bumps. The forward one is where the main gear strut mounts. The rear one is
only used with the floatplane version, and must be removed. On the YC12 it
snuggles pretty close to the midline strake, so sanding it clean is a bit
of a tickle. Another error is the rearmost cabin window. On the YC12,
possibly also on the UC101, it is supposed to be square, rather than
rectangular. Ordinarily this would be a simple fix of just painting over a
millimeter or two of clear pane. The prominent surrounding frames
complicate matters. Since I discovered the glitch after the projects were
done, I have no suggestions to offer. Accuracy buffs will want to research
several other appurtenances. The UC101 has a carburetor intake duct poking
out of the cowl underside. The Instructions for the YC12 don’t show this
step. The parts locator map shows the duct, part 6, on the sprue, but it
just ain’t there. Figuring engines need a breathing nostril somewhere, I
Dremeled one from a snippet of resin pour block.
| CONSTRUCTION |
The first task is figuring out how the
affix the cabin windows. Neither the panes nor the openings have any
recesses, flanges, tabs, bevels, or other means of holding them in place. I
found that after cleaning the edges with a swipe of 600 grit san ding
stick, they are a pretty snug press fit; but luck would be the only
adhesive keeping them from popping out – or in. Flowing liquid or CA glue
around the edges
ding
stick, they are a pretty snug press fit; but luck would be the only
adhesive keeping them from popping out – or in. Flowing liquid or CA glue
around the edges
 would
fog them, so I coated the insides with low viscosity epoxy. This improved
their clarity, but raised hell with their refractivity. That’s not a real
problem, since you can’t see much inside anyway.
would
fog them, so I coated the insides with low viscosity epoxy. This improved
their clarity, but raised hell with their refractivity. That’s not a real
problem, since you can’t see much inside anyway.
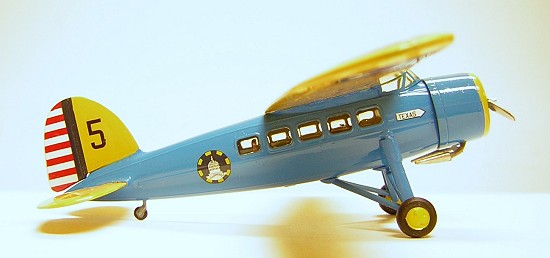
To remedy that problem I decided to build the UC101 with an open door. Even then not much is visible. The inside of the door has no detail, so I added some bogus framing made of Evergreen strip. I wasted considerable additional effort detailing and busying up the cockpit. The injected canopy is clear, but the optics aren’t exactly Bausch & Lomb. Still more time and work were frittered away filling and sanding the poor fit of the nose piece. When the cowl ring is slid into place over the engine it covers the gaping and mis-matched seam. Also sloppy up front is the fit of the engine in the cowl. Rather than the usual too-tight fit, this one is too loose. A ring of Evergreen 1.5 strip glued around the cylinder heads cured that.
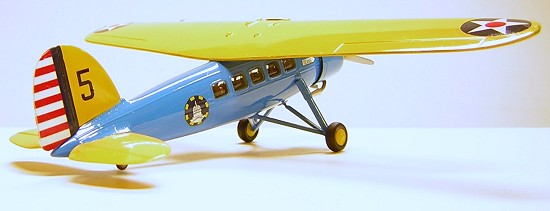
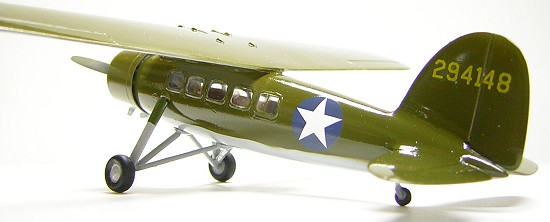
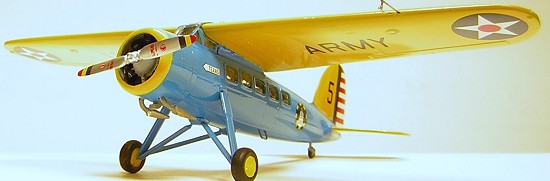
| COLORS & MARKINGS |
 The UC101 airframe was
built up before painting, but the yellow and blue scheme was more easily
and neatly done by painting the fuselage, wing, and tailplanes separately.
Another difference between the two was the masking of the cabin windows.
The former had its windows masked with a tape strip, was sprayed OD, then
the spaces between the windows were hand brushed when the tape was
removed. The results were a bit sloppy so the YC-12 fuselage got a
preliminary airbrushing before the windows were fit and masked. Paints were
Testors gloss enamels. OD is made by adding orange to bright green. Neutral
grey is just black and white. The YC12 marking guide quotes a Federal
Standard Light Blue number starting with a “3”. Couldn’t find it in any
reference; besides, that makes no sense because the prefix “3” denotes a
lusterless finish and the blue was supposed to be gloss. A “Russian
solution” (Gudenov) was whiting up some no-name blue until it matched a
shade labeled “light blue” in Squadron Signal’s Air Force Colors V1.
I neglected to note, or rather noted but don’t remember, who did the
decals. They’re not the usual Propagteam, but are printed every bit as
precisely, and behave considerably better, sliding tractably into place;
and reacting well to Superscale setting fluids. Future sealed everything
under a glass gloss.
The UC101 airframe was
built up before painting, but the yellow and blue scheme was more easily
and neatly done by painting the fuselage, wing, and tailplanes separately.
Another difference between the two was the masking of the cabin windows.
The former had its windows masked with a tape strip, was sprayed OD, then
the spaces between the windows were hand brushed when the tape was
removed. The results were a bit sloppy so the YC-12 fuselage got a
preliminary airbrushing before the windows were fit and masked. Paints were
Testors gloss enamels. OD is made by adding orange to bright green. Neutral
grey is just black and white. The YC12 marking guide quotes a Federal
Standard Light Blue number starting with a “3”. Couldn’t find it in any
reference; besides, that makes no sense because the prefix “3” denotes a
lusterless finish and the blue was supposed to be gloss. A “Russian
solution” (Gudenov) was whiting up some no-name blue until it matched a
shade labeled “light blue” in Squadron Signal’s Air Force Colors V1.
I neglected to note, or rather noted but don’t remember, who did the
decals. They’re not the usual Propagteam, but are printed every bit as
precisely, and behave considerably better, sliding tractably into place;
and reacting well to Superscale setting fluids. Future sealed everything
under a glass gloss.
| FINAL CONSTRUCTION |
 Only point worth
mentioning is that the canopy must go on before the wing. There’s no way
to squeeze it in afterwards. The kit pitot tubes were heavy handed, so I
spent a tedious evening supergluing together sub-microscopic lengths of
wire.
Only point worth
mentioning is that the canopy must go on before the wing. There’s no way
to squeeze it in afterwards. The kit pitot tubes were heavy handed, so I
spent a tedious evening supergluing together sub-microscopic lengths of
wire.
| CONCLUSIONS |
MPM’s “Long Run Technology” is a marked improvement over earlier releases. Add some locating tabs and pins, simplify window installation, and they will rival the best out of Japan or Italy.
December 2005
Copyright ModelingMadness.com
If you would like your product reviewed fairly and fairly quickly, please contact the editor or see other details in the Note to Contributors.
Back to the Review Index Page 2017