Amodel 1/72 Hydroplane SPL
|
KIT #: |
7271 |
|
PRICE: |
$11.00 several years back
|
|
DECALS: |
One option |
|
REVIEWER: |
Peter Burstow |
|
NOTES: |
Short run |
 Designed
by I. V. Chetverikov for submarine launching, 2 aircraft were built in 1934, the
first called OSGA 101, the second the SPL Gidro-1.
Designed
by I. V. Chetverikov for submarine launching, 2 aircraft were built in 1934, the
first called OSGA 101, the second the SPL Gidro-1.
The OSGA 101 had 3 seats and was first flown in
spring 1935. In September and October 1937 it achieved three FAI records in the
light amphibian class, Speed over a 100km course - 170.2 kph, Distance – 480 km,
Ceiling – 5400 m.
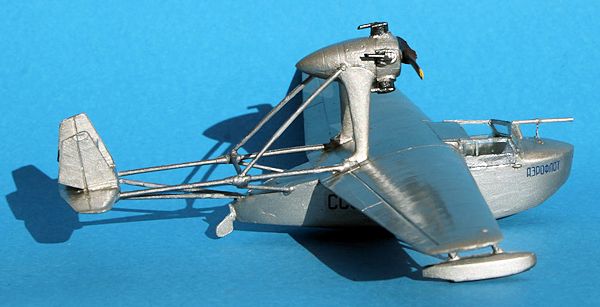
The SPL was much smaller with seating for two.
It was designed to fold and fit in a small hanger aboard a submarine. Poor
hydro-dynamics, and the lack of submarines to carry it, doomed the design. The
prototype was passed to
DOSAAF
(Voluntary Society for Collaboration with the Army, Air Force and Navy, which
sponsored aero clubs throughout the USSR).
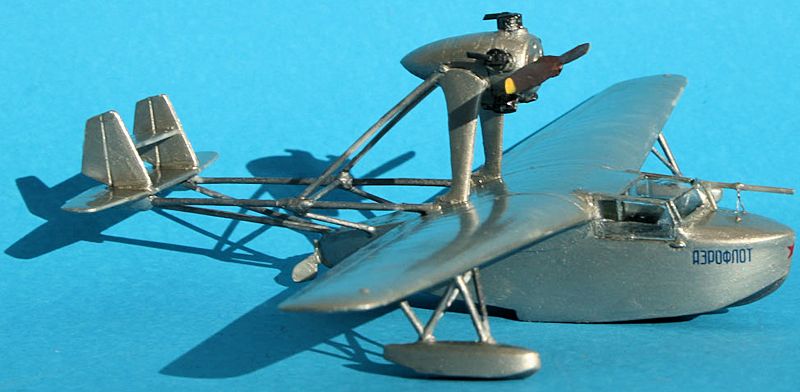
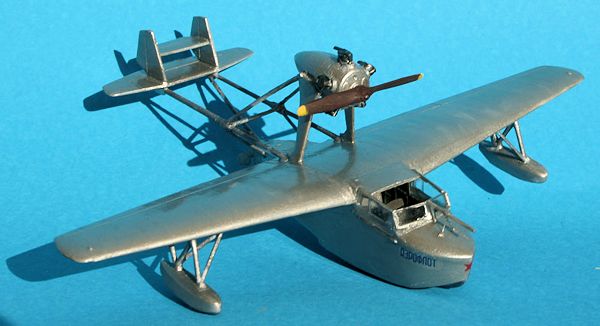
The kit represents the second prototype, and is very small, spanning 135mm or
just under 5 and ¼ inches.
Moulded in a light grey, soft plastic there
are 44 parts for this tiny flying boat. The plastic has a slightly rough surface
appearance, lots of flash, but the pieces seem to be well shaped and finely
detailed.
There is an understated fabric effect on the wing aft of the
spar, and framework detail on the cockpit side walls. There are small sink marks
on the underside of the flaps.
 Many
of the small thin parts such as exhaust pipes, pitot tube, and struts were not
really usable due to mould misalignment ledges, soft floppy plastic and large
sprue attachments, they probably could be made to work, but can more easily be
replaced with Evergreen rod.There are a number of holes or dents for extra parts
not supplied or mentioned in the instructions, elevator balance weights,
amphibious gear and control stick. So there is scope for further detailing
beyond what I attempted.
Many
of the small thin parts such as exhaust pipes, pitot tube, and struts were not
really usable due to mould misalignment ledges, soft floppy plastic and large
sprue attachments, they probably could be made to work, but can more easily be
replaced with Evergreen rod.There are a number of holes or dents for extra parts
not supplied or mentioned in the instructions, elevator balance weights,
amphibious gear and control stick. So there is scope for further detailing
beyond what I attempted.
Extra materials and products used
are;
0.3 and 0.4 mm Evergreen rod, fine wire,
Revell Contacta polystyrene glue,
Loctite 401 superglue,
Mercury MH16 superglue accelerator,
Tamiya acrylic paints,
Long Life floor polish,
Squadron Green Putty,
Mr Surfacer 1000,
Mr Hobby Mr Mark Setter and Softer,
Microscale Micro Krystal Klear,
Winchester size 9 lead shot.
Building commenced with the cockpit, two seat
back rests, and a fuel tank were fitted to the floor. The floor was painted
light grey as per the instructions. I painted the tank aluminium, the seats and
tank straps dark brown. I added masking tape lap straps, and a control stick
from wire.
The
next sub-assembly was the hull, made up of a planing bottom, two sides and a
rear deck. Dry fitting revealed this was not going to go well, as the curves
along the joints didn't match. I found that the cockpit would go in after the
hull was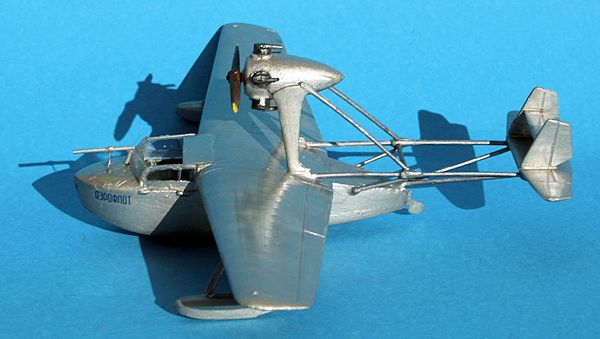 assembled, so it was set aside. I painted the inside of the sides around the
cockpit area light grey, and picked out the frame detail in dark brown.
assembled, so it was set aside. I painted the inside of the sides around the
cockpit area light grey, and picked out the frame detail in dark brown.
Starting at the step in the hull, I joined the
sides to the bottom with superglue, working along a little bit at a time towards
the ends, forcing the hull and side into contact. I needed to slice a little off
the sides at the front to make it all fit together, and ended up with a large
gap at the rear knife edge. The rear deck went on with no problems.
I filled the gap at the rear with a tiny piece
of plastic-card, and green filler. When it was all hard I sanded it into shape,
leaving a nice sharp knife edge at the rear of the hull. A thin bead of filler
over the joints, and a light sand finished the hull.
I then fixed the cockpit assembly into
place, there was no positive location, and I think it ended up too far back. I
then added the instrumant panel, without adding the supplied decal. I painted it
black and dry brushed silver highlights on the instruments.
There were 3 parts to the wing, an full span
upper surface with trailing edge, and two inset lower surfaces. There was a sink
mark along the underside of the upper surface, parallel with the edge, but very
shallow. I decided not to fix it as the filling and sanding would have destroyed
the detail. These parts wer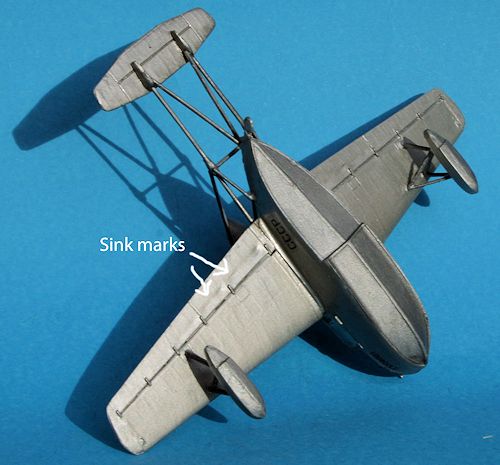 e
cleaned up, and fitted together well. The wing was then fitted to the fuselage,
leaving small gaps at the underside wing roots. These were given a smear of
filler and a light sand.
e
cleaned up, and fitted together well. The wing was then fitted to the fuselage,
leaving small gaps at the underside wing roots. These were given a smear of
filler and a light sand.
The engine and nacelle were tackled next. I
abandoned the cowling ring, as I like exposed cylinders, and the instructions
described it as optional. I made five new exhaust pipes from 0.3 mm plastic rod.
The cylinders needed a small mould step and a little flash cleaned up. The whole
lot came together nicely but again needed a tiny amount of filling and sanding.
The
little biplane tail assembly and the wing tip floats went together after
cleaning the flash and mould lines. Again more minor filling and sanding of the
joints.
Now the bit I had avoided for a week or so, the tail boom. A close look at the
only decent picture I could find, showed it to be made from what appeared to be
scaffolding pipe. I used the kit engine pylon, and main boom pieces, and made
the rest of the struts from 0.4 and 0.3 mm Evergreen rod. It took a bit of trial
and error to get it almost square. A blob of superglue on the joints held it all
together and the result was surprisingly strong.
The floats, engine pylon and tail boom were then
joined to the wings and fuselage and the assembly left a day or two to harden
up.
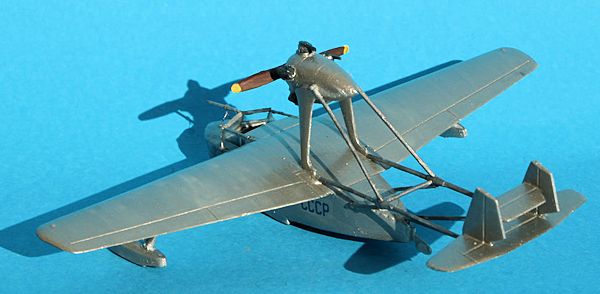 I painted
the model Gloss Titanium Silver on the fuselage and wings, with the planing
bottoms and tail boom pipes gloss Metallic Grey. Engine cylinders and exhausts
in Gunmetal.
I painted
the model Gloss Titanium Silver on the fuselage and wings, with the planing
bottoms and tail boom pipes gloss Metallic Grey. Engine cylinders and exhausts
in Gunmetal.
The decals went with no problem on the glossy
smooth surface. I used a little setting liquid to make sure they stayed put. The
red star on the nose got a little softener to make it conform to the sharp
angle. Once dry they were sealed with a little floor polish.
Like a lot of flying boats and float planes this
model was a tail sitter. I put a blob of superglue into the nose and dropped in
about 20 shot until it tipped forward.
 I
bought a 10kg pack of the shot years ago from a local gun shop, only cost a few
dollars and will probably last me forever. The shot is so small it will go into
little spaces and packs well. Good for last minute fixing of tail sitters.
I
bought a 10kg pack of the shot years ago from a local gun shop, only cost a few
dollars and will probably last me forever. The shot is so small it will go into
little spaces and packs well. Good for last minute fixing of tail sitters.
The kit clear parts went on with a little
sanding and trimming to make them fit. The propeller was painted a couple of
shades of brown to simulate wood, and attached. It was fixed horizontal as it is
too long, or the engine pylons too short, and it would touch the top of the
cockpit.
The rudder was cleaned up and added. I made a
new pitot from 0.3 mm Evergreen rod, and its struts were made from fine copper
wire.
A
little bit of touch up painting, and an overall coat of floor polish and it was
made.
It
turned out a nice little model, and a good exercise of basic scratch building
skills. It needed a small amount of joint filling and sanding, less than normal
for a short run kit, mainly because it is so small.
I
enjoyed the build and the model will sit near the front of the display case.
http://en.wikipedia.org/wiki/Chetverikov_SPL.
Vaclav Nemecek, The History of Soviet Aircraft from 1918, Key Publishing, London
1986.
Kit Instructions.
Peter
Burstow
February 2013
If you would like your product reviewed fairly and fairly quickly, please
contact
the editor or see other details in the
Note to
Contributors.
Back to the Main Page
Back to the Review
Index Page