
| KIT #: | 4246 |
| PRICE: | $14.00 MSRP |
| DECALS: | See review |
| REVIEWER: | Ben Brown |
| NOTES: | Liveries Unlimited sheet A4-078 used |
| HISTORY |
First flown in November 1986, the Fokker 100 is based on the smaller F28-4000. The F28’s fuselage was stretched to accommodate up to 122 passengers. In addition to many modernized systems, the F100 had an increased wingspan and Rolls Royce Tay engines to replace the original Speys. The new engines were more powerful, more economical, and met Stage 3 noise regulations. With a maximum takeoff weight of 95,000 lbs, the F100 had a cruise speed of 456 knots and a range of over 1500 miles. By the time Fokker went out of business in 1996, 283 F100s had been built.
The F100 was simple, reliable, and flew “like a big Cessna 172.” While not as
fast as a 727, or high-flying as a 757, it performed as advertised, and all of
the pilots I know who flew the F100 loved it. If memory serves (pardon the
pun), the F100 had only one Memory Item in the airplane’s emergency procedures.
A Memory Item is the list of things you are supposed to do after you say, “Oh
s***!!” but before you pull out the emergency checklist for a given emergency.
Just for comparison, our Canadair Regional Jets (CRJ) had 24 different Memory
Items covering engine failures, fires, and such, each with as many as ten steps
to accomplish before referring to the checklist. One interesting “habit” the
Fokker had was in the summer, on a humid day, condensation would freeze inside
the air conditioning ducts above the overhead compartments while the plane was
sitting on the ground. During the takeoff roll, when the nose came up, the
chunks of ice would roll down the ducts to the back of the plane. All of the
passengers 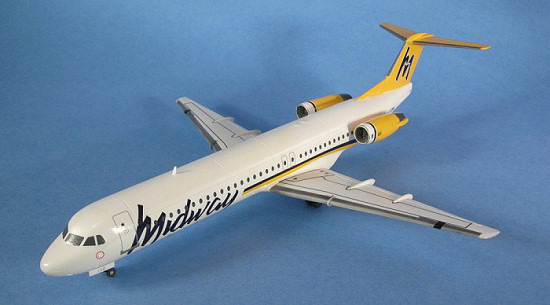 would look up at
the ceiling as this rattling noise moved past them down the cabin to the back of
the plane. Flight attendants would often make an announcement over the PA to
calm anyone who might have been concerned about the noise.
would look up at
the ceiling as this rattling noise moved past them down the cabin to the back of
the plane. Flight attendants would often make an announcement over the PA to
calm anyone who might have been concerned about the noise.
Fokker 100s were operated by several U.S. airlines, including American Airlines, USAir, and Midway Airlines, and are still flying for many other airlines around the world. Back in the early ‘90s, when USAir was still operating Piedmont’s old F28s, there was a Charlotte, NC (CLT) Approach controller who often referred to them as Little Motor Fokkers, while the F100s were Big Motor Fokkers. “Henson, you got that Big Motor Fokker in sight?” “Sure do!” “Well, follow that Fokker cleared for the visual to two-three tower’s eighteen one anna good-daaay!”
Resurrected from the rubble of a previous company of the same name, Midway Airlines began flying five Fokker 100s out of Chicago’s Midway Airport in 1993. After struggling through a rough year in Chicago, the company was purchased and moved to Raleigh-Durham International Airport in central North Carolina. There, they operated eight Fokker 100s, several A320s, and eventually 24 CRJs. Even though the airline operated several different types of jet, the Fokker was the company’s “trademark” aircraft; the one most people would think of when Midway was mentioned. Fokkers even starred in a couple of humorous television commercials back when Midway bothered to advertise. In 1999, Midway began buying 737-700s with the intention of replacing the F100s. After Fokker’s demise, spare parts were at a premium, and it became more and more expensive to operate the F100. I was told at the time that it would almost cost less to just park the Fokkers and pay rent on them than it cost to fly them on revenue flights. Midway became known for industry-leading service and performance, but unfortunately, its management team wasn’t nearly as competent as its pilots, flight attendants, and ground personnel. The company filed for Chapter 11 bankruptcy protection in August 2001 and parked four of its F100s. It continued to operate the four others F100s, along with the 737s and CRJs, until the airline shut down the next month following the 9/11 attacks. After a failed attempt to make a come-back flying only 737s, and a second failure as a commuter for USAirways, the bankruptcy judge shut Midway down for good on October 29, 2003.
| THE KIT |
Revell-Germany’s Fokker 100 comes molded in white plastic, with a clear sprue that contains a windscreen, and navigation light lenses. Typical of Revell, passenger windows are holes in the fuselage. The kit can be built with the landing gear up or down, but no stand is included. The landing gear struts are thin and scale-looking, but the gear doors are much too thick and should be replaced with styrene sheet. The sprue that contains the landing gear parts and engine nacelles looks like it was made by a limited production company using low-pressure injection. There is a lot of flash, the nacelle halves don’t quite match, and the overall quality just isn’t up to that of the other sprues. There are only 48 parts in the kit, so construction goes along pretty quickly.
| CONSTRUCTION |
I’m new to
airliner modeling, but it hasn’t taken me long to form an opinion in the holes
vs. decals window debate. So, before starting any construction, I filled all of
those little window holes with super glue. Next time, I’ll just push Milliput
putty out through the windows and sand it smooth. The super glue worked okay,
but I had to go back over it several times with more super glue and putty to
fill pinholes. Once the windows were filled and sanded, I installed the nose
gear well (It is possible to put it in backwards if
 we are not paying attention to
what we are doing, but we don’t need to talk about that, do we?), glued a couple
of fishing weights in the nose, and then closed up the fuselage. The stabilizer
can be added later in the assembly process, but I went ahead and installed it
because everything up there was going to be painted the same color. I didn’t
think to blank off the APU exhaust on the right side of the fuselage above the
engine, so now you can see the white fuselage interior through the hole. The
windscreen part needs some tweaking to get it to fit properly. Since I was
going to paint over it anyway, I used super glue to fair the part into the
fuselage. I think Minicraft’s method of using a single, large clear part that
makes up most of the fuselage around the windscreen is a lot better than trying
to jam an ill-fitting sliver of brittle clear plastic in place. I think Revell
is coming around, since their newer 737-800 kit uses Minicraft’s method. One
small problem that didn’t crop up until the decaling stage is the antennae on
the sides of the tail will interfere with any kind of logo decal that is applied
there. They are too thick anyway, so replace them with some new ones made from
thin styrene sheet after the decals are applied.
we are not paying attention to
what we are doing, but we don’t need to talk about that, do we?), glued a couple
of fishing weights in the nose, and then closed up the fuselage. The stabilizer
can be added later in the assembly process, but I went ahead and installed it
because everything up there was going to be painted the same color. I didn’t
think to blank off the APU exhaust on the right side of the fuselage above the
engine, so now you can see the white fuselage interior through the hole. The
windscreen part needs some tweaking to get it to fit properly. Since I was
going to paint over it anyway, I used super glue to fair the part into the
fuselage. I think Minicraft’s method of using a single, large clear part that
makes up most of the fuselage around the windscreen is a lot better than trying
to jam an ill-fitting sliver of brittle clear plastic in place. I think Revell
is coming around, since their newer 737-800 kit uses Minicraft’s method. One
small problem that didn’t crop up until the decaling stage is the antennae on
the sides of the tail will interfere with any kind of logo decal that is applied
there. They are too thick anyway, so replace them with some new ones made from
thin styrene sheet after the decals are applied.
I assembled the engines and had to do a lot of sanding and filling on them. These are the only real problem areas on the kit. The underside of one nacelle half was shaped differently than its mate, so I had to build the other half up with super glue and sand everything to shape. The seams inside the intakes and exhausts are pretty bad, requiring liberal doses of Mr. Surfacer to fill. The aft sections around the thrust reverser actuator fairings also needed a lot of cleanup due to the below-average molding quality. You could hold off adding the engines to the fuselage until after painting, but you’d have to do quite a bit of test-fitting and sanding to get a decent fit. I went ahead and glued the engines to the fuselage and filled any gaps since they can be easily masked for painting.
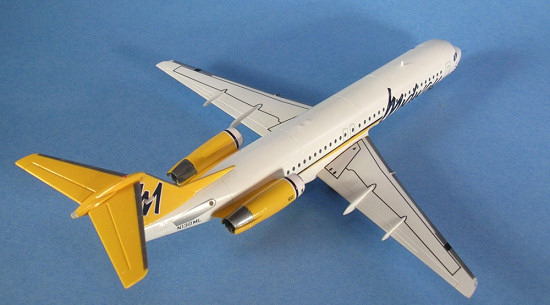
The wings are nicely-detailed, but the lower wing parts are a little thick toward the tips. I had to sand them down quite a bit to get them to fit flush with the depressions in the upper wing halves. Separate flap fairings are provided, and these go on with just a little trimming and sanding. The wing fences provided are about six scale inches thick, so I cut some new ones with styrene sheet. The wing fit the fuselage fairly well, with just a little filler on the belly, just forward and aft of the wing. The contour of the wing didn’t match those of the fuselage in some spots, but I was able to fix this while sanding the filler putty. Once the wing was in place, it was off to the paint hangar.
| COLORS & MARKINGS |
I primed
my model with several coats of Floquil Reefer White, followed by a couple of
coats of Model Master Insignia White. Unlike Midway’s 737s and A320s, the
Fokkers had white wings, which saved me a lot of masking. After a couple of
days’ drying time, I 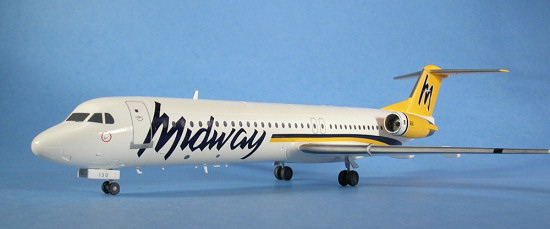 masked
the engines and tail and painted them using Testors Yellow (1114) in the little
square bottle. The leading edges of the wings and tail were painted with
Metalizer Aluminum, and I used Metalizer Magnesium on the thrust reversers. In
a surprisingly short time, the model was ready for some decals.
masked
the engines and tail and painted them using Testors Yellow (1114) in the little
square bottle. The leading edges of the wings and tail were painted with
Metalizer Aluminum, and I used Metalizer Magnesium on the thrust reversers. In
a surprisingly short time, the model was ready for some decals.
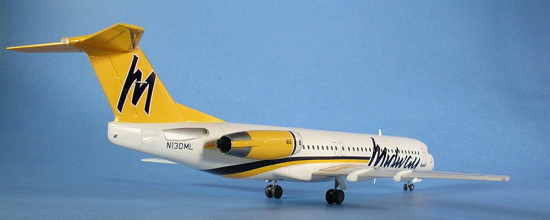
I used Liveries Unlimited’s decals, following the application instructions. The instructions mention the Midway logo covered part of the passenger door outline and scuff plate, but on some jets, it didn’t. I chose a jet that had the door markings over the logo merely because I had some good photos of it. The logo uses a window to “dot the I,” so I had to juggle the positions of the logo and the window decal to get everything in the right position. Liveries’ decals are very thin, and mostly went down without any trouble. It took quite a bit of swearing and Microscale’s Micro Set to get the engine stripes to lay down right, but all of the other decals went right down and fit perfectly. The decal sheet also provided wing walks, a few stencils, and even windshield wipers. Once the decals were dry, I sprayed the model with a coat of Future to seal everything.
| FINAL CONSTRUCTION |
The
landing gear parts were on the same sprue as the engines, so the struts needed a
lot of clean-up and the tires were not round. The gear struts are too short,
making the model squat down like a CRJ rather than sitting up like a proper
Fokker. On the
 full-size
F100, there
is a gap visible between the top of the outboard main gear tire and the bottom
edge of the gear doors. I used a small section of
brass tube to extend the nose gear strut about 1mm, and
extended the main gear struts by almost 1.5mm by gluing a little block of
plastic inside the main gear wells. This helped the look of the model
tremendously. When I build my next Fokker, I’ll just build new struts from
brass tube. A single anti-collision beacon is provided in the kit, but it looks
much too large, so I made a couple of new ones using clear sprue then painted
Tamiya Clear Red. The clear nav light on the tip of the tail needed some
tweaking to match the shape of the trailing edge of the fin. Finally, I
replaced all of the antennae I had knocked off with new ones made from .010
styrene
full-size
F100, there
is a gap visible between the top of the outboard main gear tire and the bottom
edge of the gear doors. I used a small section of
brass tube to extend the nose gear strut about 1mm, and
extended the main gear struts by almost 1.5mm by gluing a little block of
plastic inside the main gear wells. This helped the look of the model
tremendously. When I build my next Fokker, I’ll just build new struts from
brass tube. A single anti-collision beacon is provided in the kit, but it looks
much too large, so I made a couple of new ones using clear sprue then painted
Tamiya Clear Red. The clear nav light on the tip of the tail needed some
tweaking to match the shape of the trailing edge of the fin. Finally, I
replaced all of the antennae I had knocked off with new ones made from .010
styrene
| CONCLUSIONS |
These little nano-scale airliner models are a fun, fairly easy break from my usual 1/48 military airplane habit. I am seriously hooked! The Revell kits go together without too much filling and sanding, and there are not a lot of tiny parts to get bogged down with. One of these Revell airliner kits can usually be built and ready for paint in an afternoon or two. If you’ve never built an airliner, give one of Revell’s kits a try sometime.
| REFERENCES |
Airliners.net http://www.airliners.net
Airliner Café http://www.airlinercafe.com/index.php
March 2006
Model and decals courtesy of my wallet.
If you would like your product reviewed fairly and fairly quickly, please contact the editor or see other details in the Note to Contributors.