| KIT #: | 079/04639 |
| PRICE: | $ |
| DECALS: | Two/Three options |
| REVIEWER: | Brian Baker |
| NOTES: | Conversion using both kits |
| HISTORY |
Another
more bizarre AT-6 conversion that I became aware of recently, the biplane
conversion, was rebuilt in 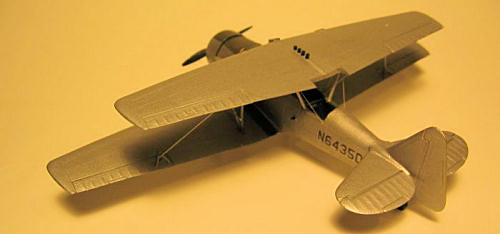 pays off, as a check of the US
Civil Register on-line shows that number currently assigned to a Cessna 172.
This is common, as when aircraft are scrapped and registrations are cancelled,
the numbers are thrown back into the FAA’s “open file” when they are reassigned
to other aircraft. Years ago, I
began collecting paper copies and Microfische disks of the FAA’s US Civil
registers, and my 1963 and 1964 issues. Along with the Warbirds Guide,
listed this aircraft, N6435D, as c/n
88-17079, an AT-6D originally ordered by the Army as 42-85295, but later
assigned to the Navy as SNJ-5, B/N 84995.
It was probably retired from the Navy in the mid fifties, stored at
pays off, as a check of the US
Civil Register on-line shows that number currently assigned to a Cessna 172.
This is common, as when aircraft are scrapped and registrations are cancelled,
the numbers are thrown back into the FAA’s “open file” when they are reassigned
to other aircraft. Years ago, I
began collecting paper copies and Microfische disks of the FAA’s US Civil
registers, and my 1963 and 1964 issues. Along with the Warbirds Guide,
listed this aircraft, N6435D, as c/n
88-17079, an AT-6D originally ordered by the Army as 42-85295, but later
assigned to the Navy as SNJ-5, B/N 84995.
It was probably retired from the Navy in the mid fifties, stored at
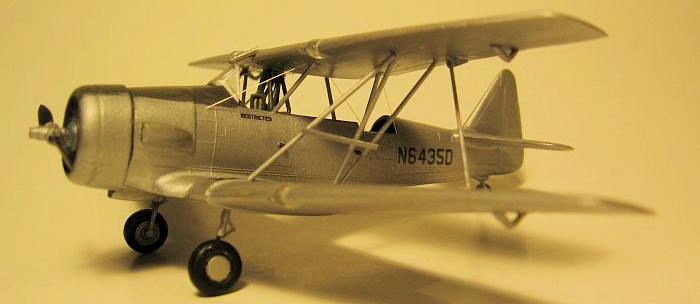
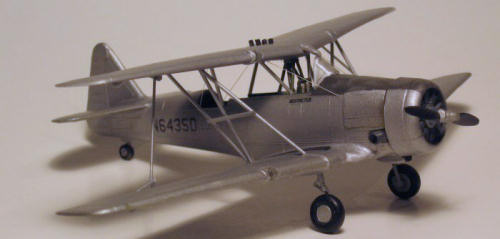
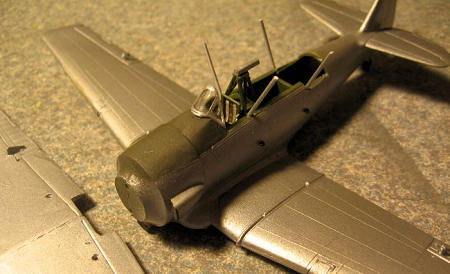
The
airplane retained the basic configuration of the AT-6D, with only the cockpit
and addition of the upper wing changing its appearance.
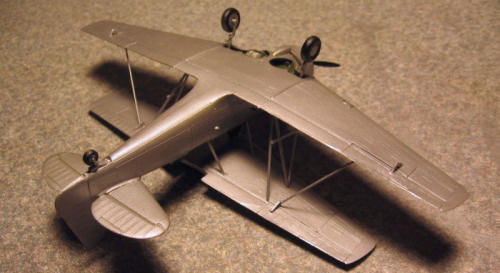
The additional wing consisted of two outer wing panels from another
airplane, and enough struts to stabilize the structure.
The wing produced a negative stagger,
much like a Beech D-17S, probably to move the CG back so that the spray tank
 could be made larger, and a heavier load could be carried.
Cabane struts braced the center section, and large “N” struts were
installed outboard. Ailerons were
interconnected by a smaller strut, and some bracing wires were installed between
the cabane struts. There were no
landing gear doors, and the cockpit was completely open except for the standard
windshield. Only the front seat
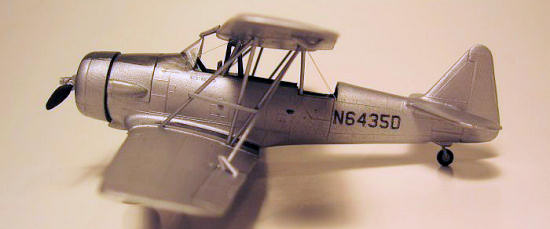
remained. The entire airplane looks fairly weatherbeaten, with an OD anti-glare
which is badly chipped, and a very faded “N6435D” on the rear fuselage side.
At that time, although not visible in the photos, the plane would have
only had a fuselage number, with no other markings on the wings or anywhere
else, although there is a hint of a small “Restricted” underneath the cockpit
window, which would be regulation for this aircraft. The entire airplane is
silver or unpainted. It truly looks
like a working airplane.
could be made larger, and a heavier load could be carried.
Cabane struts braced the center section, and large “N” struts were
installed outboard. Ailerons were
interconnected by a smaller strut, and some bracing wires were installed between
the cabane struts. There were no
landing gear doors, and the cockpit was completely open except for the standard
windshield. Only the front seat
remained. The entire airplane looks fairly weatherbeaten, with an OD anti-glare
which is badly chipped, and a very faded “N6435D” on the rear fuselage side.
At that time, although not visible in the photos, the plane would have
only had a fuselage number, with no other markings on the wings or anywhere
else, although there is a hint of a small “Restricted” underneath the cockpit
window, which would be regulation for this aircraft. The entire airplane is
silver or unpainted. It truly looks
like a working airplane.
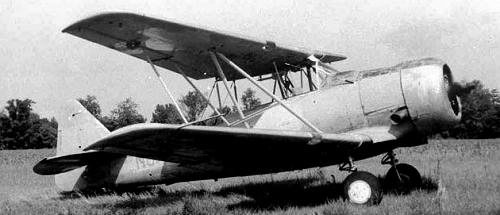
My source
of information on the airplane comes from a set of three black and white photos
of the airplane, showing the plane from the front, side, and rear.
Years ago, most airplane
photographers would shoot three to five views of each airplane, and whoever shot
these certainly was helpful in providing the modeler with enough information for
a good conversion.
| THE KIT |
No information provided. Check the Preview Archives on the basic kit.
| CONSTRUCTION |
Although
I became aware of another conversion of an AT-6 kit in 1/72 scale after I
started the preparation process, I decided to do my research independently.
It started with constructing a 1/72 scale drawing of the aircraft.
I have a set of 1/72 scale three views of the AT-6, so I cut and pasted
to the point that a reasonably accurate drawing was made.
This was helpful mainly in getting the
 wing in the proper location, as
mounting the wing was probably the most difficult part of the conversion.
Mounting positions of the struts were located on the drawings using the
photos as a guide. The photos and
three view were used throughout the building process to avoid guesswork.
wing in the proper location, as
mounting the wing was probably the most difficult part of the conversion.
Mounting positions of the struts were located on the drawings using the
photos as a guide. The photos and
three view were used throughout the building process to avoid guesswork.
I
detailed the cockpit with sidewall details, using the excellent seat, control
stick, and instrument panel. The
cowling, however, were hopeless, so I substituted one from an old Hawk kit,
which looks very good. The prop is OK, but I substituted a better one from the
spares box, although I’m not sure what
kit it came from. I painted the
insides in “interior green”, leaving the rear cockpit section open.
I did use the small bulkhead that the kit provides, although I don’t have
photographic proof of its existence either way. However, the wing obscures most
of the rear cockpit anyway, so it is not really an issue. I did use the front
windshield, cutting it off from the entire canopy unit, and installed it after
painting the antiglare olive drab.
Quite a bit of filler was required, and some trimming was needed to remove the
mounting lugs for the rocket racks on the undersides of the wings.
 Once the
basic airframe was assembled, filled, and painted, it was time to attach the
upper wing. I marked the points
where the struts attached, and drilled small holes as anchor points. I had
planned to use Tenax, but ended up using small spots of super glue, as this
makes, I believe, a stronger structure.
Once the
basic airframe was assembled, filled, and painted, it was time to attach the
upper wing. I marked the points
where the struts attached, and drilled small holes as anchor points. I had
planned to use Tenax, but ended up using small spots of super glue, as this
makes, I believe, a stronger structure.
I didn’t
have any specialized strut material, so I used plastic rod of the correct size.
Cutting the cabane struts to size, and measuring them with dividers, I
attached these to the fuselage in the proper locations, allowing them to set up.
Since the airplane retained its roll bar behind the pilot’s seat, I used
that as a sort of measure to help stabilize the whole structure.
I then attached the forward cabane struts, and after letting the whole
thing set up overnight, I began on the outboard “N” struts.
These I cut to length and fitted individually, a tedious trial-and-error
process. But with the mounting holes drilled, it was really fairly easy.
The aileron rods were also installed, but as the photos show some kind of
fixture on both upper and lower ailerons, I added these first and then glued the
connecting struts in place.
| COLORS & MARKINGS |
After a last coat of silver, I removed the masking tape from the landing lights, as they show as being retained, although I can’t imagine that they were actually hooked up. I then made the decal license numbers on my computer, spray coated them after they dried, and applied them to the fuselage sides. Also, I used decal stock to represent the wing walks, which were black and quite worn.
| FINAL CONSTRUCTION |
Then I
attached the bracing wires to the fuselage, and the project was complete.
| CONCLUSIONS |
August 2011
If you would like your product reviewed fairly and quickly, please contact me or see other details in the Note to Contributors.