MPM 1/72 Lockheed Vega
| KIT #: | 72523 |
| PRICE: | 6 Maltese Liri |
| DECALS: | see review |
| REVIEWER: | Carmel J. Attard |
| NOTES: | Short run |
| HISTORY |
The
Lockheed Vega is regarded amongst the most famous airplanes in history in view
of records established by various pilots. Vega is a single engine, shoulder wing
monoplane that was basically made of wood with very smooth, having a streamlined
design for its time. The first prototype made its maiden flight on the 4th
of July 1927. There were five designs in all, and the series 5 differed from its
predecessors in that the Vaca engine was installed. The Vega was also
extensively used for transporting USAAF
 personnel, freight and on postal trips
apart from other service in Argentina, Mexico and Canada. A few saw service in
WWII in USAF and RAAF.
personnel, freight and on postal trips
apart from other service in Argentina, Mexico and Canada. A few saw service in
WWII in USAF and RAAF.
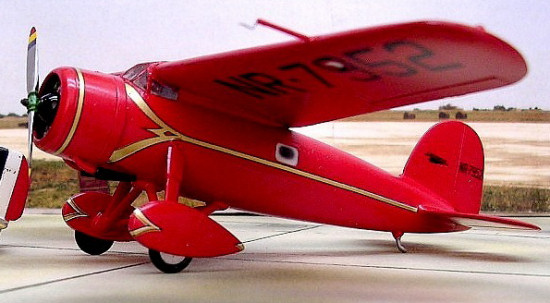
The most famous version is the Vega type 5B that was later converted into the ‘C’ version and named "Winnie Mae" which was flown by pilot Wiley Post and Navigator Harold Getty. These two circled the world between the 23rd June and 1st of July 1931.and the feat being repeated with only W. Post at the controls. Later the same Post flew the Vega on high altitude flying. Today this aircraft is on permanent display at the Smithsonian Air and Space Museum in Washington DC.
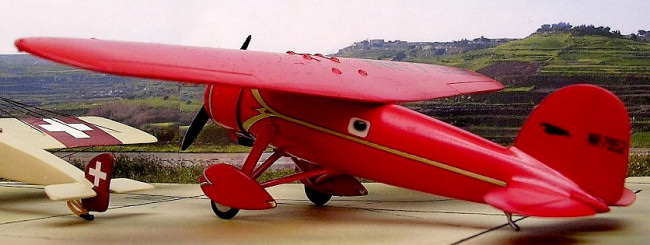
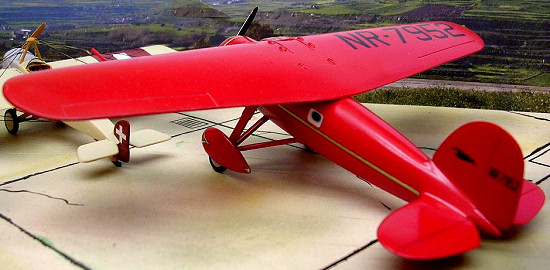
Another Vega, an 5B version was equally famous when Emilia Earhart, who apart from establishing various speed records for women flying solo flights in the Vega named "Lady Lindy". The flight over the Atlantic took 15 hours and 18 minutes flying from Harbor Grace, in Newfoundland to Londonderry spanning a distance of 1100 Km.
| THE KIT |
The Vega is an injection-moulded kit, which comes as the MPM kit number72523-Vega "Winnie Mae", and "Lady Lindy" models 5. It is a very welcomed kit since apart from the previously issued version MPM 72522; these remain the only types issued in injection-moulded form at the scale of 1/72. Previous release of the Vega was the Rareplanes vacform kit. The kit comes in a sizeable box having a picturesque artwork depicting the "Winnie Mae" banking over a wide ocean backdrop. The detail shown is more than sufficient to refer to when it comes to detail the model and positioning the decals in particular if it is decided to model NR-105W.
 The kit
can be completed in any four liveries that are provided for in the decals that
come with it. Three of these are “Winnie Mae" at different stages of liveries
with variations in the windows these carry or with a different size tail fin and
rudder. These all had short engine exhaust pipes whereas the other decal obtion
is for "Lady Lindy" with longer exhaust pipes. One has to decide which version
to do at an early stage and in my case I selected to do mine as "Lady Lindy".
This is basically an overall red colourscheme with otherwise gold trimmings
supplied in decal sheet apart from the large black registration letters on the
wings. In selection this version I needed to blank eight window portholes
retaining only one window on each side of the fuselage. This version also needed
the longer exhaust pipes that come under the engine cowling.
The kit
can be completed in any four liveries that are provided for in the decals that
come with it. Three of these are “Winnie Mae" at different stages of liveries
with variations in the windows these carry or with a different size tail fin and
rudder. These all had short engine exhaust pipes whereas the other decal obtion
is for "Lady Lindy" with longer exhaust pipes. One has to decide which version
to do at an early stage and in my case I selected to do mine as "Lady Lindy".
This is basically an overall red colourscheme with otherwise gold trimmings
supplied in decal sheet apart from the large black registration letters on the
wings. In selection this version I needed to blank eight window portholes
retaining only one window on each side of the fuselage. This version also needed
the longer exhaust pipes that come under the engine cowling.
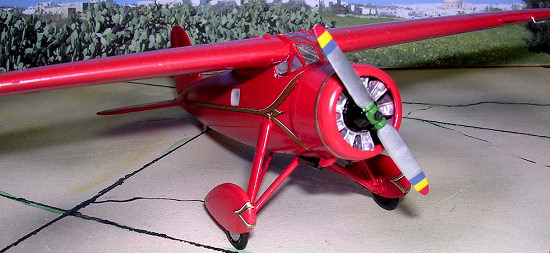
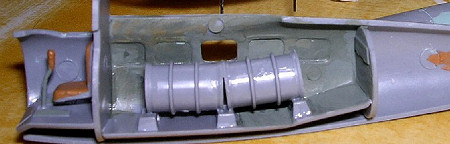
The kit is moulded in light grey plastic with fine inscribed lines. Making either of the long distance versions require modifying the interior layout of the aircraft. This is made simple as the kit provides parts to install two cylindrical fuel tanks in tandem, which are mounted on brackets integral with the cabin floor in place of the normal passenger seats. A separate cockpit consisting of seat, control console and instrument panel is provided and to its rear is a bulkhead, which separates it from the fuel tank compartment. There are three sets of seats, which are surplus in this case and are intended for other version issued in a different livery.
| CONSTRUCTION |
 The
engine cowling is slightly oval in shape and care has to be taken to ensure that
it is correctly fixed in place. This should taper towards the front when
viewed from the side. A separate cabin door is provided shou
The
engine cowling is slightly oval in shape and care has to be taken to ensure that
it is correctly fixed in place. This should taper towards the front when
viewed from the side. A separate cabin door is provided shou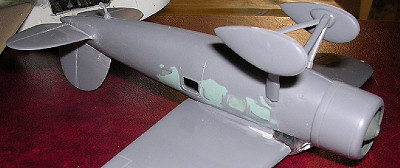 ld one wish to cut
the one from the fuselage and fit it open to show the interior fuel tankage
compartment. Like other MPM kits the tailplanes are butt jointed to
ld one wish to cut
the one from the fuselage and fit it open to show the interior fuel tankage
compartment. Like other MPM kits the tailplanes are butt jointed to
 the
fuselage. The top and bottom wings along with the cockpit transparency are
together cemented in position. Two small failings on both sides beneath the fuselage windows were sanded away. These are probably introduced to take struts
that hold the floats in the event a float version is released in future. Finally
the undercarriage components are fixed in place. This I must say was not a
straightforward job since I had to drill 1mm diam. blind locating holes, which
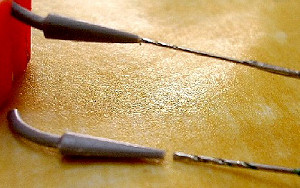
were absent on the spatted wheel parts. Incidentally the long exhaust stacks
were also drilled at the outlet as shown in photo.
the
fuselage. The top and bottom wings along with the cockpit transparency are
together cemented in position. Two small failings on both sides beneath the fuselage windows were sanded away. These are probably introduced to take struts
that hold the floats in the event a float version is released in future. Finally
the undercarriage components are fixed in place. This I must say was not a
straightforward job since I had to drill 1mm diam. blind locating holes, which
were absent on the spatted wheel parts. Incidentally the long exhaust stacks
were also drilled at the outlet as shown in photo.
| COLORS & MARKINGS |
 The
instruction sheet suggests a bright Fokker red giving Humbrol 19 as the right
type. I used Modelmaster equivalent, which gave very satisfactory finish with an
airbrush. Probably this was one of the most simple aircraft kits I have
completed lately and basically all the extra work it needed was blanking the
windows and adding filler to get a smooth finish around the area.
The
instruction sheet suggests a bright Fokker red giving Humbrol 19 as the right
type. I used Modelmaster equivalent, which gave very satisfactory finish with an
airbrush. Probably this was one of the most simple aircraft kits I have
completed lately and basically all the extra work it needed was blanking the
windows and adding filler to get a smooth finish around the area.
| CONCLUSIONS |
This was an interesting addition to my collection and made a nice companion to the previously built Comper Swift built earlier. Both aircraft came from the same era and with a background of aviators striving for long distance records.
May 2006
Copyright ModelingMadness.com. All rights reserved. No reproduction without express permission.
If you would like your product reviewed fairly and fairly quickly, please contact the editor or see other details in the Note to Contributors.