Aeroclub 1/72 Monospar ST 25
| KIT #: | ? |
| PRICE: | £6.00 |
| DECALS: | None provided |
| REVIEWER: | Carmel J. Attard |
| NOTES: | Vacuformed kit with metal parts |
| HISTORY |
In
1935 General Aircraft Ltd flew the prototype of a new aircraft which carried the
designation Monospar ST25. This was a light twin engined five- seat cabin
monoplane designed from the ST10, and which won the 1934 King’s Cup Race. This
advanced type and the name Jubilee being allocated to mark the Silver Jubilee of
King George V’s reign. It differed from previous designs in
 having a folding
seat at the rear to accommodate a 5th passenger when required, the
cabin windows extended further to the rear, and a power plant based on two
Pabjoy Niagara II radial engines. It was popular and production continued until
1939.
having a folding
seat at the rear to accommodate a 5th passenger when required, the
cabin windows extended further to the rear, and a power plant based on two
Pabjoy Niagara II radial engines. It was popular and production continued until
1939.
During the course of time there were a few changes in the basic design but in 1936 to improve directional stability in an engine out situation, the standard tail was replaced by one of new design incorporating twin end plate fin and rudder units. In this configuration the ST25 had the name Universal. It also introduced the more powerful Niagara III engines. Production totalled 59 aircraft: 30 Jubilee and some 29 Universal machines. An ambulance version of the ST25 was developed incorporating large door to the starboard side to ease loading of a stretcher patient and a seat was provided for a medical attendant. Examples of all types were exported to several countries including Spain which proved useful during the civil war, to Switzerland, to Canada as a transport version and to Australia and New Zealand for commercial use. The entire ambulance production run went for export.
| THE KIT |
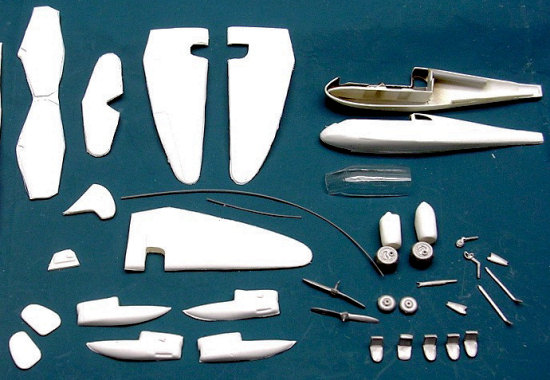
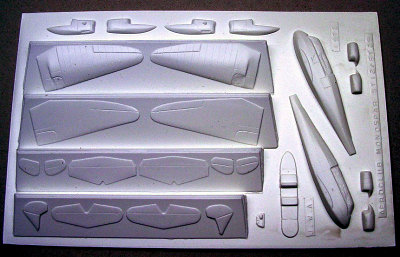 The 1/72 scale Aeroclub kit of the ST12 and ST25 comes packed
in a sealed polytene bag consisted of a sheet of white plastic which contained
the vac form principal parts like main and tail planes, fuselage halves, cockpit
floor, rear bulkhead, seats, single fin or two fin tail unit and Gypsy spare
engines. There was a contrail strip of th
The 1/72 scale Aeroclub kit of the ST12 and ST25 comes packed
in a sealed polytene bag consisted of a sheet of white plastic which contained
the vac form principal parts like main and tail planes, fuselage halves, cockpit
floor, rear bulkhead, seats, single fin or two fin tail unit and Gypsy spare
engines. There was a contrail strip of th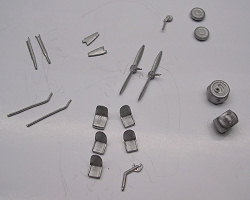 in plastic rod and a small polytene bag
contained white metal pieces which included the little Pabjoy 7 cylinder radials
which were carefully reproduced in scale and detail, the undercarriage struts
and wheels, A pair of propellers, alternative undercarriage for the ST12 version
and control wheel. A vacform clear Perspex completes the kit. No decals come
with the kit unfortunately. The 4 page instruction sheet has a brief history and
construction information on one side and a good drawing to 1/72 scale on another
sheet and an isometric view of the aircraft on another side. The kit would have
certainly yearned for an exploded view so much sought by any first timer with
cottage industry type of kits. Detail with this vac form kit was very pleasing
though. The fuselage has detail that represent the monospar construction of the
rear part, and has tubular framework forward with single girder from cabin to
tail as well as fabric covering over light secondary structure. The wing upper
and lower detail corresponds with the pyramid bracing and former ribs of
duralumin and fabric covering. The kit was issued circa 1972-73 and I got the
copy by chance from one of the stalls when I attended the Malta Merlin event at
Duxford in May 2004.
in plastic rod and a small polytene bag
contained white metal pieces which included the little Pabjoy 7 cylinder radials
which were carefully reproduced in scale and detail, the undercarriage struts
and wheels, A pair of propellers, alternative undercarriage for the ST12 version
and control wheel. A vacform clear Perspex completes the kit. No decals come
with the kit unfortunately. The 4 page instruction sheet has a brief history and
construction information on one side and a good drawing to 1/72 scale on another
sheet and an isometric view of the aircraft on another side. The kit would have
certainly yearned for an exploded view so much sought by any first timer with
cottage industry type of kits. Detail with this vac form kit was very pleasing
though. The fuselage has detail that represent the monospar construction of the
rear part, and has tubular framework forward with single girder from cabin to
tail as well as fabric covering over light secondary structure. The wing upper
and lower detail corresponds with the pyramid bracing and former ribs of
duralumin and fabric covering. The kit was issued circa 1972-73 and I got the
copy by chance from one of the stalls when I attended the Malta Merlin event at
Duxford in May 2004.
| CONSTRUCTION |
 In line with standard method of construction used for vacform
kits, the parts were first outlined with a dark soft pencil and scored around
with a modelling knife and broken away from the backing sheet. These are sanded
to required thickness particularly at trailing and leading edges of the wing
parts. The parts are small and in order to handle them easily these are held
from the surface with a masking tape formed in the shape of an inverted ‘T’ so
that the vertical part of the tape is held between fingers and the horizontal
part of the tape is stuck to the kit part. Then sand down on a medium sanding
paper. When sanding down the fuselage parts the cockpit waste area is retained
intact until the edges of the two halves are sanded to a good fit. When this is
achieved the cockpit waste area is removed ensuring that the rim for
transparency is left intact. In the end the rear quarter light window (one on
both sides) is cut.
In line with standard method of construction used for vacform
kits, the parts were first outlined with a dark soft pencil and scored around
with a modelling knife and broken away from the backing sheet. These are sanded
to required thickness particularly at trailing and leading edges of the wing
parts. The parts are small and in order to handle them easily these are held
from the surface with a masking tape formed in the shape of an inverted ‘T’ so
that the vertical part of the tape is held between fingers and the horizontal
part of the tape is stuck to the kit part. Then sand down on a medium sanding
paper. When sanding down the fuselage parts the cockpit waste area is retained
intact until the edges of the two halves are sanded to a good fit. When this is
achieved the cockpit waste area is removed ensuring that the rim for
transparency is left intact. In the end the rear quarter light window (one on
both sides) is cut.
 The
nest step is to detail the cockpit area. The cockpit floor was scored, bent up
and glued to the rear part from the rear cabin bulkhead. The floor was glued to
one half of the fuselage mating the rear bulkhead which touches the cabin top.
The main spar on the floor was in line with the indentations in the cabin sides.
This later corresponded with the outer spar that reaches each engine nacelle. At
this point the entire cabin interior was painted. This had leather colour
interior. The seats fit side by side in front of the box spar and another pair
at the rear of the
The
nest step is to detail the cockpit area. The cockpit floor was scored, bent up
and glued to the rear part from the rear cabin bulkhead. The floor was glued to
one half of the fuselage mating the rear bulkhead which touches the cabin top.
The main spar on the floor was in line with the indentations in the cabin sides.
This later corresponded with the outer spar that reaches each engine nacelle. At
this point the entire cabin interior was painted. This had leather colour
interior. The seats fit side by side in front of the box spar and another pair
at the rear of the 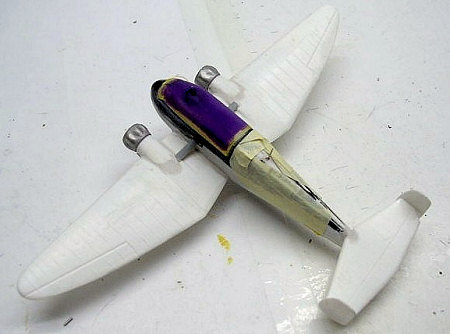 spar.
The swing over control wheel and instrument panel were fitted under the
windscreen lip. These were painted black and instruments added using white and
black detail. The fuselage halves were joined together. A hole was drilled for a
lower wing location spar. A rod was used for this stub spar.
spar.
The swing over control wheel and instrument panel were fitted under the
windscreen lip. These were painted black and instruments added using white and
black detail. The fuselage halves were joined together. A hole was drilled for a
lower wing location spar. A rod was used for this stub spar.
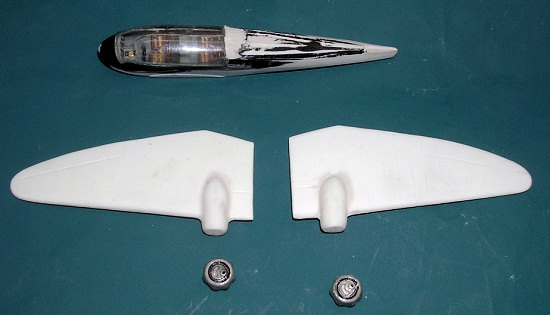
The wing panels were trimmed and sanded down. The waste from the nacelle mounting point was trimmed before joining the top and bottom wing. Once joined to form two wings one for each side, a hole is drilled to each wing root for the lower stub spar. The twin tail unit was trimmed and glued and the complete tail unit was attached to the fuselage. Small bracing studs on upper and lower were added to tail unit using measured lengths of steel wire. Main wing panels were fixed in the lower stub spar. This was allowed to dry and the nacelles fitted and gaps filled with putty. Two exterior upper struts were cut from surplus backing sheet and glued to nacelle and the fuselage sides. Cabin transparency was carefully trimmed to fit and secured with liquid cement and any gaps were filled with PVA glue. The rear quarter light window was filed with Kristal Kleer. The metal undercarriage unit was attached using super glue. Foot steps to rear root of wing were added from steel wire bent to shape. Exhaust pipes were cut from strip pieces and added to lower of each nacelle.
| COLORS & MARKINGS |
 The
cockpit canopy was masked with Tamiya tape and the kit was airbrushed in semi
matt white undercoat. The area in red was then airbrushed using Humbrol red No
174. This was left to dry overnight and a marked area was masked so that the
remaining part of the kit was airbrushed in
The
cockpit canopy was masked with Tamiya tape and the kit was airbrushed in semi
matt white undercoat. The area in red was then airbrushed using Humbrol red No
174. This was left to dry overnight and a marked area was masked so that the
remaining part of the kit was airbrushed in
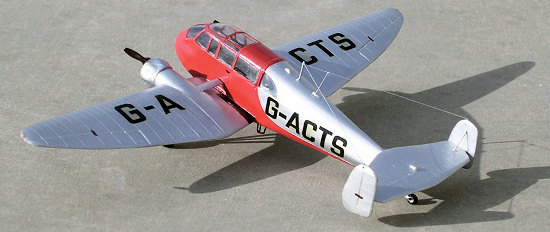
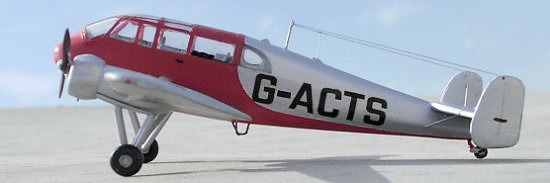
‘Polporina’ silver which is a local Hemple brand paint. The masking was then removed and the whole kit was given a coat of glanzer. Black walkway strips were cut from Xtradecal black strip and two different black letter registration sizes were picked from a Hales Frogflite decal sheet to decorate the fuselage sides and upper and lower wings. Finally the two bladed brown props were fixed in place and the wheels added to the u/c assembly.
| CONCLUSIONS |
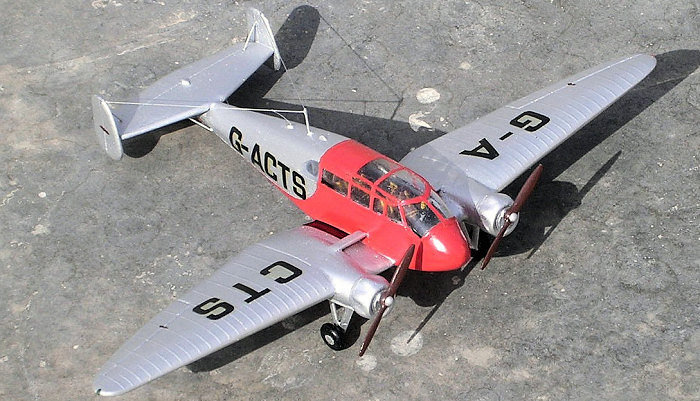
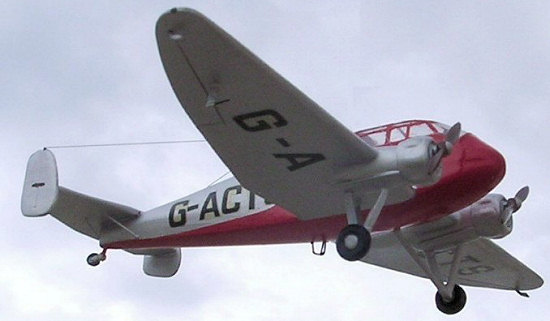 The
St 25 colour scheme that I chose to finish the kit represents one with
registration G-ACTS. This aircraft was originally a G.A.L. Monospar ST10
prototype of 1934. The aircraft was converted to ST25 from ST10 after it won the
1934 Kings Cup Air Race. The end result was pleasing and this has added another
important aircraft in my ‘between wars’ aircraft section.
The
St 25 colour scheme that I chose to finish the kit represents one with
registration G-ACTS. This aircraft was originally a G.A.L. Monospar ST10
prototype of 1934. The aircraft was converted to ST25 from ST10 after it won the
1934 Kings Cup Air Race. The end result was pleasing and this has added another
important aircraft in my ‘between wars’ aircraft section.
| REFERENCES |
Aircraft of the British Empire by Leonard Bridgman 1936
Air Britain Digest Vol XII March 1960
No3.Encyclopaedia of world Aircraft.
July 2007
Copyright ModelingMadness.com. All rights reserved.
If you would like your product reviewed fairly and fairly quickly, please contact the edito or see other details in the Note to Contributors.