| KIT #: | ? |
| PRICE: | $ |
| DECALS: | One option |
| REVIEWER: | Frank Spahr |
| NOTES: |
| HISTORY |
Dr Jones embarks to Asia – building
Minicraft´s Boeing Clipper in a diorama inspired by
Raiders of the Lost Ark
Traveling both in style and using cutting-edge technology
in the 1930ies meant using PAA´s Clippers. For a very selective group
 of
very well to do passengers, they offered the fastest and most luxurious air
transport available at the time, at a fare comparable to that later charged
for using the Concorde.
of
very well to do passengers, they offered the fastest and most luxurious air
transport available at the time, at a fare comparable to that later charged
for using the Concorde.
The original aircraft, used from 1935 on, was the Martin M-130. It was superseded by the Sikorsky S-42 and by the huge Boeing 314, the best known of them. The term “China Clipper” has been applied to all the aircraft.
The twelve Boeing Clippers only operated briefly in their intended role prior to the outbreak of WW2; during the war, some were ceded to the British, and they were used for military purposes such as VIP transport. After the war, with so many airfields constructed in the remotest locations and with significantly improved aircraft performance, floatplanes were rendered obsolete and all the Clippers were sadly scrapped. Today, only a full scale mockup in an Irish museum is left.
| THE KIT |
 In model form, the Boeing Clipper has been produced by
Airfix for a long time, it was originally issued in 1967; more recently, Minicraft has done some work on the molds, removing the gazillion rivets and
adding finely raised panel lines, and now offers the kit under their brand.
Its fit is generally OK, with the clear parts (typically) being very thick.
The particular boxing I purchased had decals for the airliner version plus
for a camouflaged presidential transport. I have no idea how those camo
decals would fit and look like.
In model form, the Boeing Clipper has been produced by
Airfix for a long time, it was originally issued in 1967; more recently, Minicraft has done some work on the molds, removing the gazillion rivets and
adding finely raised panel lines, and now offers the kit under their brand.
Its fit is generally OK, with the clear parts (typically) being very thick.
The particular boxing I purchased had decals for the airliner version plus
for a camouflaged presidential transport. I have no idea how those camo
decals would fit and look like.
I bought this kit on an impulse whilst cruising the
vendors´ tables at the Luebeck model show; the scale seemed to promise a
rather smallish model and I felt the desire for a bit of a change. Plus I
very well remembered the scenes from the Indiana Jones movies in which the
hero travels around the world, with the aircraft leaving a red line on the
map. And one of them, I was sure, the one from the first trip to Asia in the
fir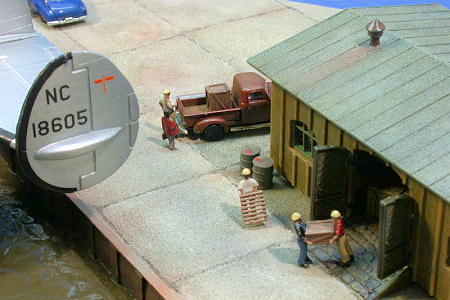 st movie, was a Boeing Clipper. My idea was to build a diorama inspired
by the boarding scene upon Dr. Jones´ departure for Asia, where he would
meet Marion Ravenwood and cause the wrecking of her tavern, amongst other
exploits.
st movie, was a Boeing Clipper. My idea was to build a diorama inspired
by the boarding scene upon Dr. Jones´ departure for Asia, where he would
meet Marion Ravenwood and cause the wrecking of her tavern, amongst other
exploits.
Well, first of all, even in 1:144, the Clipper turned out to be a fairly large aircraft. Moreover, the movie aircraft wasn´t and couldn´t have been a Boeing Clipper.
What the audience sees is a Short Solent flying boat from the late 1940ies, shot on dry land and that shot composited with a matte painting of the pier scene. Even if there had been a Clipper to shoot the scene, the movie´s setting in 1936 precludes the type´s operational history, as the first Boeing Clipper only operated in 1939. But nonetheless the short scene looked the part, even if I might have noticed earlier on that the movie aircraft had auxiliary floats which the Boeing Clipper lacked.
| CONSTRUCTION |
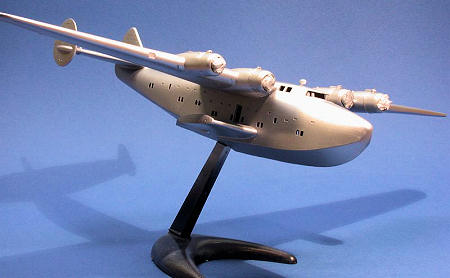 So I built the Clipper mostly OOB; the upper fuselage seam
needed some puttying, sanding and rescribing, but apart from that it was a
mostly hassle-free build. The two small antennas above the cockpit were
replaced by fine wire, and I decided to replace all the overly thick
transparent parts. To this end, I added cockpit bracing from stretched
sprue. After completion, all the windows were carefully filled with a thin
layer of white glue. In this respect I found out that not all brands of glue
dry as crystal clear as desired – better do some tests. The open door to
starboard was thinned out, but nothing was done about the complete lack of
an interior.
So I built the Clipper mostly OOB; the upper fuselage seam
needed some puttying, sanding and rescribing, but apart from that it was a
mostly hassle-free build. The two small antennas above the cockpit were
replaced by fine wire, and I decided to replace all the overly thick
transparent parts. To this end, I added cockpit bracing from stretched
sprue. After completion, all the windows were carefully filled with a thin
layer of white glue. In this respect I found out that not all brands of glue
dry as crystal clear as desired – better do some tests. The open door to
starboard was thinned out, but nothing was done about the complete lack of
an interior.
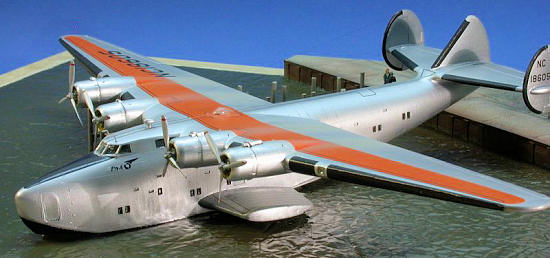
The flying boat was primed with enamels and sprayed with
JPS Acrylic silver. Prior to decaling, Future was added for a good gloss.
The kit decals, even though sometimes a hassle, were used, even for de-icer
boots, anti-glare panel and wing markings. Micro Sol worked well on them.
Luckily Vallejo´s Amaranth Red is a very close match for the orange wing
panel, so I was able to repair gaps in the decals around the engine
nacelles. The decals were sealed with Future and later with Xtracrylix satin
co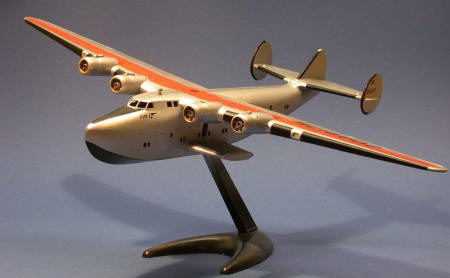 at. Weathering was minimal and mostly consisted of some slight and not too
dark exhaust staining. Aerials were made from Caenis ultra-thin fly fishing
thread, glued with white glue and tightened by heat from a dental waxing
instrument. That stuff is about as thin as stretched sprue, but about ten
times as strong. The downside is that styrene glue does not dissolve it,
which is very handy while working with stretched sprue in trimming off
excess.
at. Weathering was minimal and mostly consisted of some slight and not too
dark exhaust staining. Aerials were made from Caenis ultra-thin fly fishing
thread, glued with white glue and tightened by heat from a dental waxing
instrument. That stuff is about as thin as stretched sprue, but about ten
times as strong. The downside is that styrene glue does not dissolve it,
which is very handy while working with stretched sprue in trimming off
excess.
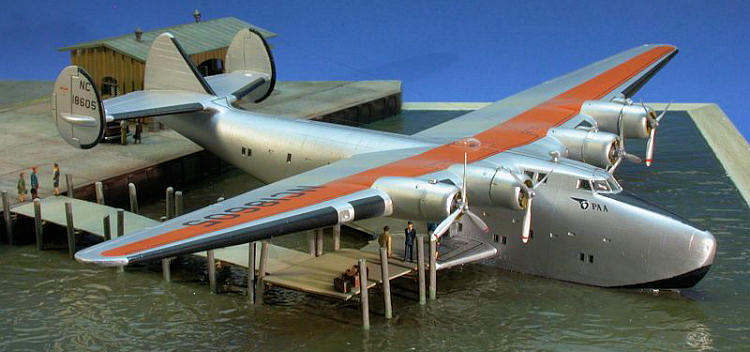
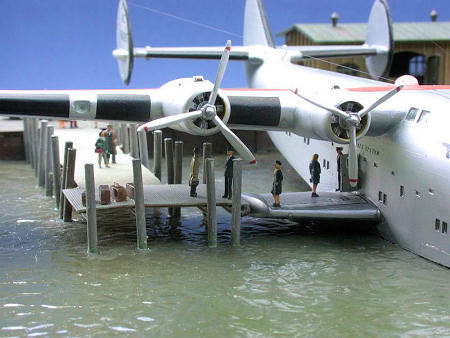
The base was constructed using my usual method from a
picture frame and plaster cast against finely crumpled aluminum foil. The
harbour water was painted using some of the more brownish and gooey RLM
shades in my stock. After drilling the holes for the pier (see below), it
was heavily sealed with many layers of gloss clear laquer.
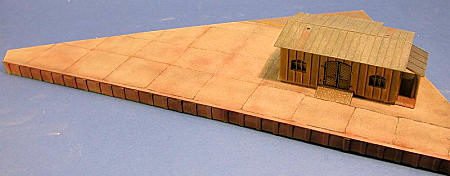 The jetty was made from foam board, with the cardboard
cover removed from the upper side and the fine styrofoam appropriately
carved. Toothpicks are perfectly suited for this job. The front of the jetty
was detailed using various sorts of styrene stock. It was painted and
weathered mostly by airbrush with a number of shades of acrylics and enamels
I thought came handy.
The jetty was made from foam board, with the cardboard
cover removed from the upper side and the fine styrofoam appropriately
carved. Toothpicks are perfectly suited for this job. The front of the jetty
was detailed using various sorts of styrene stock. It was painted and
weathered mostly by airbrush with a number of shades of acrylics and enamels
I thought came handy.
The shed is a nicely done N scale model railroading kit
from a German manufacturer. It is molded in colour. I assembled this kit OOB
and just drybrushed it with various oil paints to remove the toylike look.
Weathering was done using pastel chalks.
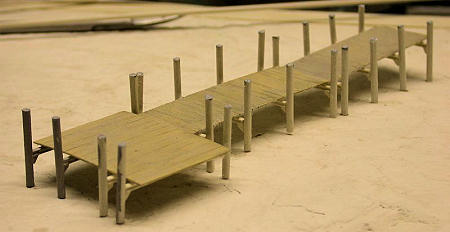
The pier was built from various Evergreen styrene stock, painted with acrylics and weathered in various ways, not the least using washes. First I made a sketch drawing of the layout, then a cardboard template, marked the poles and then started building. The poles were sunk into holes drilled into the fairly soft plaster.
Upon determining where the flying boat had to go, I removed its underwater part with a power sander until it sat snugly on the water. The Clipper was then glued to the base using acrylic gel, some remaining gaps were closed using white glue.
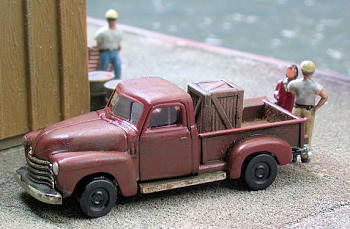
 I had hoped for some period vehicles
to make that pier a bit more lively. In the end, the only N scale
vehicles available in Germany was a set of a
limousine and a pickup. Both looked a bit post 1930´s, but being the only
game in town, I had to make do with what I had. Ordering the set at my local
hobby shop, delivery took a very long time and stalled the project.
I had hoped for some period vehicles
to make that pier a bit more lively. In the end, the only N scale
vehicles available in Germany was a set of a
limousine and a pickup. Both looked a bit post 1930´s, but being the only
game in town, I had to make do with what I had. Ordering the set at my local
hobby shop, delivery took a very long time and stalled the project.

In the meantime I had bought three sets of N scale figures.
A set of assorted workers was meant to provide some background action, a
generic set of travellers would do their best to stand in for the classy
Clipper passengers, and a set of contemporary railroad personnel would play
the roles of 1930ies PAA crew. Those pre-painted figures looked more than a
bit toylike due to their rather gaudy colours, so some had to be partially
repainted. After that, they were m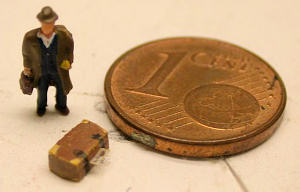 ercilessly washed with a black oil wash.
That did a great job of enhancing what details the figures had and
furthermore toned down the paintjob. An acrylic clear flat coat completed
work on the figures. I built some suitcases from styrene stock and PE
handles to make the jetty a bit more lively.
ercilessly washed with a black oil wash.
That did a great job of enhancing what details the figures had and
furthermore toned down the paintjob. An acrylic clear flat coat completed
work on the figures. I built some suitcases from styrene stock and PE
handles to make the jetty a bit more lively.
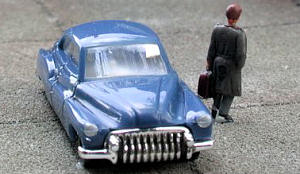
When the cars arrived, I decided to
use the pickup as the workers´ mount and
 the limo as a vehicle just having
delivered a passenger (maybe even Dr Jones?) to the aircraft.
So the limo only received a black wash to pop
out radiator grill details, and the glossy plastic was left as is. The
pickup underwent treatment both with several washes and several pastel
chalks to end up with a used and slightly battered look.
the limo as a vehicle just having
delivered a passenger (maybe even Dr Jones?) to the aircraft.
So the limo only received a black wash to pop
out radiator grill details, and the glossy plastic was left as is. The
pickup underwent treatment both with several washes and several pastel
chalks to end up with a used and slightly battered look.
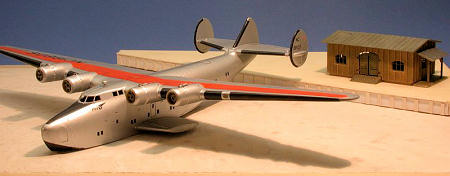
 Everything came together one Saturday afternoon; using
white glue, the vehicles and figures were mounted to the base. Several
touchups were needed after examining the images – some figures only now
showed ejector pin marks, some were misaligned or displayed a definite
four-pint-list, some lint appeared in totally unsuitable places, and some
gaps had to be filled. There was nothing I could do about the misaligned
decal on the starboard rudder, sadly.
Everything came together one Saturday afternoon; using
white glue, the vehicles and figures were mounted to the base. Several
touchups were needed after examining the images – some figures only now
showed ejector pin marks, some were misaligned or displayed a definite
four-pint-list, some lint appeared in totally unsuitable places, and some
gaps had to be filled. There was nothing I could do about the misaligned
decal on the starboard rudder, sadly.
| CONCLUSIONS |
In the end, I managed to shoot images
I felt I could display without retiring into a hole in the ground and
growing a prophet´s beard for shame – whatever glitches and other
embarrassments are still visible now I have
to and will live with. If I could obtain a
period yellow cab, I´d love to add it to the base.
| REFERENCES |
 http://en.wikipedia.org/wiki/Boeing_Clipper
http://www.boeing.com/history/boeing/m314.html
http://www.theraider.net/films/raiders/making_6_postproduction.php
http://en.wikipedia.org/wiki/China_Clipper
http://en.wikipedia.org/wiki/Martin_M-130
http://www.geocities.com/CapeCanaveral/lab/4515/martin.htm
http://www.flyingclippers.com/M130.html
http://www.flyingclippers.com/B314.html
Thanks to Rick Brownlee for his help!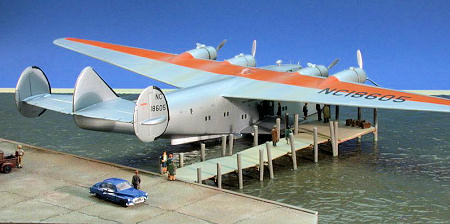
August 2008
If you would like your product reviewed fairly and quickly, please contact me or see other details in the Note to Contributors.