| KIT #: | 04053 |
| PRICE: | $22.00 AUD |
| DECALS: | Two Lufthansa options |
| REVIEWER: | Alwin Broeckelmann |
| NOTES: |
| HISTORY |
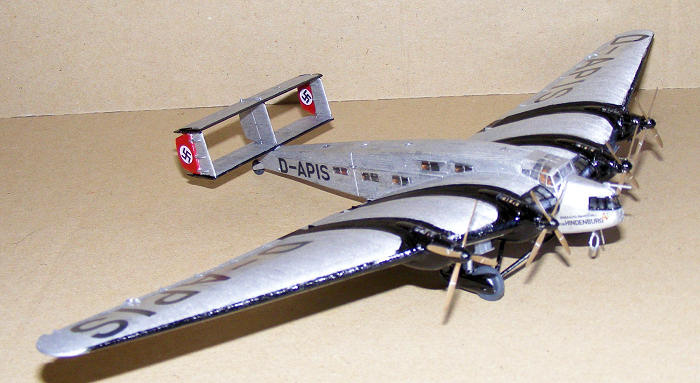
The Junkers G-38 was the largest
land-based plane of its time. Using Junkers “Deep-wing” patent of 1909, engineer
Ernst Zindel designed a large aircraft built completely of metal in which the
engines, fuel and latter passengers were housed in the wing. In contrast to the
concepts of the time that safe long distance flight over oceans was only
possible with flying boats. Hugo Junkers consequently followed the path of
developing a land-based long distance aircraft. The construction of the first
G-38 with the works number 3301 was completed in October of 1929. After first
rolling tests on 04 November Chief pilot Zimmerman took the aircraft on its
maiden flight on  system
for the newly designed tandem undercarriage and retractable radiators were used
for the first time. A further peculiarity was the pointed, which swept forward
toward the wingtips. In 1929 the Junkers aircraft engine factory at
system
for the newly designed tandem undercarriage and retractable radiators were used
for the first time. A further peculiarity was the pointed, which swept forward
toward the wingtips. In 1929 the Junkers aircraft engine factory at
 Amsterdam-London
from the summer of 1931. An extra attraction was glazed leading edge section of
the wing between the fuselage and inboard engines, originally designed as an
observation platform for passengers during flight was refitted with seats for
six passengers. Due to the success of its luxuriously equipped giant aeroplane
Lufthansa decided to have a second model built, experience gained with D-2000
led to several modifications in the new design. The passenger capacity was
increased to 32, the new model carried the factory number 3302 and arrived as
D-2500 and entered service with Lufthansa in the summer of 1932 for both charter
and scheduled flights. Passengers were allowed to move about freely during
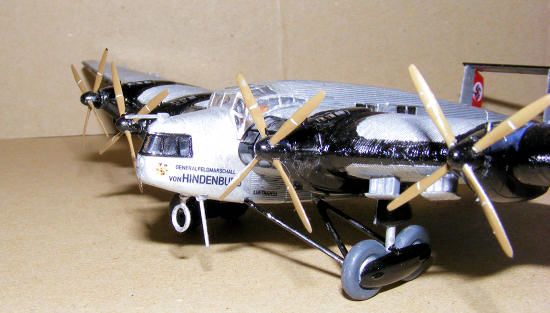
flight and a steward from MITROPA attended to the passenger’s welfare. The G-38
gave exemplary service and quickly became a popular and attractive flagship to
German Lufthansa AG, in 1934 the L88 engines of D2500 were replaced with four
Jumo 204 diesel engines and the registration changed to D-APIS. In 1935, D-AZUR
(D-2000) also received Jumo engines, the aircraft however had to be written off
as a total loss after an accident during take off on a flight to the workshops
in
Amsterdam-London
from the summer of 1931. An extra attraction was glazed leading edge section of
the wing between the fuselage and inboard engines, originally designed as an
observation platform for passengers during flight was refitted with seats for
six passengers. Due to the success of its luxuriously equipped giant aeroplane
Lufthansa decided to have a second model built, experience gained with D-2000
led to several modifications in the new design. The passenger capacity was
increased to 32, the new model carried the factory number 3302 and arrived as
D-2500 and entered service with Lufthansa in the summer of 1932 for both charter
and scheduled flights. Passengers were allowed to move about freely during
flight and a steward from MITROPA attended to the passenger’s welfare. The G-38
gave exemplary service and quickly became a popular and attractive flagship to
German Lufthansa AG, in 1934 the L88 engines of D2500 were replaced with four
Jumo 204 diesel engines and the registration changed to D-APIS. In 1935, D-AZUR
(D-2000) also received Jumo engines, the aircraft however had to be written off
as a total loss after an accident during take off on a flight to the workshops
in
Mitsubishi Ki20
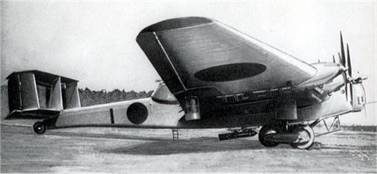 Following
the successful test flights of the G38 Junkers advised Zindel to develop a
special G38 for military purposes under the designator K51. Already in 1928
Mitsubishi from
Following
the successful test flights of the G38 Junkers advised Zindel to develop a
special G38 for military purposes under the designator K51. Already in 1928
Mitsubishi from
| THE KIT |
This kit is a nice offering from Revell, and comes on 2 sprues in grey and 1 clear. 1st with the wings and ailerons, 2nd with major components and the last with the transparencies. A nice sheet of decals for 2 versions of this aircraft. There is minimal moulding flash on any of the parts my biggest disappointment is the fact that the transparencies are as thick as the bottom of a coke bottle and give almost no vision into the detailed interior. The plastic is very soft so care needs to be taken when sanding or cutting, and the transparencies are very brittle. Instructions are good and in an 8 page A4 lay-out, 1st page is description of aircraft, 2nd is paint I.D. details, 3rd is lay-out of sprues, 4th-6th is instructions in19 separate steps the last 2 being painting and decal application guides for both versions. They are very good and clear instructions for the most just a couple of minor ones that you need to look and look again then check photos to confirm.
| CONSTRUCTION |
 I
commenced as I always do with a good study of the instructions and parts, so as
to get a feel before starting anything. 1st
build step was to dry fit the passenger and cockpit section to the fuselage 1/4s
as the fuselage is built of 5 pieces. Being the passenger/cockpit, port and
starboard sections, then roof and underside. These parts all fit together nicely
so I pre-painted all of these as per instructions, some strange ideas those
Germans the fuselage walls are 4 different colours red, medium grey, dark grey
and aluminium as you move from the passenger entry doors to the nose, different
classes I guess. While they dried I moved onto painting the floor and seats of
the pax/cockpit section, roof and the tail wheel easy enough task, lay that
aside to dry and then glue the windows into the fuselage sides as instructed.
Once all that has dried glue the centre section to one side then the other side
to it, remembering to put the tail wheel in at this point. Make sure you give
the glue full setting time as the windows can pop out of position if you
haven’t. Then while they set, put the roof windows in glue the under side to the
centre section and then the roof to it and the fuselage is all but complete.
I
commenced as I always do with a good study of the instructions and parts, so as
to get a feel before starting anything. 1st
build step was to dry fit the passenger and cockpit section to the fuselage 1/4s
as the fuselage is built of 5 pieces. Being the passenger/cockpit, port and
starboard sections, then roof and underside. These parts all fit together nicely
so I pre-painted all of these as per instructions, some strange ideas those
Germans the fuselage walls are 4 different colours red, medium grey, dark grey
and aluminium as you move from the passenger entry doors to the nose, different
classes I guess. While they dried I moved onto painting the floor and seats of
the pax/cockpit section, roof and the tail wheel easy enough task, lay that
aside to dry and then glue the windows into the fuselage sides as instructed.
Once all that has dried glue the centre section to one side then the other side
to it, remembering to put the tail wheel in at this point. Make sure you give
the glue full setting time as the windows can pop out of position if you
haven’t. Then while they set, put the roof windows in glue the under side to the
centre section and then the roof to it and the fuselage is all but complete.
Next came the tail sections, as
it’s a bi-plane style tail I pre-painted the inside sections before assembly to
make it a little easier at final painting time, very simple task glue the 3 fin/
rudder sections to the bottom sec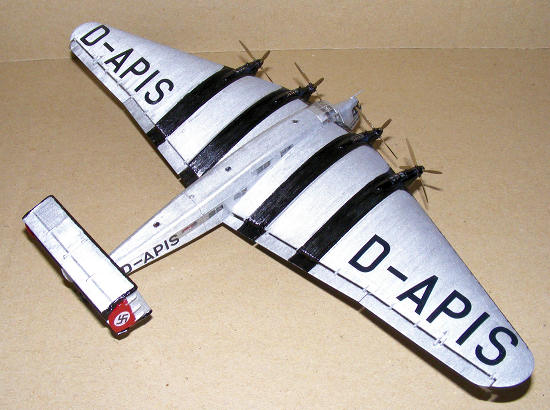 tion
ensuring they are vertical then glue the top section to them and allow to set
then glue the whole assembly to the fuselage. After pre-painting glue the
cockpit canopy into place and the nose viewing glass and forward nose landing
lights into their possies. Now we move onto the wings, I painted the inside
sections of the viewing area and under the engines in aluminium. Glued the seats
into place and then the wing halves together. Next was to fit the viewing
windows, which again I had pre-painted due to the fact that once in place they
were going to be very difficult to get at. Glue the engine widows into place and
the radiators underneath the wing between the inner and outer engines.
tion
ensuring they are vertical then glue the top section to them and allow to set
then glue the whole assembly to the fuselage. After pre-painting glue the
cockpit canopy into place and the nose viewing glass and forward nose landing
lights into their possies. Now we move onto the wings, I painted the inside
sections of the viewing area and under the engines in aluminium. Glued the seats
into place and then the wing halves together. Next was to fit the viewing
windows, which again I had pre-painted due to the fact that once in place they
were going to be very difficult to get at. Glue the engine widows into place and
the radiators underneath the wing between the inner and outer engines.
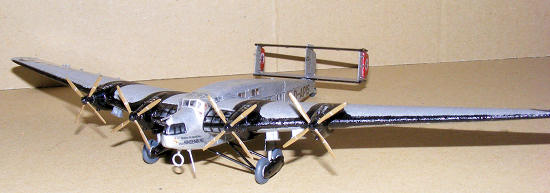
Now to Hugo’s favourite idea of combined drooping ailerons and flaps, theses went into place with no trouble and are only an annoyance once you need to handle the kit for painting, as care is needed not to break them. It tells you to put the props in place at this stage, however I chose to leave this step until I had mated the wings to the fuselage and fitted the landing gear to avoid any damage and this proved to make the job a little easier. So once the wings were mated and glue was well and truly dried I moved to the landing gear, which I had put together and was now dry and ready to go on, this is a fiddly task and patience is needed. Turn her onto her back and glue the struts to the fuselage then place a drop of glue on the strut mounting points on the wheel carriage and wing mounting point then slip it into the wing at an angle then lift the strut to match the mounting points and gently press them into place hold for 30 or so seconds and Bob’s your uncle, maybe do this one at a time. Now mount the radio direction finder and whip antenna to the underside, leave to dry. Turn her and mount her onto her feet and fit the prop assemblies to the front of the engines, and the Pitot tube to the forward nose section above the viewing windows. Now we are ready for the painting to commence in earnest.
| COLORS & MARKINGS |
Painting:
 easiest to
get hold of here in Oz. XF-16 Flat Aluminium, X-18 Semi-gloss black and XF-63
German Grey for the tyres. Internal colours are X-7 Red, XF-16, XF-20 Medium
Grey and X-5 Flat Green. Once paint was dry, as is my habit I applied a little
Tamiya X-22 clear coat in preparation for the decals to be placed.
easiest to
get hold of here in Oz. XF-16 Flat Aluminium, X-18 Semi-gloss black and XF-63
German Grey for the tyres. Internal colours are X-7 Red, XF-16, XF-20 Medium
Grey and X-5 Flat Green. Once paint was dry, as is my habit I applied a little
Tamiya X-22 clear coat in preparation for the decals to be placed.
| CONCLUSIONS |
| REFERENCES |
www.geocities.com/hjunkers/ju_g38_a1.htm History and some pics, I just googled Junkers G-38 pictures and got a lot of hits, and just picked my way through the rest.
If you would like your product reviewed fairly and fairly quickly, please contact the editor or see other details in the Note to Contributors.