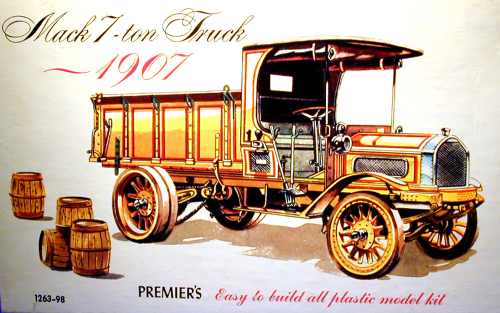
Premier 1907 Mack 7-Ton Truck
KIT # |
1263-98 |
|
PRICE: |
$1.00 at the Ankara, Turkey BX, 1961 |
|
DECALS: |
None |
|
REVIEW : |
|
|
NOTES: |
Built for a great friend and retired AF officer |
HISTORY |
For many of us “older” types, a dominant scene on US highways for many decades was semi –trailers being pulled by a Mack tractor. The Mack, with its famous bulldog hood ornament, was a staple along with Peterbilt, Kenwood and White Freightliners.
 The Mack Brothers - Jack, Augustus, and William – got started in
the transportation business in the early 1890s with a wagon and carriage
factory. The brothers opened their first truck plant in 1900 and began producing
a 40 HP, 20-passenger bus. By 1904, the company was producing heavy-duty trucks
called “Manhattans”. The first Mack trucks were chain-driven, open cab
vehicles. Like its predecessors, the 1907 7-ton model had wooden-spoked wheels
with dual wheels on the rear axle.
The Mack Brothers - Jack, Augustus, and William – got started in
the transportation business in the early 1890s with a wagon and carriage
factory. The brothers opened their first truck plant in 1900 and began producing
a 40 HP, 20-passenger bus. By 1904, the company was producing heavy-duty trucks
called “Manhattans”. The first Mack trucks were chain-driven, open cab
vehicles. Like its predecessors, the 1907 7-ton model had wooden-spoked wheels
with dual wheels on the rear axle.
The Mack Company continued for the next 83 years to produce thousands of trucks for all types of applications. In 1990 it became a wholly owned subsidiary of Renault, and in 2000 AB Volvo of Sweden purchased Mack. Today, the Mack Truck division of Volvo produces the Granite line, a 6-wheel construction vehicle for heavy duty hauling, and the Freedom line, a medium duty vehicle used for wholesale delivery and general freight.
THE KIT |
I have no idea when this Premier kit was first introduced: the one I built was purchased by a good friend and retired Air Force officer at the BX in Ankara, Turkey in 1961, for the grand sum of $1.00! (Incidentally, he is the same friend to whom I presented my 1/48 scale Monogram B-26, built as “Flakbait” – turns out he had actually flown the aircraft once from Pisa, Italy to a depot in Casablanca during World War II).
For those of you who grew up in the fifties, this kit is a trip down memory lane. It consists of 38 pieces molded in a tan plastic and 13 chrome-plated parts. There are also four wooden barrels consisting of two pieces each and molded in tan plastic. The model is a “curbside” model, meaning there is no engine or drive train. In addition, since there were no windshields on the prototype trucks, there are no clear parts such as those found in more “modern” vehicle kits (and even the headlight lenses are chromed). Instructions are crude by today’s standards and consist of hand-drawn pictures. The kit came with no decals.
|
CONSTRUCTION |
 Construction was simple and straightforward. I first assembled
the cab, leaving off the roof to accommodate painting of the interior. I then
glued the two hood pieces together and glued that assembly to the cab. The next
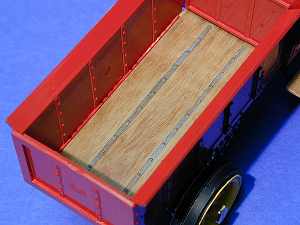
assembly was the three piece truck box, which I glued together and then let dry,
trying to keep it in the general shape that it would be in when assembled to the
bed (which would be painted in a wood color prior to final assembly).
Construction was simple and straightforward. I first assembled
the cab, leaving off the roof to accommodate painting of the interior. I then
glued the two hood pieces together and glued that assembly to the cab. The next
assembly was the three piece truck box, which I glued together and then let dry,
trying to keep it in the general shape that it would be in when assembled to the
bed (which would be painted in a wood color prior to final assembly).
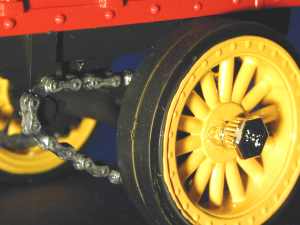 The springs, axles and chain drives came next. These were glued
to the frame and the whole frame assembly was set aside for the paint shop.
Finally, I glued the rear dual tire rims together.
The springs, axles and chain drives came next. These were glued
to the frame and the whole frame assembly was set aside for the paint shop.
Finally, I glued the rear dual tire rims together.
PAINT & FINAL ASSEMBLY |
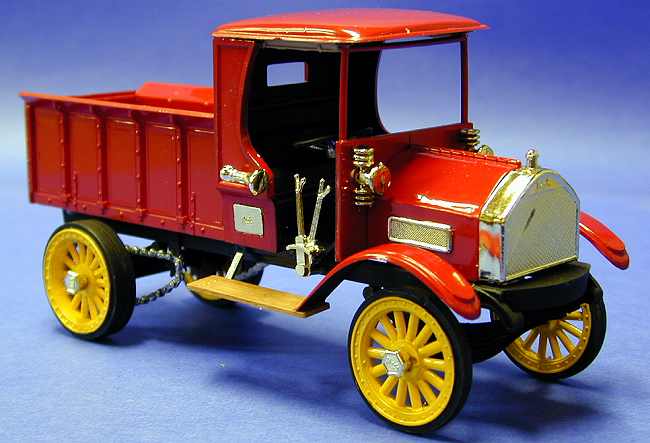
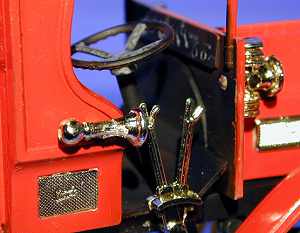
I tried to find pictures of old Mack trucks to help determine an appropriate overall paint scheme, but was relatively unsuccessful in that endeavor. After discussing this with my friend, we decided on a bright red paint job (hey…who knows what color they painted these things in 1907!). With that decision, I opted for my favorite gloss red paint: Model Masters Guards Red, which is a fairly close match to Ferrari Red. The first paint step was to give the cab interior a coat of Testors flat black. While I had the flat black out, I sprayed the frame assembly the same color. I then dry-brushed the dashboard instruments with flat white paint to highlight the gauges.
 I masked off the cab interior and painted the cab assembly, truck
box, front fenders, and cab roof Guards Red. After achieving as high a gloss
finish as I could with the airbrush, I set these three assemblies aside to dry.
I next masked off the frame from the truck bed and airbrushed the bed and the
running boards with Model Masters Wood. When these were dry, I hand-painted the
metal bed runners with Pactra Steel. Finally, I drybrushed the bed with Model
Masters leather to simulate the grain of the wooden bed floor.
I masked off the cab interior and painted the cab assembly, truck
box, front fenders, and cab roof Guards Red. After achieving as high a gloss
finish as I could with the airbrush, I set these three assemblies aside to dry.
I next masked off the frame from the truck bed and airbrushed the bed and the
running boards with Model Masters Wood. When these were dry, I hand-painted the
metal bed runners with Pactra Steel. Finally, I drybrushed the bed with Model
Masters leather to simulate the grain of the wooden bed floor.
I chose Model Masters gloss bright yellow for the wheels. After spraying the wheels, I hand-painted the tires with flat black. (Pundits will be sure to take Blair to task for not pinstriping the wheels and other parts of the truck, a common practice back then. :o) Ed)
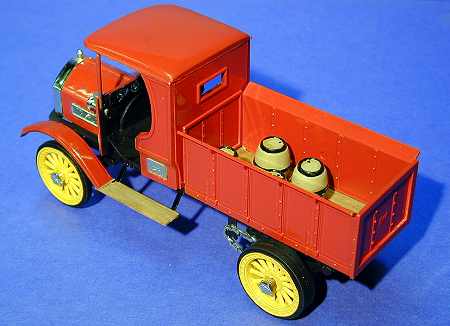
After painting all the parts, I began the final assembly process. I mated the truck box to the bed and frame, and then glued the cab roof to the cab assembly. I attached the cab assembly to the frame with superglue and glued the wheels and tires to the axles. The running boards were glued on, and then the front fenders were attached. Finally, I glued on the various chrome pieces – radiator, horn, lights, brake assembly, and hubcaps. To add to the model, I painted the metal rims of the assembled barrels and placed them in the bed.
CONCLUSIONS |
 Talk about a quick build: I started this kit four days before
Christmas and finished it on Christmas Day. The next day I delivered it to my
friend. That might be some kind of record for me (at least in the last thirty
years. My first years of modeling, like most modelers, consisted of kits that
were fully assembled in maybe an hour and then were being used to wage some war
or battle). The kit was a great diversion, and particularly timely given I had
slipped into another funky bout of the dreaded Modeler’s Syndrome.
Talk about a quick build: I started this kit four days before
Christmas and finished it on Christmas Day. The next day I delivered it to my
friend. That might be some kind of record for me (at least in the last thirty
years. My first years of modeling, like most modelers, consisted of kits that
were fully assembled in maybe an hour and then were being used to wage some war
or battle). The kit was a great diversion, and particularly timely given I had
slipped into another funky bout of the dreaded Modeler’s Syndrome.
For an oldie, this kit looks pretty good once it is assembled. The kit was definitely a nostalgia trip for me, and is probably worth a lot of money if left unbuilt. But nothing could be worth more money than to see my friend’s face when I showed up at his front door with the assembled model! Thanks for the building opportunity, Vic, and thanks for the many years of service and sacrifice to the Nation.
January 2003
REFERENCES |
“Mack History, Mack Truck Website, 2002.
If you would like your product reviewed fairly and fairly quickly, please contact the editor or see other details in the Note to Contributors.