| KIT #: | 51102 |
| PRICE: | $ |
| DECALS: | One option |
| REVIEWER: | Frank Spahr |
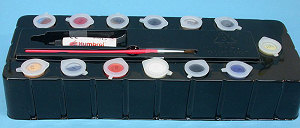
| NOTES: | Styrene in two colours plus chrome-plated, Vinyl, rubber tyres, steel axles, decals, 13 plastic tinlets of acrylic paint, one paintbrush, one tube of glue. Recommended from age 8 up – currently not available, re-issue scheduled for April, 2007 |
| HISTORY |
Aardman Animations Studios from Bristol, UK, are renowned world wide for producing excellent animated movies, true labours of love chock full of British humour. Their best work has always been made the traditional way using stop-motion and fairly large model sets, their more recent CGI efforts like “Flushed Away” have been less successful.
 Due to the very
labour-intensive techniques involved, the studio mainly produces shorter films:
Commercials, short films and animated series. “Chicken Run” (2000), about
chicken escaping from a poultry farm resembling a German POW camp, was the
first full-length film and the start of a partnership with DreamWorks (that
has recently ended), but the studio's most famous creations are Wallace and
Gromit.
Due to the very
labour-intensive techniques involved, the studio mainly produces shorter films:
Commercials, short films and animated series. “Chicken Run” (2000), about
chicken escaping from a poultry farm resembling a German POW camp, was the
first full-length film and the start of a partnership with DreamWorks (that
has recently ended), but the studio's most famous creations are Wallace and
Gromit.
Nick Park invented the characters during film school. Wallace, a lovable, very British inventor and cheese aficionado, and his silent yet extremely intelligent dog Gromit, have appeared in three short films so far: “A Grand Day Out”(1989), “The Wrong Trousers” (1993) and “A Close Shave”(1995), earning several highly coveted awards and gaining a cult following world-wide. A series of short films “Wallace & Gromit's Cracking Contraptions” (2002) prepared their so far biggest outing: They starred in their first full-length film in 2005. “Wallace & Gromit and the Curse of the Were-Rabbit”, a brilliantly done spoof of the classical horror movies. This movie nonetheless is a family movie, as all the carnage and massacres are committed on vegetable victims by a veg-ravaging rabbit monster. The movie won an Academy Award (so far the third for a Wallace & Gromit production) and became very popular, not the least amongst modelers, as there's a serious amount of excellent modeling work to be seen.
| THE KIT |
 Britain's cult
brand Airfix hasn't produced that many new releases since their heydays in the
1960's / 70's, but they did two model kits from “A Close Shave” in the late
1990's, of which I built one. They were not that easy to find even then. I was
pretty excited when I read about the release of a new kit of the Anti Pesto Van
from the Giant Rabbit movie, so I tried to lay my hands on one. Sad to say, it
seems that those kits were marketed solely in the UK, a fresh example for
Airfix' recent policy of “limited run” releases at inflated prices. I was lucky
enough to obtain a kit from a British ebay seller at a still reasonable prize of
approximately 37 EURO.
Britain's cult
brand Airfix hasn't produced that many new releases since their heydays in the
1960's / 70's, but they did two model kits from “A Close Shave” in the late
1990's, of which I built one. They were not that easy to find even then. I was
pretty excited when I read about the release of a new kit of the Anti Pesto Van
from the Giant Rabbit movie, so I tried to lay my hands on one. Sad to say, it
seems that those kits were marketed solely in the UK, a fresh example for
Airfix' recent policy of “limited run” releases at inflated prices. I was lucky
enough to obtain a kit from a British ebay seller at a still reasonable prize of
approximately 37 EURO.
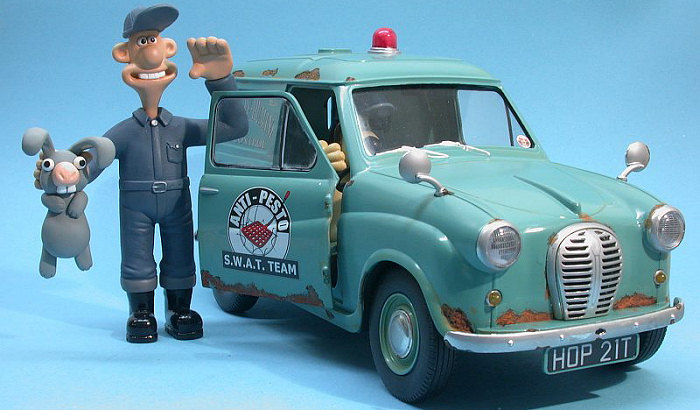
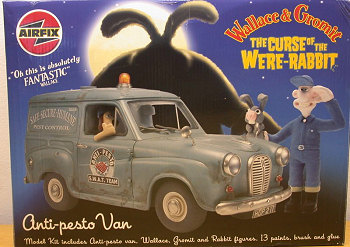
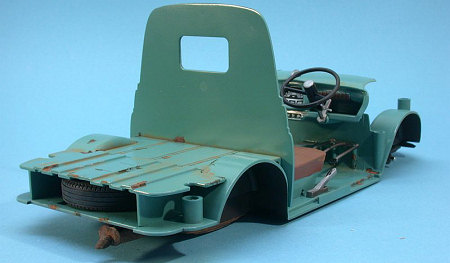
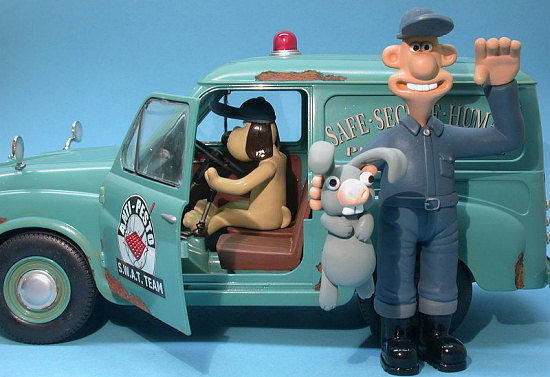
The big and nicely decorated box is chock-full with goodies, containing the Austin A35 van (with interior, but without engine) plus figures of Wallace and Gromit and a Rabbit Of Ordinary Size. The tube glue and paintbrush were discarded at first look, but I did use some of the acrylic paints.
 The instructions
are very clearly printed and easy to follow, giving (as usual for Airfix) colour
callouts for Humbrol paints only. Those aren't complete and not always correct.
The decals are (which is unusual for Airfix) printed in register and are quite
nicely done and comprehensive, including tax sticker and alternate license
plates.
The instructions
are very clearly printed and easy to follow, giving (as usual for Airfix) colour
callouts for Humbrol paints only. Those aren't complete and not always correct.
The decals are (which is unusual for Airfix) printed in register and are quite
nicely done and comprehensive, including tax sticker and alternate license
plates.
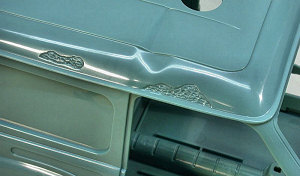 The
transparencies are quite nicely done and packed, no problem with that. The
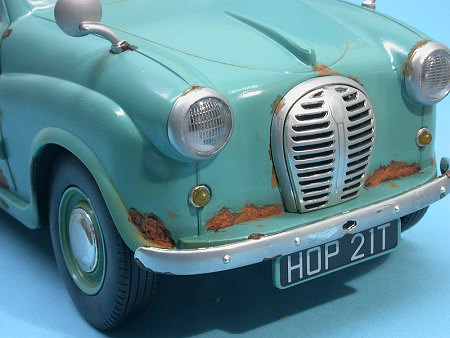
styrene parts for the car are molded in the mint green colour of the movie
miniature so the car isn't meant to be painted; Airfix has also molded numerous
dents and rusted areas to reproduce the used and weathered look of the movie
miniature. In my perception, this is pretty much overdone, but I didn't try to
putty and sand them. Some details around the car are nice, but others are much
simplified, such as the windscreen wipers which are molded to the chassis. There
is little or no flash, but some ejector pin marks have to be removed. There are
sink marks, but they don't have to be removed as they disappear amongst the
molded dents. The chrome parts are very glossy and need dulling down if to
resemble the slightly dilapidated look of the movie miniature. The figures are
molde
The
transparencies are quite nicely done and packed, no problem with that. The
styrene parts for the car are molded in the mint green colour of the movie
miniature so the car isn't meant to be painted; Airfix has also molded numerous
dents and rusted areas to reproduce the used and weathered look of the movie
miniature. In my perception, this is pretty much overdone, but I didn't try to
putty and sand them. Some details around the car are nice, but others are much
simplified, such as the windscreen wipers which are molded to the chassis. There
is little or no flash, but some ejector pin marks have to be removed. There are
sink marks, but they don't have to be removed as they disappear amongst the
molded dents. The chrome parts are very glossy and need dulling down if to
resemble the slightly dilapidated look of the movie miniature. The figures are
molde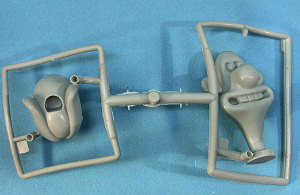 d in styrene, but with vinyl heads. I have no idea why and do not like
vinyl as it isn't easily sanded or painted, at least for me. Fit of the figure
parts is lacklustre.
d in styrene, but with vinyl heads. I have no idea why and do not like
vinyl as it isn't easily sanded or painted, at least for me. Fit of the figure
parts is lacklustre.
Generally the kit seems designed with sturdiness in mind, meant to be played with by children, but honestly there are some parts of the assembly sequence that are pretty demanding and might be too hard for many kids. Given the limited run character of the kit, I doubt that it's mainly sold to kids these days.
Soon after I received my kit, Airfix went bankrupt due to Heller's problems, so for a while availability of Airfix kits was pretty much in doubt. Now that Hornby has taken over Airfix, a second production run of the Anti Pesto Van has been announced for April, 2007. It has to be hoped that this is true as this is a really nice kit with a lot of potential as has been demonstrated by the many ingenious conversions on display at Telford last year.
| CONSTRUCTION |
I decided to build the kit OOB, although there's oodles of possibilities of conversions. So I started the kit on a rainy Friday afternoon in my modelling den, cutting, sanding and gluing, beginning with the figures.
 I soon realized
that Airfix had taken great efforts to make Wallace as sturdy as possible,
locking hands, arms and feet with massive undercuts to the body – probably to
prevent kids from dismembering him. I didn't like that as it made cleanup and
painting needlessly complicated, so I brought out my motor tool and ground off
the offending areas on neck and hands, enabling me to complete those as
subassemblies. Generally speaking, the styrene turned out to be very soft,
responded very well to glue and was easily sanded – for once I didn't need to
preserve delicate engravings. It took some corrections, but no big deal at all.
I somehow got the vinyl parts cleaned up but didn't like the procedure one bit.
I soon realized
that Airfix had taken great efforts to make Wallace as sturdy as possible,
locking hands, arms and feet with massive undercuts to the body – probably to
prevent kids from dismembering him. I didn't like that as it made cleanup and
painting needlessly complicated, so I brought out my motor tool and ground off
the offending areas on neck and hands, enabling me to complete those as
subassemblies. Generally speaking, the styrene turned out to be very soft,
responded very well to glue and was easily sanded – for once I didn't need to
preserve delicate engravings. It took some corrections, but no big deal at all.
I somehow got the vinyl parts cleaned up but didn't like the procedure one bit.
After priming, I
sprayed W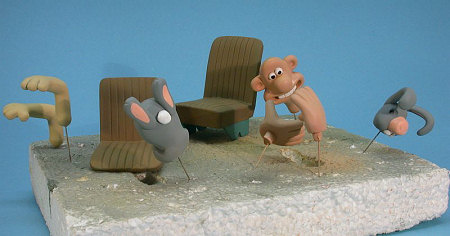 allace's overalls Humbrol 96 blue, same as the caps both characters
wear. The boots and details were hand painted with the kit's acrylics. I didn't
like the skin tone recommended in the instructions when comparing to the movie's
DVD (my primary reference), so I mixed a somewhat doughy skin tone from Model
Master #1706E (sand flat) and Humbrol 82 (orange).
allace's overalls Humbrol 96 blue, same as the caps both characters
wear. The boots and details were hand painted with the kit's acrylics. I didn't
like the skin tone recommended in the instructions when comparing to the movie's
DVD (my primary reference), so I mixed a somewhat doughy skin tone from Model
Master #1706E (sand flat) and Humbrol 82 (orange).
Gromit was a
tougher build. Fit was between less than basic and non-existent, so a LOT of
sanding and filling was involved, partly only after aligning the parts in a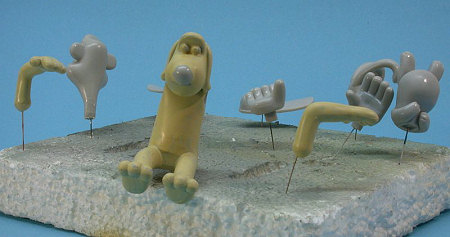 test
fit inside the car where he sits on the driver's seat. The worst fit was around
his waistline, and I pitied any 8-year-old trying to tackle this task alone. I
didn't like the acrylic shade provided so painted him in many layers of Hum
test
fit inside the car where he sits on the driver's seat. The worst fit was around
his waistline, and I pitied any 8-year-old trying to tackle this task alone. I
didn't like the acrylic shade provided so painted him in many layers of Hum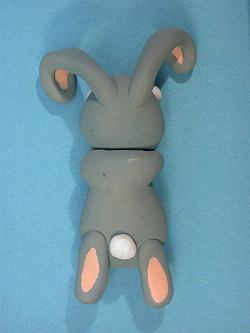 brol
71 – hey, all those tinlets I collected over the years must be good for
something in the end! Ears, nose and eyes were hand painted with acrylics.
brol
71 – hey, all those tinlets I collected over the years must be good for
something in the end! Ears, nose and eyes were hand painted with acrylics.
I really love all those rabbits in the movie, they're cute, funny and lots of fun. So I was happy about the inclusion of one - Wallace carries it by the nape of its neck. Body and head were built as subassemblies to simplify painting. After filling and cleanup I checked the DVD for the “paint scheme”. The rabbit was sprayed Model Master medium grey. Sadly, the kit rabbit lacks the bunny tail all the movie rabbits have, but that was VERY easily scratchbuilt from a glob of Milliput. Contrary to the kit instructions, not only the nose, but also the insides of the ears and the undersides of the feet were painted a cutesy pink – as in the movie. I was glad that the eyes were individual parts, so painting was simplified.
| COLORS & MARKINGS |
During work on the figures I also worked at the car. The first thing to decide was the issue of painting. I dismissed the idea of leaving the styrene unpainted, as I was sure I'd have to fill and sand somewhere, necessitating a touch-up with paint. Apart from that I felt doing so was behind me, back in the days of my youth. Well, I did return to this “technique” on my later Jupiter C, but at that point of my life last May I felt I needed the CORRECT shade of paint.
Getting that was
harder than I had imagined. Revell, Model Master and Humbrol didn't help me at
all. In the end I decided that car paint would be best obtained at a specialized
shop. So I took along a piece of sprue as a colour sample to a local shop and
asked what could be done. Well, that shop was very helpful. They had RAL charts
(the German equivalent of FS shades) and a mixing and canning machine. We spent
some time leafing through the shade guides until deciding on RAL 6033 mint-tuerkis.
That was duly mixed and filled into a rattle can fo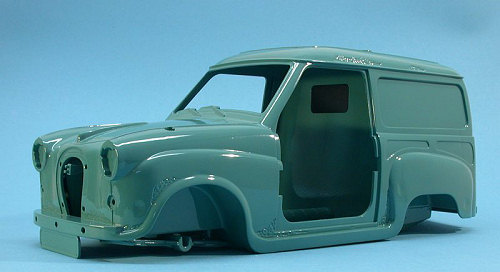 r
a price of about 10 EURO. I wouldn't want to try that sort of paint in my
teensy-tiny airbrush. I also bought some fine grade wet-sanding paper plus
another rattle can of plastic primer, hoping that would help me with the vinyl
parts.
r
a price of about 10 EURO. I wouldn't want to try that sort of paint in my
teensy-tiny airbrush. I also bought some fine grade wet-sanding paper plus
another rattle can of plastic primer, hoping that would help me with the vinyl
parts.
Next I prepared
the car for painting, cleaning up and building subassemblies. The door hinges
were added at this point, too. I had to remove a number of ejector pin marks in
the passenger compartment and inside the trunk, using an electric tooth brush
with a piece of sanding paper instead of the brush.
The day after I turned on the exhaust above my paint booth, put on my
face mask, opened the window and sprayed the kit from the rattle cans, first the
primer and then the actual paint. I had suspended the chassis from the exhaust
for good access. The primer dried very fast and left no visible trace. Sadly, it
didn't improve the paint's grip on the vinyl parts. The RAL shade was a
different thing altogether: I had never experienced such a massive amount of
paint fumes and odours – I was very thankful for all my precautions. Otherwise,
the paint gave an excellent glossy finish (like on a car ...) if sprayed
cautiously. I hadn't achieved such a nice surface with modelling paints yet.
Having to destroy this nice surface later on made me sad …
Whilst the paint
cured, I continued with the various small parts. The clear parts for the
indicators, braking lights and warning light were painted yellow and red with
Revell's coloured clear coat (#730/731). I should note that the warning light in
the movie 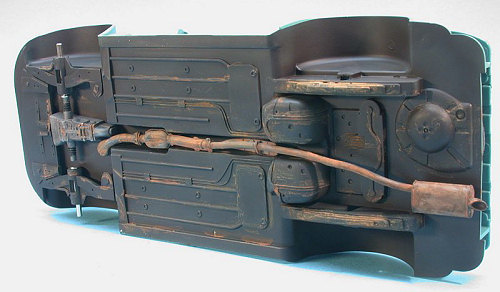 miniature is red beyond doubt, yet box the box illustration and the
instructions want it yellow.
miniature is red beyond doubt, yet box the box illustration and the
instructions want it yellow.
The large exhaust parts were sprayed Model Master Burnt Metal, then drybrushed with acrylic rust paint from the kit. The rest of the car's underside parts were painted in a dark and dirty metalizer, whilst the car's underbody itself was sprayed Model Master Rubber, postshaded with flat black and weathered with watercolours.
The seats and door panels were hand painted with the abovementioned acrylic rust paint from the kit (the nearest equivalent would be Model Master Siena). Pedals, hand brake, shift and steering were painted with metalizers with details picked out in black.
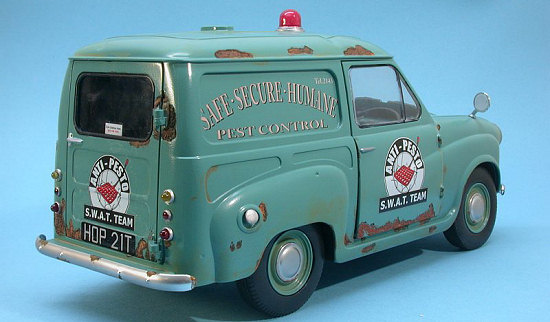
Now was the time to apply the decals. The car paint was an excellent base for decals work, and although the size and delicacy of the decals made it a challenging work, things worked out fine with the aid of some MicroSol. The lettering at the car's sides are a bit oversize, but I couldn't help that. After curing, the decals were sealed with Future.
All the chrome parts were dulled with Flat Future (Tamiya acrylic flat base plus Future) and then applied.
| FINAL CONSTRUCTION |
 I then could
start weathering. As I mentioned before, the rusted areas are way overdone in
comparison with the movie miniature, which is dirty, grimy and showing some
evidence of rusting, yet not such a massive attack as in the kit. It looks like
my 1975 Audi 50 very shortly before it went to the boneyard. On the other hand,
the dents are not as pronounced as in the movie miniature. Well, I sure wouldn't
want to go anal on that issue, so I worked out how to paint these areas to
improve their looks.
I then could
start weathering. As I mentioned before, the rusted areas are way overdone in
comparison with the movie miniature, which is dirty, grimy and showing some
evidence of rusting, yet not such a massive attack as in the kit. It looks like
my 1975 Audi 50 very shortly before it went to the boneyard. On the other hand,
the dents are not as pronounced as in the movie miniature. Well, I sure wouldn't
want to go anal on that issue, so I worked out how to paint these areas to
improve their looks.
My weathering
started with some irregular dulling down the entire car using Flat Future. Then
it was time for the rust. I had bought a clever two-component stuff for
producing real rust some while ago, but found it dried out pretty fast and was
beyond saving. So I had to look for alternatives. Following a tip from Norwegian
modeller Vegard Henanger I made my own rust from steel wool, which upon being
placed into water rusted very nicely. Upon drying, I ended up with rust powder
which I mixed with Revell flat coat and applied at the rusty areas. I didn't
spare the bumpers, especially where the chrome was ruined by removal from the
sprue. That stuff dried pretty fast yet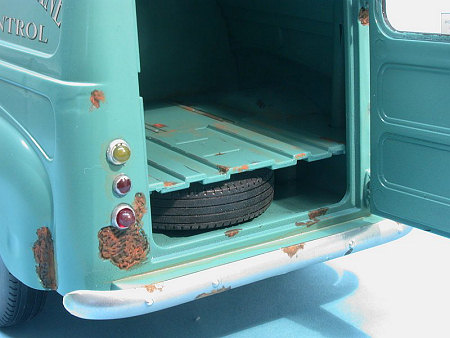 looked too dark and unconvincing afterwards. Another case to prove that the real
thing doesn't necessarily look real, too.
looked too dark and unconvincing afterwards. Another case to prove that the real
thing doesn't necessarily look real, too.
So I painted the areas with various watercolours (mainly orange and sienna) until I was satisfied. Though it didn't look like in the movie, I felt I couldn't do any better.
Finally it all came together, so the various more or less fiddly bits could be attached. It was also then that I glued the transparencies with CA glue after painting the rubber insulators before.
The final “marriage” of chassis and body was pretty exciting. You need to wiggle the door hinges around several dimensions of space-time simultaneously, half-assembling, then somehow wiggling and poking the hinges into their receptions, until you can apply the final pressure and hear the relieving *click*.
After completing the car I could place Gromit on the driver's seat, only then finally attaching his arms so they fit with the steering wheel and the door. I couldn't achieve the posture of the box illustration (but then that was the original movie Gromit). Then I completed the Gromit figure as described.
| CONCLUSIONS |
 Great fun and a
nice big model OOB, and a tremendous base for all sorts of great conversions.
Great fun and a
nice big model OOB, and a tremendous base for all sorts of great conversions.
Some shortcomings can be more or less easily addressed, such as:
reducing the overdone rust areas
- replacing the windshield wipers
- adding doorknobs
- adding a radiator figure
I guess that most kids from age 8 up would welcome some help in constructing this model. Airfix should rethink its limited release policy as this kit amongst others could find more buyers.
| REFERENCES |
 - “Wallace &
Gromit in the Curse of the Were - Rabbit” DVD, great movie and very useful bonus
material!
- “Wallace &
Gromit in the Curse of the Were - Rabbit” DVD, great movie and very useful bonus
material!
- the studio's website www.aardman.co.uk
- IMDB http://www.imdb.com/title/tt0312004/
-As always, Wikipedia http://en.wikipedia.org/wiki/Aardman
March 2007
Copyright ModelingMadness.com
If you would like your product reviewed fairly and fairly quickly, please contact the editor or see other details in the Note to Contributors.