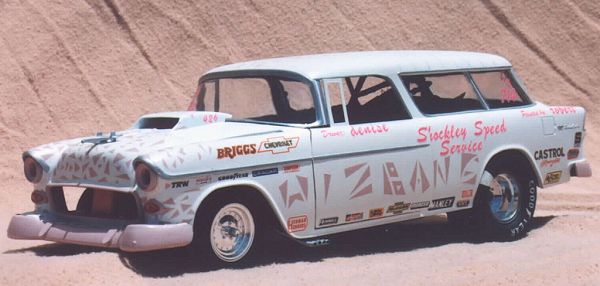
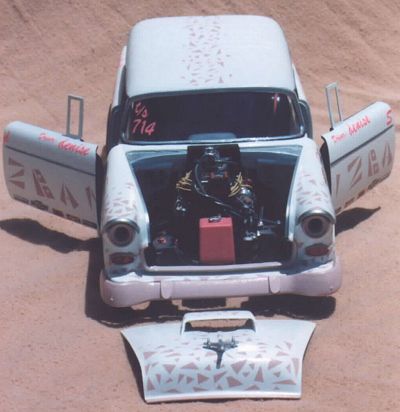
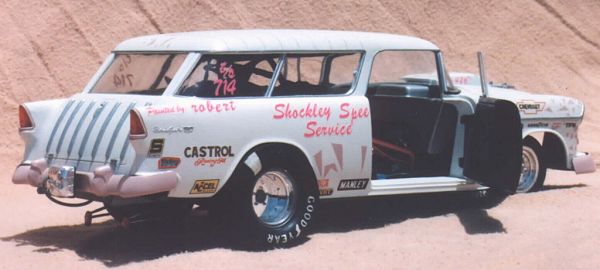
'WIZBANG' 1955 Chevy Nomad Top Sportsman Dragster
AMT 8657 1955 Chevy Nomad $25.00 1/16th scale
Revell 0730 Chevy Vega Funny Car (Jungle Jim) $22.00 1/16th scale
Review and photos by Robert Schockley, Car Builder Extrordinaire
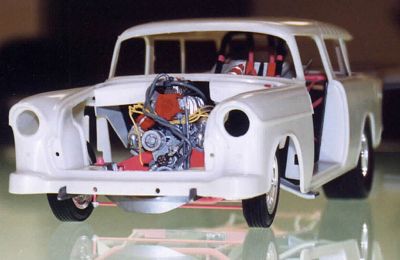
A regular visitor to Famosa Raceway's (Bakersfield, Ca.) excellent Goodguys Nostalgia drag races, I'm always inspired to build a drag-strip terror after attending an event. I also happened to pick up this Nomad at a swap meet there at the race track, but decided that the kits custom-engine option of a single Turbo on a 350 C.I. Chevy just wasn't up to snuff, so I used a Revell 'Jungle Jim' Funny Car to provide the 'Go-Power', in the form of a Nitro-burning supercharged 426 C.I. Hemi. I know Chevy-purists out there are screaming, but until I find a decent 1/16th scale big-block in something other than a Hemi, it's gonna have to be the engine of my choice in these kit-bashed race cars.
 Like
starting with the cockpit of an airplane model, I always start with the engine
on these projects. This allows you to position the block between the frame
rails so that you can see what kind of cutting you're going to have to do
on the frame rails, body pan & interior tub. In this case, I had to cut
out a significant portion of the body pan for the transmission & headers.
The entire firewall was removed as well as the radiator support area at the
front of the frame. These Revell Hemi engines are pretty easy to build. My
only advice is to (1), shorten the distributor, and (2), ditch the kit-supplied
rubber band blower-belt. The distributor sits so high that after you've put
the ignition wires on, they wind-up being almost as high as the top of the
supercharger, and definitely will play havoc with hood clearance. As for
the blower-belt, it's simply too small in diameter and is strong enough that
it'll pull the the crankshaft pulley right off the model when you stretch
it up to the blowershaft. On top of being too small, it also has a tendency
to dry-rot, split and crack, which is exactly what happened to mine (this
was AFTER I'd installed the belt safety-guard...grrrrr). What I did to correct
this was to pull the old belt out and then glue two strips of 600 grit sandpaper
together, to simulate the right thickness & to give it a 'rubber belt
look' and texture, paint it flat black, then thread this back thru the safety
guard and glue the two ends together at the bottom of the crankshaft pulley.
Like
starting with the cockpit of an airplane model, I always start with the engine
on these projects. This allows you to position the block between the frame
rails so that you can see what kind of cutting you're going to have to do
on the frame rails, body pan & interior tub. In this case, I had to cut
out a significant portion of the body pan for the transmission & headers.
The entire firewall was removed as well as the radiator support area at the
front of the frame. These Revell Hemi engines are pretty easy to build. My
only advice is to (1), shorten the distributor, and (2), ditch the kit-supplied
rubber band blower-belt. The distributor sits so high that after you've put
the ignition wires on, they wind-up being almost as high as the top of the
supercharger, and definitely will play havoc with hood clearance. As for
the blower-belt, it's simply too small in diameter and is strong enough that
it'll pull the the crankshaft pulley right off the model when you stretch
it up to the blowershaft. On top of being too small, it also has a tendency
to dry-rot, split and crack, which is exactly what happened to mine (this
was AFTER I'd installed the belt safety-guard...grrrrr). What I did to correct
this was to pull the old belt out and then glue two strips of 600 grit sandpaper
together, to simulate the right thickness & to give it a 'rubber belt
look' and texture, paint it flat black, then thread this back thru the safety
guard and glue the two ends together at the bottom of the crankshaft pulley.
The end result was perfect and will be a feature of any future blown engines I build featuring 'realistic' rubber band blower-belts. The Revell headers were too short to make it out past the side of the car, so I crafted a set of Zoomie-style headers from hollow tube styrene. To me, they are a tad too small in diameter but they get the job done well enough. I was just happy that I didn't have to make cut-outs in the fenders for them, as that would've played heck with the door clearance.
Next up was the suspension parts. I went with the AMT 12-bolt differential
 and leafspring suspension. Not totally trick race-car stuff to be sure, but
it would greatly simplify the installation process (or so I thought). To
make room for the slicks, all I had to do was to cut out the stock wheel
wells outside of the frame rails. Then, I completely cut out the body pan
between the frame rails from directly under the differential, all the way
back to the rear frame rail, replacing this with sheet styrene (this removed
the molded-in gas tank and spare tire). Now is when the headaches began.
I had to shorten the rear end to get the slicks inside the wheel wells, so
I thought "simple, just cut off the leaf springs, move them to the inside
of the frame rails, hack-off a bit from the differential and you're in business!"
Problem was, after I hacked-off the ends 'just a bit', they no longer reached
the brake-hub assemblies on the tires, and were in fact almost half an inch
shy! I remedied this by using the AMT supplied rear axle (which runs through
the differential, allowing the tires to spin). Now the tires were connected,
but that axle looked way too thin in diameter all by itself, so I made some
'blocks' out of styrene and positioned them on the ends of the differential.
and leafspring suspension. Not totally trick race-car stuff to be sure, but
it would greatly simplify the installation process (or so I thought). To
make room for the slicks, all I had to do was to cut out the stock wheel
wells outside of the frame rails. Then, I completely cut out the body pan
between the frame rails from directly under the differential, all the way
back to the rear frame rail, replacing this with sheet styrene (this removed
the molded-in gas tank and spare tire). Now is when the headaches began.
I had to shorten the rear end to get the slicks inside the wheel wells, so
I thought "simple, just cut off the leaf springs, move them to the inside
of the frame rails, hack-off a bit from the differential and you're in business!"
Problem was, after I hacked-off the ends 'just a bit', they no longer reached
the brake-hub assemblies on the tires, and were in fact almost half an inch
shy! I remedied this by using the AMT supplied rear axle (which runs through
the differential, allowing the tires to spin). Now the tires were connected,
but that axle looked way too thin in diameter all by itself, so I made some
'blocks' out of styrene and positioned them on the ends of the differential.
With styrene rod traction bars, frame sub-connectors, repositioned shocks, & Revell wheelie-bars and brake lines, the finished product looked 'racey' enough for me. The front end straight tube axle comes from the Funny car and was mounted slightly to the rear of the original crossmember. I cut off the A-arms, but left the crossmember in to serve as a place to mount the fuel cell.
 Then
I proceeded to the interior, which had a couple of challenging parts, but
otherwise wasn't too difficult. First up were the wheel tubs, fashioned from
sheet styrene. Real race car tubs are shaped round, pretty much like the
tires they cover. This can be a pain to replicate, so what I do is to begin
at the front edge of the tire opening, glue down the front edge of the styrene,
and let it it dry completely. Then, the sheet can be gently bent as you near
the top of the tub, gluing as you go.
Then
I proceeded to the interior, which had a couple of challenging parts, but
otherwise wasn't too difficult. First up were the wheel tubs, fashioned from
sheet styrene. Real race car tubs are shaped round, pretty much like the
tires they cover. This can be a pain to replicate, so what I do is to begin
at the front edge of the tire opening, glue down the front edge of the styrene,
and let it it dry completely. Then, the sheet can be gently bent as you near
the top of the tub, gluing as you go.
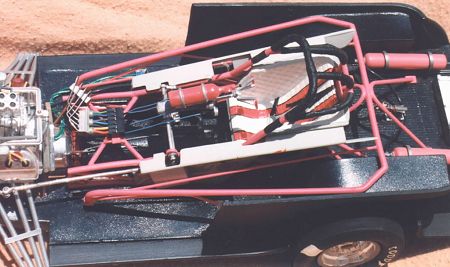
Once you reach the top of the curve, continue the sheet straight back, as far as you need to go, then end it by going straight back down. This gives sort of a 'half-tub', and is easy to replicate for the other side. Next was the installation of the Revell Funny Car frame. I had to cut-off the front about an inch and a half, and everything rear of the seat tub area. The frame was connected to the body pan with plenty of styrene tubing. In fact, I made a frame to go around the Funny Car frame, which really helped to fill-out the interior. Being a station wagon, the Nomad has gobs of space in the back. To fill this area in, I installed a twin-NO2 bottle system and a large race car battery. The bottles themselves are arc-welding bottles from an Italerei Field Tool set, with a 1/35 scale 60mm mortar part serving as the system regulator. The battery was formerly a 75mm shell crate. Other add-ons were the shifter-boot, which was a 1/700 scale US Navy 5" turret, with the shifter sitting in where the barrel normally goes (this actually looks pretty good, as the turrets' Observer station on top makes for a pretty good "Shift NOW!!!" light, when painted red); gauges on the steering column and NO2 system are 1/700 naval gun tubs; and the wiring harness parts come courtesy of an old Commodore 64 computer. The hardest part was getting the Vega firewall installed. Many trial fits showed that it needed cutting to accommodate the front of the roll cage, and that the firewall by itself didn't fill in the area sufficiently, so I added styrene side panels, which in turn served to help mount the firewall to the body. I also added a 'foreword' wirewall to reduce the cavernous appearance left by removal of the original firewall. The final interior mods were to remove the molded-in door panels and replace them with styrene panels.
 Body
modifications were few and simple. I had to cut a chunk out to make room
for the supercharger, and had to slightly shave the rear wheel-well foreword portion to
accommodate the slicks. I also drilled out the headlight bezels
and cut off the front bumper 'bumps', which resulted in a nice 'spoiler'
look to the bumper. About the hardest part was cutting out the molded-in
grill from the surrounding grill frame.
Body
modifications were few and simple. I had to cut a chunk out to make room
for the supercharger, and had to slightly shave the rear wheel-well foreword portion to
accommodate the slicks. I also drilled out the headlight bezels
and cut off the front bumper 'bumps', which resulted in a nice 'spoiler'
look to the bumper. About the hardest part was cutting out the molded-in
grill from the surrounding grill frame.
I broke that sucker twice in the process and was much relieved when it was finished. The AMT hood scoop had about an 8th of an inch removed from the rear portion. The hood was slightly warped and unfortunately doesn't sit flush, and the opening doors do not shut completely to my satisfaction, but other than that, the Nomad is a solid kit. I finished it with Testors Gloss White, Testors Gloss Coat, and Testors 'Fifties Pink' as the graphics and 'Wizbang' lettering on the side. All those little diamonds were masked-on with regular old masking tape, but it took about 5 applications to get around all the curves adjacent to the headlights and grill. Autographics supplied the lettering and the the decals came from the scrap box. Bare Metal Foil covers the parachute. I was going to do all the trim with it, but chickened out and hand-painted it silver instead...maybe next time. See you at the races!
 |