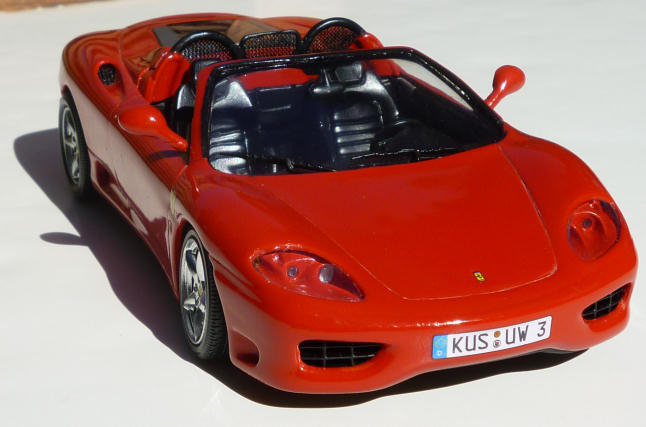
Revell 1/24 Ferrari 360 Modena Spyder
Ferrari
360
Modena
is a two-seat, mid-engine sports coup that was produced by Ferrari from 1999
through 2005. It replaced Ferrari 388 and it was replaced in turn by Ferrari
F430. The body is an all aluminum space-shell that was developed with help from
 Alcoa that
was 40% stiffer than 388 while being 28% lighter. The styling was done by
Pininfarina and indicated a sharp departure from the Ferrari styling that had
dominated Ferrari mid-engine cars in ‘80’s and ‘90’s. Instead of having a sharp,
wedge-like shape that was initially introduced with 308 in 1975 with pop-up
headlights, 360 had a rounded shape with fixed headlights that harkened back to
the days of Ferrari Dino. The design in some sense is informed by Ferrari’s F40
and F50 super cars with the “engine under glass” look that is now the standard
for all Ferrari mid-engine cars, i.e, F430, Enzo and Ferrari Italia.
Alcoa that
was 40% stiffer than 388 while being 28% lighter. The styling was done by
Pininfarina and indicated a sharp departure from the Ferrari styling that had
dominated Ferrari mid-engine cars in ‘80’s and ‘90’s. Instead of having a sharp,
wedge-like shape that was initially introduced with 308 in 1975 with pop-up
headlights, 360 had a rounded shape with fixed headlights that harkened back to
the days of Ferrari Dino. The design in some sense is informed by Ferrari’s F40
and F50 super cars with the “engine under glass” look that is now the standard
for all Ferrari mid-engine cars, i.e, F430, Enzo and Ferrari Italia.
The engine is a
90 deg., 3.6L, V-8 engine that produces 400 hp and allows the car to go from 0
to 60 mph in 4.3 seconds. As a V-8, the car is not very fuel efficient with city
mileage rated at 11 mpg and the highway mileage at 16 mpg. The transmission was
originally a 6-speed manual that was later replaced with a F-1 style 6-speed
manual.
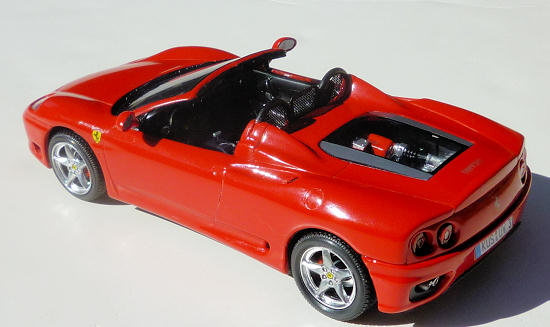
The Spider is
the convertible version of the 360. It is, in my opinion, an instant classic.
Its lines are clean and smooth and streamlined. It is a vast improvement over
the targa version of its wedge-like predecessors. Although now it has been
replaced in the Ferrari stable by the new Italia, 360 is in my opinion the car
that set the example for all sports cars in the first decade of the 21st
Century.
Just as the
original ushered in a new era of design for Ferrari, this kit ushered in a new
era for Revell
Germany.
Right now, Revell has produced the entire Ferrari commercial car line for the
2000’s and this was one of their first kits. As such, it does not have the level
of sophistication and detail seen in some of Revell’s newer kits (for example
this does not have a rear suspension). However, it is serviceable kit with few
vices.
 My kit was
a reboxing of the original Revell AG kit by Revell
USA.
The kit comes in several white sprues, a clear sprue that includes the windows
for the hard top version of the kit, a chrome sprue, four rubber tires and a
square plastic mesh that is to be cut up to produce various grills that festoon
the car.
My kit was
a reboxing of the original Revell AG kit by Revell
USA.
The kit comes in several white sprues, a clear sprue that includes the windows
for the hard top version of the kit, a chrome sprue, four rubber tires and a
square plastic mesh that is to be cut up to produce various grills that festoon
the car.
The molding in
general is OK with seem mold lines on the body. The worse part though is that
there are ejection pin marks on the doors and on the intake manifold. Although
the ejection pin marks are on not on the detail side of these parts, they have
left an impression on the detailed side. Fortunately, the ones on the doors are
not that noticeable and the one on the engine practically disappears under the
engine window.
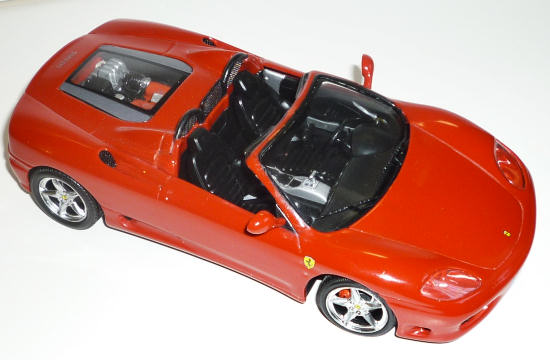
The seats don’t
have a back but that is not noticeable once they are in the car.
The engine
compartment on this car does not open and while not a “curbside” model in the
classic sense (no engine and no opening engine compartment) by some it could be
considered as such.
The chromed
parts consist of the tail pipes, the rims, the brake discs and the center
console. On my sample the chrome had not taken and parts had a flat appearance.
I did not care, however, as I intended to get rid of the chrome and paint the
parts with Alclad and Metalizer as needed.
One curious
think about all of Revell’s recent Ferrari cars is that wheels are not
realistic. They each consist of a back plate/rim (like a barrel with the top
open) that goes on the axel and is held in place with the brake/caliper assembly
allowing the wheels to rotate.
This kit does not have the convertible top although
I think the top only distracts from the beauty of the car.
The first job
was to paint the rear body panel/rear frame part as well as the main frame.
Since Tamiya TS-8 Italian red spray cans were not available, I decided to give
Testors Custom Lacquer System paint a try. This is a two part system with a base
coat and a clear gloss. After several trials (I spent more money on paint than I
did on the kit), I think I have finally gotten the hang of this system.
The first task
is to thoroughly wash the parts that you want to paint. Following the
instructions on the can do a dusting of the paint first and after a couple of
minutes give it a wet coat. The trick here is to not move very fast as you are
spraying thus allowing the paint to build up sufficiently without having too
much of an orange peel/grainy appearance. If you happen to get some orange peel
after the paint has dried (although the instruction says 2 hours, I would give
it 24 hours just to be sure) do not worry; you still have the clear coat to
apply.
 Follow the
same procedure for the clear coat as you did for the base color and let it dry.
Usually you should not have any orange peel at this point but if you do, you
need to crank out the micro mesh/sand paper. Start with something like 1500 grit
and go up all the way to 12000 grit on the micro mesh. Note that as you are
sanding you should only be polishing the clear coat and not the paint. As soon
as you see paint on your sandpaper/micro mesh stop; wash and dry the part to get
rid of sanding dust, and apply another layer of clear coat and start polishing
again after it has dried. Make sure that you alternate the direction of your
sanding every time you change grits (think “Karate Kid” up and down on one grit
and side to side on the next grit). After you are done with you last grit, break
out the polishing compound (available from automotive stores) and rub it all
over the part, and start polishing it with circular motions. This should give
you very good finish.
Follow the
same procedure for the clear coat as you did for the base color and let it dry.
Usually you should not have any orange peel at this point but if you do, you
need to crank out the micro mesh/sand paper. Start with something like 1500 grit
and go up all the way to 12000 grit on the micro mesh. Note that as you are
sanding you should only be polishing the clear coat and not the paint. As soon
as you see paint on your sandpaper/micro mesh stop; wash and dry the part to get
rid of sanding dust, and apply another layer of clear coat and start polishing
again after it has dried. Make sure that you alternate the direction of your
sanding every time you change grits (think “Karate Kid” up and down on one grit
and side to side on the next grit). After you are done with you last grit, break
out the polishing compound (available from automotive stores) and rub it all
over the part, and start polishing it with circular motions. This should give
you very good finish.
After the
Italian red part had gone on the body and various other parts (including the
interior of the head lights and the headrest/roll bar assembly and side view
mirror shells), I masked the rear body panel and painted the rear frame and main
frame with Model Master Flat Black. After painting the rear lights the
appropriate clear red and clear orange and attaching it to the rear
 body panel
with Microscale Krytal Klear. I then attached the rear body panel to the frame.
body panel
with Microscale Krytal Klear. I then attached the rear body panel to the frame.
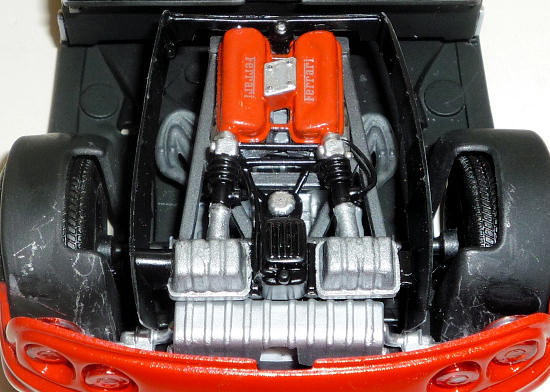
Next came the
engine/transmission/rear axel assembly. The transmission was hand painted with
Model Master Lacquer silver (my favorite silver now).
The engine
block was airbrushed with Metalizer non-buffing aluminum and various details
were hand-painted silver and Model Master dark gull gray. The tailpipes were
chromed. I removed all the chrome with Easy Off. I then airbrushed them (along
with other parts that required the chromed look) with Alclad Lacquer black.
After that had dried, I airbrushed Alclad chrome. The tailpipes look rather
crude and someone with better modeling skills than me may want to scratch-build
replacements for them. The rear axel was airbrushed with Humbrol semi-gloss
black (#85) and its tips were hand-painted silver. Note that there is no rear
suspension.
The rear axle
was fitted to the transmission and the whole thing was attached to the frame.
The fit was excellent with positive lock. Then the engine block was fitted on
top of it. The fit in general was excellent. I then painted the engine support
brace/lower intake manifold Metalizer gunmetal and hand painted the lower part
of the manifold dark gull gray and attached it to the engine block.
The front
suspensions were next. These along with the tie rod were painted Humbrol
semi-gloss black. After they had dried, I painted the springs Model Master dark
gull gray and attached the tie rod to them by using a hot screw driver to blunt
the tip of the pins on the suspensions that attach them to the tie rod.
The
cabin/interior was now constructed. I airbrushed the floor with MM dark gull
gray. I also airbrushed part of the door interiors and the shifter MM Lacquer
silver. I then painted the center console Metalizer aluminum. Afterwards, I
masked the floor and area
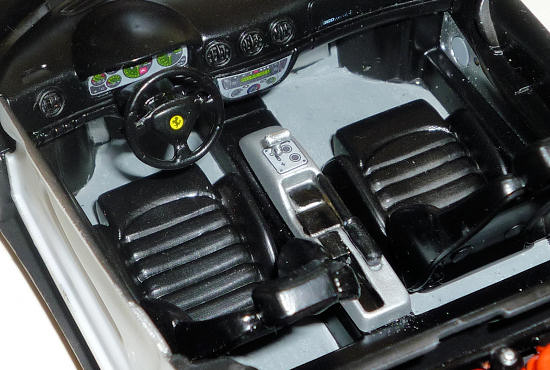 that was
painted silver and airbrushed everything with Humbrol semi-gloss black including
the seats, the dashboard, the steering wheel, the steering column and the rest
of the door interior. I had to wait a couple of days for these to dry. I then
picked various details with appropriate colors, including painting the vents
with MM flat black, the pedals with MM Lacquer silver, the speakers in the door
with MM dark gull gray and the boxes and lids on the center console Humbrol
semi-gloss black.
that was
painted silver and airbrushed everything with Humbrol semi-gloss black including
the seats, the dashboard, the steering wheel, the steering column and the rest
of the door interior. I had to wait a couple of days for these to dry. I then
picked various details with appropriate colors, including painting the vents
with MM flat black, the pedals with MM Lacquer silver, the speakers in the door
with MM dark gull gray and the boxes and lids on the center console Humbrol
semi-gloss black.
The assembly of
the cabin was rather simple. I decaled the dash dials, the radio and the shifter
part of the console. After these had dried, I assembled the steering wheel and
the steering column to the dashboard. Then I attached the shifter and the
parking break to the console. The problem that I had was that I could not see
where the hole for the shifter was through the decal. I solved that problem by
poking a needle through the hole from the bottom of the console and puncturing
the decal. After the shifter and break were attached, the console was glued to
the cabin floor. This required a bit of sanding to make the console snap into
place but it was not too much of a problem. I then attached the dashboard and
the door interiors to the cabin floor. Finally, the seats went in. These snap
into place so I did not glue them in. Finally, the entire cabin assembly was
attached to the frame with front suspension sandwiched between the cabin floor
(which include the front wheel wells) and the frame.
Next up was the
engine manifold. This had to be trimmed since the entire chassis is used both
for the spider and the hardtop version of the car. This was done rather easily
since the cut line was marked in the molding. I then painted the manifold first
by airbrushing Humbrol semi-gloss black, then painted various details with
Humbrol satin red (#174), MM aluminum, and MM lacquer silver. The manifold
fitted into place with no problems.
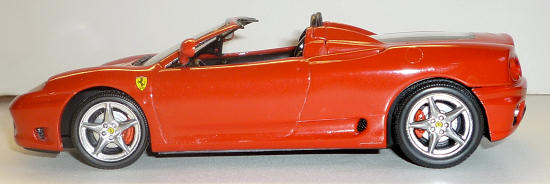
I now worked on
the wheels. First I painted the inner wheels with Humbrol semi-gloss black. Then
I painted the brake discs and the outer wheel with Alclad. The calipers were
painted with Humbrol satin red and Humbrol gunmetal. After these had dried, I
attached the brake discs to the inner wheels, added the tires and put the inner
wheels on the axels and glued the calipers on to keep the wheels in place. After
this the black “Ferrari” decals were put on the calipers. Finally, I added the
outer wheels and decals the “Prancing Horse” Ferrari logos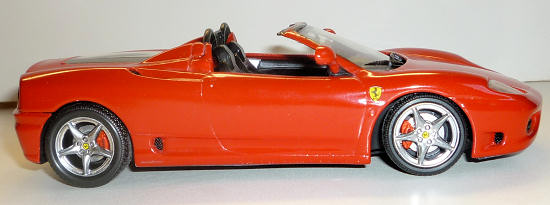 on the hubs. The chassis was now finished.
Now it was time
for the body. The body was already painted so I had to assemble different parts
to it. First was the roll bar. This part gave me the fits in terms of fit and
painting. I had painted it first with Italian red and after masking it, I had
sprayed it with Humbrol semi-gloss black. However, that paint did not hold as I
was trying to fit it to the body. I had to strip the paint and repaint the whole
thing and then attached to the body. I then cut the grills both for the roll
bars and for various intakes and outlets on the body. I attached the body grills
with superglue and attached the roll bar grills with Krystal Klear.
Next was the
head light/front lower panel. I had painted this Italian red and hand-painted
the radiator intakes MM flat black. I painted the back of the headlights silver
and painted the turn signal light Tamiya clear orange. I attached the front
panel/headlight assembly to the main body with the headlight lenses sandwiched
in between.
Next I attempted
to add the clear engine cover. This along with the windshield had been dipped in
the Future at the very beginning of the build. The grills on the side of the
engine cover are presented by decals. I had decaled the engine cover and had let
it dry. However, I did not notice that when I bumped my workbench it had drop on
the ground and I stepped on it and heard a loud crack. The cover was damage
beyond repair so I went on line and ordered the replacement part along with a
new decal sheet from Revell.com. The items arrived in a couple of weeks free of
charge (thanks Revell for great customer service).
Meanwhile, I had
acquired a Tamiya version of this kit and it had masks for the windshield and
the engine cover so that parts of the glass could be painted black. I made
copies of these masks in following manner. I first marked the outlines on the
Tamiya mask with a pen. I then made a photocopy of the masks. Finally, I
attached this copy to a sheet of Frisket with double-sided tape and used a Xacto
knife to cut out the pattern from Frisket.
When the new
cover arrived, I first dipped in future and let it dry. I then masked it and
used the Frisket mask on it and on the windshield and painted both with Tamiya
semi-gloss black (X-18, I had been using enamels because they are more durable
but in this case, I wanted something that dried quickly so I could finish the
job). I added the decals to the engine cover and attached to the body using
Krystal Klear.
Before attaching
the windshield, I hand painted the seal and inside the windshield frame on the
body as well as the triangle on the door where the side view mirrors attach with
Humbrol semi-gloss black. I also attached the windshield wipers (paint Humbrol
semi-gloss black) to the windshield with Krystal clear. The fit of the
windshield is not good at all. After applying Krystal Klear to the windshield
edges, I used clamps to keep the windshield attached to the frame. This did the
trick.
The final bits
and pieces were the rearview and the side view mirrors. These were painted
appropriate color (Italian red for the side view mirror shells and semi-gloss
black for the rearview mirror with silver for the mirrors). The side view
mirrors were attached with superglue and the rear view mirror was attached with
Krystal Klear.
The final stage
was attaching the body to the chassis. The fit here wasn’t very good. I used
superglue and rubber bands to attach the body to the chassis.
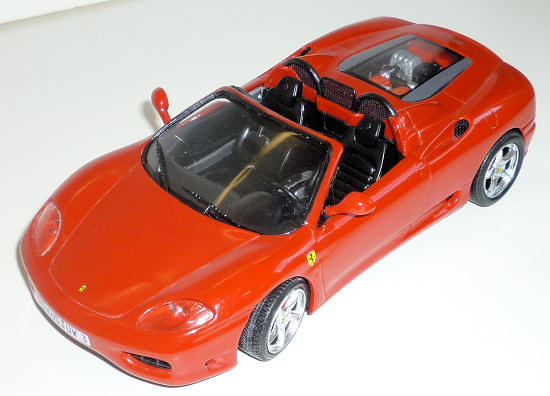
I put on various
decals in their prescribed locations. These are rather thin and go on without
any problems. The only real options here are choosing the license plate (I used
the German plates) and whether or not you add the Ferrari shields on the front
fenders (I did).
This was my
second car kit since I have come back to modeling. Before that, I hardly ever
made cars. Although it is not perfect, it still makes a nice replica of a very
beautiful car and makes me want to build more cars. As an aside, Tamiya also
makes the same car in the same scale, and although it is about $20 more
expensive than the Revell kit, I think the price difference is worth it (see
the review here in Modeling Madness. Overall grade:
B+.
Shervin
ShambayatiNovember 2011
If you would like your product reviewed fairly and fairly quickly, please contact the editor or see other details in the
Note to
Contributors.
Back to the Main Page
Back to the Review
Index Page