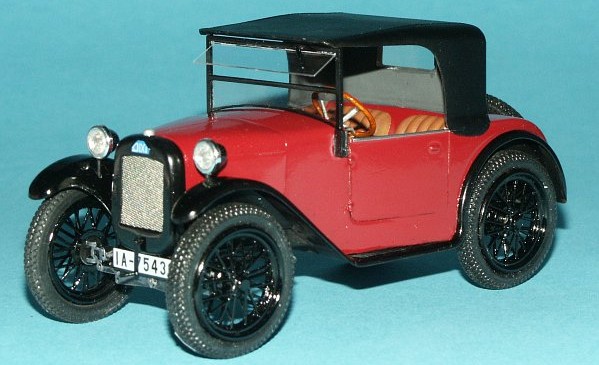
Revell 1/24 BMW 3/15 PS
| KIT #: | 07131 |
| PRICE: | € 12.50 |
| DECALS: | Three options |
| REVIEWER: | Martin Sczepan |
| NOTES: | Probably a rebox of an old Heller kit |
| BACKGROUND |
Some historical and technical information about the car and a description what you will find in the box can be found in my preview of the kit. Only one more remark: While looking for information about the car I found out that the kit is obviously a reissue of a Heller kit which is about 25 years old. It could be found in the 1981 catalogue.
| CONSTRUCTION |
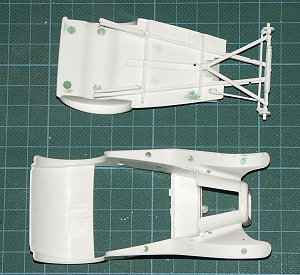
 Before ‚real’
construction work starts, some filling and sanding for all those ejector
pin marks has to be done. Most
Before ‚real’
construction work starts, some filling and sanding for all those ejector
pin marks has to be done. Most
 noticeably problem areas are the door
insides. All other ejector marks are on the underside of the model are not
that visible. I filled them anyway and while I was at sanding, I also
removed the poor representation of the exhaust system. The headlight
mounting points were drilled out and small imperfections in the body
surface were sanded off. Since most of the chrome parts in the kit are of
parts, which have to be painted later on, I removed these parts from their
sprue and dechromed them by soaking them in oven cleaner (from a spray can)
for about 15 minutes. In fact, the only chromed parts I kept were the
headlights.
noticeably problem areas are the door
insides. All other ejector marks are on the underside of the model are not
that visible. I filled them anyway and while I was at sanding, I also
removed the poor representation of the exhaust system. The headlight
mounting points were drilled out and small imperfections in the body
surface were sanded off. Since most of the chrome parts in the kit are of
parts, which have to be painted later on, I removed these parts from their
sprue and dechromed them by soaking them in oven cleaner (from a spray can)
for about 15 minutes. In fact, the only chromed parts I kept were the
headlights.
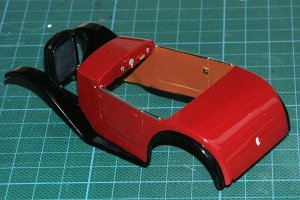
Now it was time to
start with the body construction. Firewall and doors were glued in place.
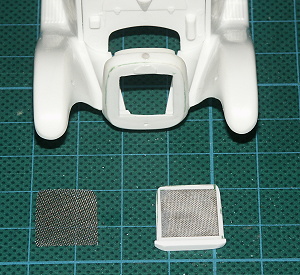
Since I didn’t like the simplified radiator housing assembly, I decided to
modify it. A new front face was cut from thin plastic sheet and the
original part was opened up (so that only a frame would remain) and then
the new front was glued in place. After removal of the radiator cap
 the
whole assembly was puttied and sanded smooth and a 1 mm hole was drilled
for mounting a new cap. Then the new radiator housing was mounted to the
body. The joints were strengthened with cyano glue and the whole thing had
to dry thoroughly. Meanwhile I cut some wire mesh for the radiator housing
and scratch built a radiator from Evergreen material and some more wire
mesh. I wanted the engine hood panels to be removable so I glued the four
hood parts together using the completed body/radiator assembly as a guide.
The joints were strengthened with strips of styrene material. Then
everything was sanded again to get a smooth and even body surface. The
wheels are simple two part assemblies. I scratched some of the flash on the
spokes away with an X-acto knife but otherwise used them as supplied in the
kit. A new exhaust pipe/muffler was built from plastic tubing and wire and
painted in a rust color.
the
whole assembly was puttied and sanded smooth and a 1 mm hole was drilled
for mounting a new cap. Then the new radiator housing was mounted to the
body. The joints were strengthened with cyano glue and the whole thing had
to dry thoroughly. Meanwhile I cut some wire mesh for the radiator housing
and scratch built a radiator from Evergreen material and some more wire
mesh. I wanted the engine hood panels to be removable so I glued the four
hood parts together using the completed body/radiator assembly as a guide.
The joints were strengthened with strips of styrene material. Then
everything was sanded again to get a smooth and even body surface. The
wheels are simple two part assemblies. I scratched some of the flash on the
spokes away with an X-acto knife but otherwise used them as supplied in the
kit. A new exhaust pipe/muffler was built from plastic tubing and wire and
painted in a rust color.
 In the next step
the front and rear suspension components were mounted to the base plate.
Some careful alignment was required to get the right sit for the front
wheels. For easier painting I left of the transmission and rear axle
components, which were built as a separate subassembly. Some more filling
of sink marks was necessary with these parts. The chassis assembly was then
airbrushed with medium grey. After some masking the frame and suspension
parts got a coat of satin black and the leaf springs were brush painted in
gunmetal. At the end of this step the underside of the car was weathered
with some drybrushing and washes. The cockpit floor has some nasty sink
marks, which cannot be removed without destroying the surface structure. My
solution to this problem was to glue on new floor panels made from styrene
sheet and engraved with a line pattern similar to the one found on the kit
parts.
In the next step
the front and rear suspension components were mounted to the base plate.
Some careful alignment was required to get the right sit for the front
wheels. For easier painting I left of the transmission and rear axle
components, which were built as a separate subassembly. Some more filling
of sink marks was necessary with these parts. The chassis assembly was then
airbrushed with medium grey. After some masking the frame and suspension
parts got a coat of satin black and the leaf springs were brush painted in
gunmetal. At the end of this step the underside of the car was weathered
with some drybrushing and washes. The cockpit floor has some nasty sink
marks, which cannot be removed without destroying the surface structure. My
solution to this problem was to glue on new floor panels made from styrene
sheet and engraved with a line pattern similar to the one found on the kit
parts.
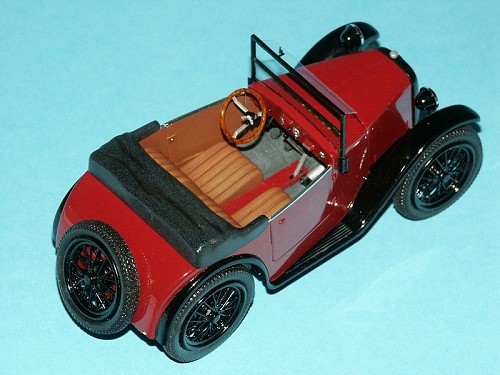
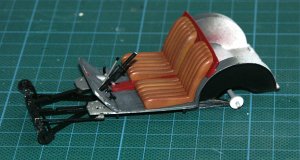
The engine was assembled from the kit parts. The cylinder heads got some additional detailing and four holes for the spark plugs were drilled. I painted the engine block dark metallic grey, the cylinders black and the exhaust manifold with rust color. Other small bits were painted in different shades of grey and silver.
| COLORS & MARKINGS |
 Painting starts
with the inside of the body. For almost all painting work I used Revell and
Humbrol enamels. First a coat of dark ochre was applied followed by a
somewhat translucent layer of reddish brown. The seats got the same
treatment with some additional preshading in dark brown before the final
coat of satin red brown.
Painting starts
with the inside of the body. For almost all painting work I used Revell and
Humbrol enamels. First a coat of dark ochre was applied followed by a
somewhat translucent layer of reddish brown. The seats got the same
treatment with some additional preshading in dark brown before the final
coat of satin red brown.
 Then the painted interior was masked off with
Humbrol Maskol. I decided to paint my DIXI in a nice dark red instead of
the emerald green proposed in the instruction sheet. But as a first step
the fenders, radiator and engine compartment had to get their black finish.
All parts were airbrushed with satin black followed by a coat of gloss
black. In this step also the wh
Then the painted interior was masked off with
Humbrol Maskol. I decided to paint my DIXI in a nice dark red instead of
the emerald green proposed in the instruction sheet. But as a first step
the fenders, radiator and engine compartment had to get their black finish.
All parts were airbrushed with satin black followed by a coat of gloss
black. In this step also the wh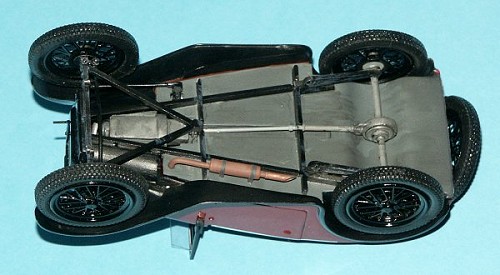 eels, headlights (the lamp rings were masked
off with Tamiya-tape and Maskol before), windshield frame and soft top
(only satin) got their black paint. Now it was time to mask the fenders.
With some careful masking using Tamiya tape (cut to strips of app. 2 mm
width) and Maskol I managed to get the body ready for the application of
the red paint. For ensuring a good coverage I started with two consecutive
layers of satin red followed by two layers of glossy red. Before the last
layer was applied (and after a drying time of more than a week) the paint
was sanded using 1000 grit sandpaper to eliminate rough spots. When the
last paint layer was sufficiently dry, masking was removed. A final gloss
coat was applied after another week of drying time, some more sanding –
this time using 2000 grit sandpaper and the application of the decals
(factory badge, instruments and license plate). For the representation of
the chromed door rails I used 1 mm wide strips of bare metal foil.
eels, headlights (the lamp rings were masked
off with Tamiya-tape and Maskol before), windshield frame and soft top
(only satin) got their black paint. Now it was time to mask the fenders.
With some careful masking using Tamiya tape (cut to strips of app. 2 mm
width) and Maskol I managed to get the body ready for the application of
the red paint. For ensuring a good coverage I started with two consecutive
layers of satin red followed by two layers of glossy red. Before the last
layer was applied (and after a drying time of more than a week) the paint
was sanded using 1000 grit sandpaper to eliminate rough spots. When the
last paint layer was sufficiently dry, masking was removed. A final gloss
coat was applied after another week of drying time, some more sanding –
this time using 2000 grit sandpaper and the application of the decals
(factory badge, instruments and license plate). For the representation of
the chromed door rails I used 1 mm wide strips of bare metal foil.
| FINAL CONSTRUCTION |
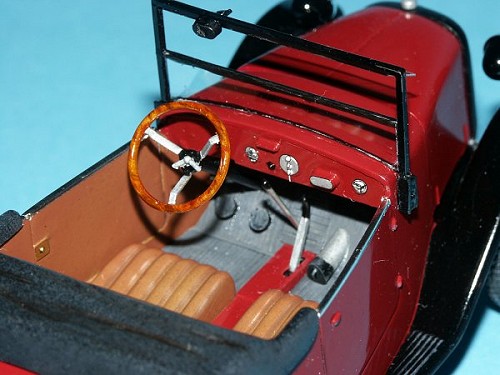
Final construction starts with attaching the rear axle to the suspension. At this point careful alignment of the parts is essential to get all four wheels touching the ground. I needed some small pieces of styrene strip shimmed between right hand side attachment point of the suspension and the axle to get everything lined up. Then seats, pedals, steering column and gear shift and brake levers were attached to the floor pan. The gear shift lever was replaced with a scratch built item, made from wire with a drop of cyano glue representing the knob.
 Finally it was time
to mate the chassis assembly with the body. Everything fits more or less
except for ca. 1 mm wide gaps between body and floor plate. I left these as
they were since I didn’t wanted to mar the nicely painted surfaces with
glue…
Finally it was time
to mate the chassis assembly with the body. Everything fits more or less
except for ca. 1 mm wide gaps between body and floor plate. I left these as
they were since I didn’t wanted to mar the nicely painted surfaces with
glue…
Then I implanted the engine into its compartment after I installed my scratch built radiator. To make it look somewhat more realistic, I added ignition wires and spark plugs made from wire and plastic tubing. The starter crank was replaced by a scratch built version.
The clear parts in the kit are relatively thick so I decided to replace the wind shield and rear window with thin clear plastic sheet. I used the kit parts as templates. The wind shield frame and windows were attached to the body. The windshield wiper was replaced and the wiper motor was removed from the kits wind shield part and attached to the frame.
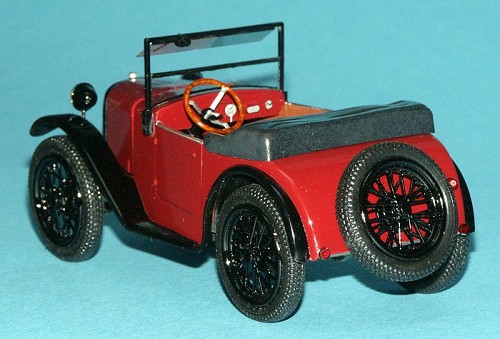
The last step was to mount lamps, steering wheel and wheels to the model. Rear lights were painted clear red and black before attaching them to the car body with two component glue.
The hood and soft top parts were not glued to the model so it is possible to display it with open/closed top or engine compartment.
| CONCLUSIONS |
Despite its age, this is a nice little kit which is easy to assemble and offers nice detailing. In some spots (sink marks, ejector pin marks) additional filling and sanding is required but nothing beyond the capabilities of most modelers. The use of chrome parts is somewhat overdone and the transparent parts are not up to modern standards but fortunately these are things which can be easily corrected. So if you are looking for something unusual or are interested in historic cars, this kit could be interesting for you. It offers potential for additional detailing and could also be converted into an Austin Seven – or one of its many derivatives - with some work.
May 2005
If you would like your product reviewed fairly and quickly , please contact me or see other details in the Note to Contributors.