| KIT #: | 48020 |
| PRICE: | $8.95 when it was brand new. |
| DECALS: | One option |
| REVIEWER: | Tim Peters |
| NOTES: |
| HISTORY |
This generation of Olds Cutlass replaced the Delta 88 for the 1988 NASCAR season and was used until the end of the 1992 season when Olds left NASCAR, following Buick’s departure the year before.
This version of the Morgan McClure #4 debuted in 1988 with Rick Wilson driving. He scored the team’s first pole at Bristol in 1988. After two winless seasons, the team hired Phil Parsons to drive the car in 1990. Parsons was released after three sub par races and Ernie Irvan was hired. Irvan won the pole for the spring Bristol race in his third start for the team. The team switched to a Chevrolet in the middle of the season, debuting the car at Talladega in July. Irvan scored the team’s first win 3 races later at Bristol, leading the several successful seasons afterwards.
| THE KIT |
 This is AMT’s version of the
NASCAR 1988 Olds Cutlass.
The kit was released in 3 different
boxings, the #94 Sunoco car, the #68 Country Time car and the Kodak car.
AMT’s kits usually reflect the
short track versions of the cars so the bodies have more grill openings then you
would find on a car that ran at a bigger track like Daytona.
The roll cage is a bit different
than the Monogram stock cars which tend to look like the superspeedway versions
of the cars.
The body is molded with an separate
hood and trunk.
The car has a clear sprue with a
windshield and a wrap around rear window that includes the rear quarter windows
and a lip for trunk.
You also get a clear fuel filler
and vent tube.
The chrome sprue has the several of
the engine accessories and the wheels as well as a 2 piece jack.
Like most stock car kits, just
about all the chrome parts need to be stripped as stock cars don’t have any
chrome under the hood.
Chrome wheels were banned in NASCAR
in the late 80’s so the wheels need to be stripped and painted, usually gloss
black.
The decals match the box art and in
register so no issues here.
The glue kits like these are long
out of production but they can be found easily at shows or on Ebay.
This is AMT’s version of the
NASCAR 1988 Olds Cutlass.
The kit was released in 3 different
boxings, the #94 Sunoco car, the #68 Country Time car and the Kodak car.
AMT’s kits usually reflect the
short track versions of the cars so the bodies have more grill openings then you
would find on a car that ran at a bigger track like Daytona.
The roll cage is a bit different
than the Monogram stock cars which tend to look like the superspeedway versions
of the cars.
The body is molded with an separate
hood and trunk.
The car has a clear sprue with a
windshield and a wrap around rear window that includes the rear quarter windows
and a lip for trunk.
You also get a clear fuel filler
and vent tube.
The chrome sprue has the several of
the engine accessories and the wheels as well as a 2 piece jack.
Like most stock car kits, just
about all the chrome parts need to be stripped as stock cars don’t have any
chrome under the hood.
Chrome wheels were banned in NASCAR
in the late 80’s so the wheels need to be stripped and painted, usually gloss
black.
The decals match the box art and in
register so no issues here.
The glue kits like these are long
out of production but they can be found easily at shows or on Ebay.
| CONSTRUCTION |
 The
first thing I always do on stock car kits is fold up the instructions and put
them back in the box.
These cars are much easier to build
without them and paint color callouts tend to range from close to funny.
I start by painting the engine.
I painted the block and headers
steel, the distributor cap, belts, fan and radiator hose semi-gloss black with
the rest of the parts being painted aluminum including the transmission.
I glued the firewall to the chassis
next.
A quick note on this part, I have
not built a stock car kit where this fits right.
The firewall always sits high on
the transmission tunnel and creates a ridge.
You can fix this by sanding the
bottom of the firewall where it meets the floor pan until it fits better and
smoothing the join with filler.
I didn’t do that here as the black
cage and the dashboard will hide it and no one is looking under this car.
Then I attached the fuel cell to
the chassis.
Next take the center roll bar, it’s
shaped like a X, and place it in the chassis.
The longest end goes through the
firewall.
Now, to make painting easier, glue
the part that goes through the firewall to the chassis.
Then cut the bar at the firewall
and remove the bar.
Then I started on the roll cage.
It’s much easier to assemble the
cage first then paint it to avoid paint touchups on every join.
I started by attaching the rear of
the cage to the sides and placing them on the chassis to confirm the alignment.
Don’t glue anything to the chassis
itself, just leave it loose.
Continue assembling the roll cage
using the chassis as a guide.
When you are done and the glue is
set, remove the cage and set it aside.
The
first thing I always do on stock car kits is fold up the instructions and put
them back in the box.
These cars are much easier to build
without them and paint color callouts tend to range from close to funny.
I start by painting the engine.
I painted the block and headers
steel, the distributor cap, belts, fan and radiator hose semi-gloss black with
the rest of the parts being painted aluminum including the transmission.
I glued the firewall to the chassis
next.
A quick note on this part, I have
not built a stock car kit where this fits right.
The firewall always sits high on
the transmission tunnel and creates a ridge.
You can fix this by sanding the
bottom of the firewall where it meets the floor pan until it fits better and
smoothing the join with filler.
I didn’t do that here as the black
cage and the dashboard will hide it and no one is looking under this car.
Then I attached the fuel cell to
the chassis.
Next take the center roll bar, it’s
shaped like a X, and place it in the chassis.
The longest end goes through the
firewall.
Now, to make painting easier, glue
the part that goes through the firewall to the chassis.
Then cut the bar at the firewall
and remove the bar.
Then I started on the roll cage.
It’s much easier to assemble the
cage first then paint it to avoid paint touchups on every join.
I started by attaching the rear of
the cage to the sides and placing them on the chassis to confirm the alignment.
Don’t glue anything to the chassis
itself, just leave it loose.
Continue assembling the roll cage
using the chassis as a guide.
When you are done and the glue is
set, remove the cage and set it aside.
| COLORS AND MARKINGS |
Take
the assembled chassis and roll cage along with the trailing arms, rear end
housing, rear shelf , seat
dashboard and instrument panel and
the lower front suspension and painted everything flat black.
While that is drying, I painted the
rest of the parts.
The driveshaft was painted white
with aluminum ends, the springs, brakes
and exhaust were painted steel.
The steering shaft, shocks, blower
motor and radiator were all painted aluminum.
The fire extinguisher was painted
red with a silve r nozzle.
I stripped the chrome from the
wheels and painted them gloss black.
r nozzle.
I stripped the chrome from the
wheels and painted them gloss black.
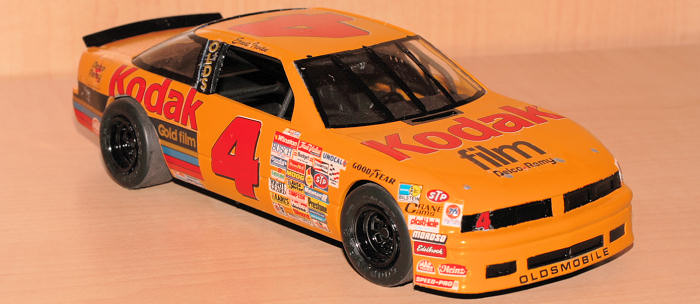
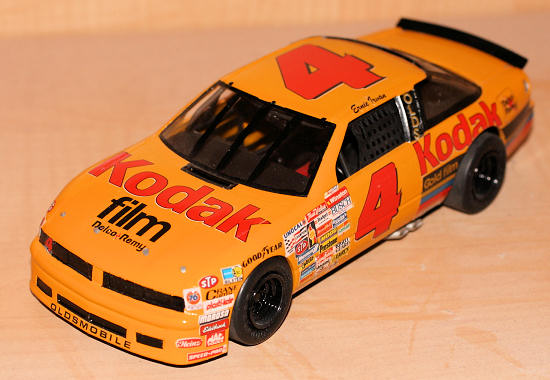
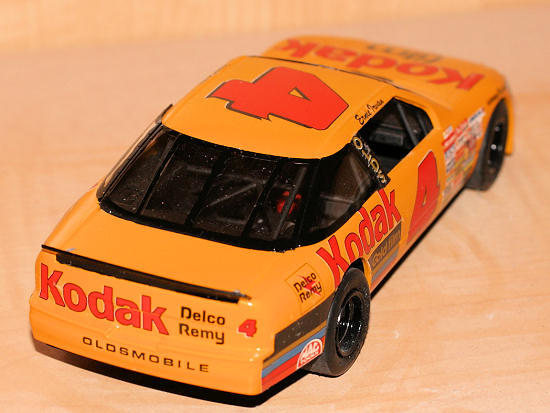
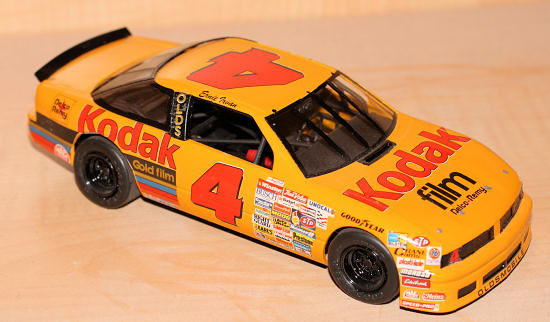
For the body, First I primed the car black and wet sanded the patch area again to get it real smooth. Then I masked off the grill openings on the nose, the B-posts and the carb inlet at the base of the windshield. Then it was time for color. The #4 team painted all of the Kodak cars the same shade of yellow, starting with the first Olds in 1986 all the way to the Pontiacs in 2003. It was a GM factory color called Wheatland yellow and it matched Kodak’s flim boxes. The easiest way to match the color is to give the body a flat red under coat and then spray the body Duplicolor Schoolbus Yellow. You can also use regular Testors yellow as well as it as an orange tint to it. After the body cured for a few days, I pulled the masking off and started polishing. I lightly wet sanded the body with 4000 and 6000 grit polishing cloths and then rubbed it down with polishing compound and a flannel cloth. I painted the rear spoiler gloss black and glued it to the body. I shot the body with a light coat of gloss clear and then started decaling. AMT’s decals aren’t as bad as Monogram’s decals from the 80’s but they are a tad thick and the glue on the decals is a murky white. You will be changing the decal water a few times. I usually start on one corner and worked my way around the car.
| FINAL BITS |
As the parts cured, I started on
the body.
Normally this is an easy step but
the body had a significant molding defect on the right rear fender.
I cut out the affected area with my
dremel tool and a cutoff wheel and made a patch from Evergreen sheet.
I glued in the patch panel and
sanded and puttied the patch until it blended in the fender.
I also glued the hood and trunk to
the car (more on the trunk later)and attached the rear bumper.
The bumper will need a little
blending into the body but with careful assembly,
 you should be able to avoid
putty.
I then started assembling the
chassis.
The first thing I did was glue the
rear end housing, brakes and
springs to the trailing arms and
attach the driveshaft.
I also slid the metal rear axle in
place and glued it in.
Make sure it’s even to make sure
the rear tires have something to mount to.
I then glued the power steering
pump and steering shaft to the chassis as it’s a real pain to do it later.
Next, I assembled the front
suspension and attached it to the chassis.
Then I dropped in the engine and
mounted the rear suspension.
I then attached the radiator and
got it lined up to the fan.
I also attached the seat and the
interior accessories.
I assembled the dashboard and
steering wheel next.
Now it’s time to drop the cage in
place.
Since the cage was built on the
chassis earlier, it should just drop into place.
Once that’s in, attach the rear
view mirror, exhaust
and the dash assembly and that
should complete the chassis.
The final step is to build the
tires.
I scuffed the tires with a sanding
wheel on my Dremel to give them a raced look as well as to get rid of the mold
seam down the middle of the tires.
Then assembly the wheels and mount
the front axle stubs in the inner wheels before you glue them into the tires (or
insert trimmed sprue in the wheels if you forget, ask me how I know…).
Then mount the tires on the car.
Once all four tires are on and
straight, let it sit for a day or two to set.
you should be able to avoid
putty.
I then started assembling the
chassis.
The first thing I did was glue the
rear end housing, brakes and
springs to the trailing arms and
attach the driveshaft.
I also slid the metal rear axle in
place and glued it in.
Make sure it’s even to make sure
the rear tires have something to mount to.
I then glued the power steering
pump and steering shaft to the chassis as it’s a real pain to do it later.
Next, I assembled the front
suspension and attached it to the chassis.
Then I dropped in the engine and
mounted the rear suspension.
I then attached the radiator and
got it lined up to the fan.
I also attached the seat and the
interior accessories.
I assembled the dashboard and
steering wheel next.
Now it’s time to drop the cage in
place.
Since the cage was built on the
chassis earlier, it should just drop into place.
Once that’s in, attach the rear
view mirror, exhaust
and the dash assembly and that
should complete the chassis.
The final step is to build the
tires.
I scuffed the tires with a sanding
wheel on my Dremel to give them a raced look as well as to get rid of the mold
seam down the middle of the tires.
Then assembly the wheels and mount
the front axle stubs in the inner wheels before you glue them into the tires (or
insert trimmed sprue in the wheels if you forget, ask me how I know…).
Then mount the tires on the car.
Once all four tires are on and
straight, let it sit for a day or two to set.
After finishing the decaling, I sprayed the car with gloss clear again. I painted the trim and support bars on the glass gloss black. Now to mount the glass, you are going to have an issue if you glued the trunk in place as the rear glass has a wide lip on the end that will keep it from going in. If you leave the trunk loose, the window drops right in. If it’s glued in, you will need to work the rear window in from the bottom and then glue it in after it’s in. After that the chassis goes in. Place the rear of the chassis in first and then slide the front of it up and into position and that finishes the car.
| CONCLUSIONS |
This is a fun kit to build. The nice thing about stock cars is that they can all be assembled the same way. The AMT cars use the exact same chassis under different bodies so once you figure out the tricks, it’s smooth sailing. The AMT cars are fun to build and are a great starting point for anyone getting into stock cars. The older kits like this one are easy to find and a very easy build.
August 2012
If you would like your product reviewed fairly and fairly quickly, please contact the editor or see other details in the Note to Contributors.