Revell
Monogram
| KIT #: | 0536 |
| PRICE: | $12.00 MSRP when new |
| DECALS: | One option |
| REVIEWER: | Shawn Payne |
| NOTES: | A whole hobby shop of aftermarket sets used. |
| HISTORY |
Revell has a long history of
producing nicely detailed dragster kits, and this 1996 release of Top Fuel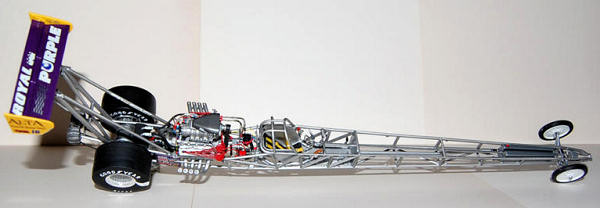 Alcohol dragsters lived up to their expected quality.
These kits were impressive in their detail and captured the overall look
and feel of the top line of drag racing cars.
This kit was released in many liveries of top teams and one off special
sponsor schemes.
Alcohol dragsters lived up to their expected quality.
These kits were impressive in their detail and captured the overall look
and feel of the top line of drag racing cars.
This kit was released in many liveries of top teams and one off special
sponsor schemes.
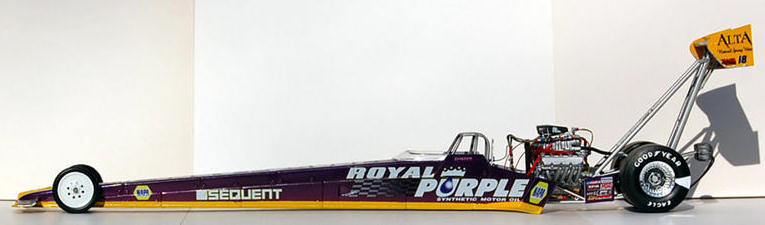
This kit
represents the livery that Cristen Powell broke records and got her first win in
1996. As a teenager at the NHRA
Sears Craftsman Nationals in 1996, she set a new national alcohol dragster
elapsed time record with a run of 5.44 seconds.
In her 7th professional race at
| THE KIT |
This kit
comes molded in white plastic, chrome, clear windscreen and vinyl tires, with
the large rear tires coming in two parts.
All parts come bagged in the box.
Instruction and decals round out the inventory.
There was little flash on some of the parts but over all clean up was
minor. The only major issue which v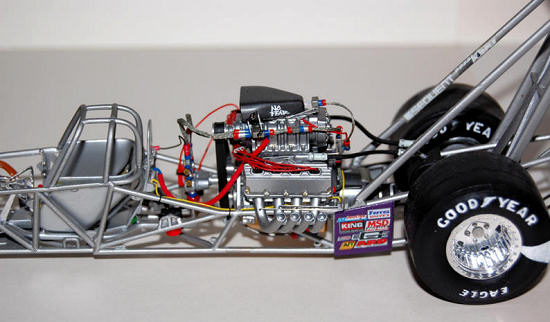 aried
from kit to kit was the condition of the main body’s rail frame.
This part was molded as a whole unit from seat compartment to nose.
The frames have a slight bend in them of various degrees from kit to kit,
ranging from slight to noticeable.
The reason for this turned out to be that when the part was being pulled out of
the injection machine, if it was not pulled straight out but at an angle then
the still warm plastic would twist and bend before completely cooling.
Heating the frame part in hot tap water and some playing around with it
could get the part back in to a line straight enough that would work.
The main one piece body did not seem to suffer from this problem, at
least not in any of the kits is have.
aried
from kit to kit was the condition of the main body’s rail frame.
This part was molded as a whole unit from seat compartment to nose.
The frames have a slight bend in them of various degrees from kit to kit,
ranging from slight to noticeable.
The reason for this turned out to be that when the part was being pulled out of
the injection machine, if it was not pulled straight out but at an angle then
the still warm plastic would twist and bend before completely cooling.
Heating the frame part in hot tap water and some playing around with it
could get the part back in to a line straight enough that would work.
The main one piece body did not seem to suffer from this problem, at
least not in any of the kits is have.
Revell captured the detail of the alcohol engine nicely. Alone it builds in to a great stand alone. The instructions are clear in their step-by-step construction with painting guides throughout. The decals are of good quality but just a little transparent with the white and yellow logos. Two sets are needed to double up with those logos to get a nice appearance.
| CONSTRUCTION |
Most of the parts will need to be
painted prior to gluing together.
First with the alcohol engine:
I wanted to really detail this engine out as much as I could.
So off to my local hobby shop:
There I got the following aftermarket sets:
Display Scale Products detailing set, 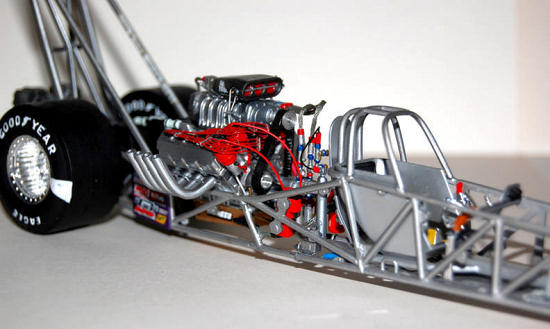 the engine
and painted them as the instruction called for.
At this point I decided to reinforce the pulley mounts with brass rod so
the tension of the rubber aftermarket belt would not break away.
Working from a few photos and a wiring diagram provided from the DSP set,
I drilled out all the locations for the wiring and scratch built the components
as they were being call for. I used hollow aluminum tubing cut into small
sections and painted blue and red to be used at the hose connectors.
This worked out well and gave some extra strength to these parts.
Needless to say a lot of time was needed, and it was slow going
detail-work on the engine. I must
say that this was a lot of fun to do and I just took my time and let the engine
come together. With the
engine completed, I set it aside and moved on.
the engine
and painted them as the instruction called for.
At this point I decided to reinforce the pulley mounts with brass rod so
the tension of the rubber aftermarket belt would not break away.
Working from a few photos and a wiring diagram provided from the DSP set,
I drilled out all the locations for the wiring and scratch built the components
as they were being call for. I used hollow aluminum tubing cut into small
sections and painted blue and red to be used at the hose connectors.
This worked out well and gave some extra strength to these parts.
Needless to say a lot of time was needed, and it was slow going
detail-work on the engine. I must
say that this was a lot of fun to do and I just took my time and let the engine
come together. With the
engine completed, I set it aside and moved on.
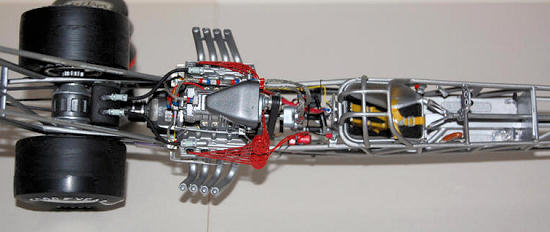
Moving on
to the frame I assembled what cross bars that could be added without interfering
with later components. Also at this
point I glued the engine and rear wing frame rails to the main frame.
I sprayed the frame rail parts with Testors Model Master Steel from the
can. The seat tub was sprayed
aluminum along with the fuel tank.
Now time
for the assembly of the components:
In went the fuel tank with the kit supplied fuel lines.
Front suspension and the steering rod, of which I used aluminum tubing
for that part instead of the kit supplied part.
In went the seat tub and the small parts that are attached to the frame
around the engine. Next went in the
rear axle. This aligned the rear
part of the frame and made it so the engine ju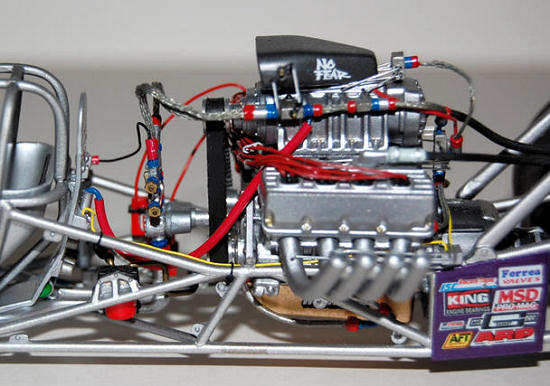 st
dropped into the frame without problems.
Once the engine was in place the last of the engine “plumbing” was done.
The frame rail part of the kit was now complete.
I assembled the tires and wheels and put them on.
All four wheels touched the ground, a small miracle to say the least.
st
dropped into the frame without problems.
Once the engine was in place the last of the engine “plumbing” was done.
The frame rail part of the kit was now complete.
I assembled the tires and wheels and put them on.
All four wheels touched the ground, a small miracle to say the least.
I cleaned
up the mold lines on the body with little effort, glued on the front wings and
the rear side skirts. Then
assembled the rear wing, and now these parts were ready for paint.
First I painted the inside of the body Testors Aluminum.
Then on the topside of the body I painted the Yellow trim and wing end
plates with Testors yellow. I used
Testors Model Master Gloss Royal Purple sprayed on with the airbrush to paint
the main color of the body and wings.
The decals went on without problems. As mentioned before the whites and yellows on the sheet were a bit transparent, so doubling up on those would have helped. Because the areas that the decals were to be placed were pretty much flat surfaces, I found no need for the use of solvents.
| CONCLUSIONS |
 This kit
builds up nice with no assembly problems.
It is a good model for beginners and does open itself up for all the
advanced aftermarket stuff for the super detailers.
For me this was a fun change of pace from the military jets I mostly
build. This is one of two models I
have on display in my work office.
This kit
builds up nice with no assembly problems.
It is a good model for beginners and does open itself up for all the
advanced aftermarket stuff for the super detailers.
For me this was a fun change of pace from the military jets I mostly
build. This is one of two models I
have on display in my work office.
Note.
You may have noticed that the left front wing end plate is missing, it
got lost a few years back now in a move.
Someday I will replace it.
April 2010
If you would like your product reviewed fairly and quickly, please contact me or see other details in the Note to Contributors.