Monogram
| KIT #: | 36115 |
| PRICE: | $16.98 |
| DECALS: | At least two options |
| REVIEWER: | Shawn Payne |
| NOTES: | New mold kit |
| HISTORY |
In the late 1980’s Monogram released a series of IndyCar model kits. Each kit covered a different type of chassis and engine combination. This kit is of the Buick Lola combination that was driven by Teammates, 3 time Indy 500 winner , Johnny Rutherford and Jim Crawford in the 1988 Indy 500. Jim Crawford was the only non-Penske driver to lead a lap in that year’s 500 which saw Rick Mears win his 3rd of 4 500’s.
| THE KIT |
The model
is molded in white plastic. The
tree for the wheels, mirrors and fuel filler cap are chrome plated with the
windscreen molded in clear smoked plastic.
The decals are a little thick but well printed and work well with
solvents. The decals give you the
option of either of the two cars.
The parts have no flash and require little clean up.
The detail is very nice and accurate for the engine and cockpit tub.
It al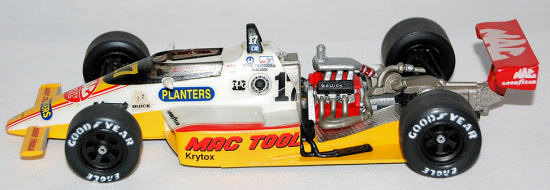 so
gives you the front and rear wings to build either speedway or short track/road
course configurations. The black
vinyl tires are good representations of the Goodyear speedway slicks.
so
gives you the front and rear wings to build either speedway or short track/road
course configurations. The black
vinyl tires are good representations of the Goodyear speedway slicks.
The
instructions give you step by step construction in good order and also give
painting guides and after some reviewing of the speedways archives to be correct
for what colors to use and where.
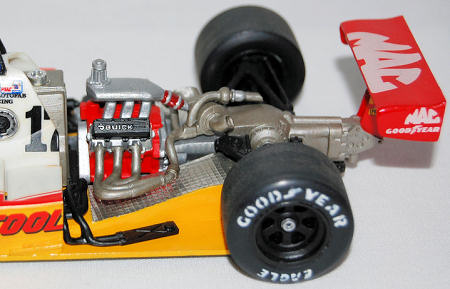
The parts for the engine are well detailed and it comes with the two engine halves, two transmission halves with separate headers and valve covers with the manufacture Buick logo molded in. Also included is a driver figure.
| CONSTRUCTION |
Starting
with the engine I glued the 2 halves of the block together and then the
transmission halves together. For
ease of painting I did not glue the engine and transmission parts together at
this time. The rest of the engine
parts were cleaned up and prepped for painting.
 Now on to
the tub. I decided not to use the
driver so I set those parts in the spare parts box and moved on.
For this kit most of the parts were painted before the construction was
done. I painted the tub
aluminum with the dash flat black and highlighted the instrument gages with
silver, white and red. A drop of
crystal clear was placed in the gage faces and the tub was done.
The bottom of the chassis’s inside engine compartment was painted flat
black and the molded lower rear suspension painted chrome silver.
I used bare metal foil where the exhaust heat shields are on the chassis.
With that done it was time to glue in the tub and the engine after it was
painted and assembled to the lower chassis.
At this point decide which wing package you’re going to go with and place
the front wing in to place. Glue
the upper part of the front tub to the lower chassis and your ready for final
painting of the body. With this kit
the engine cowling and upper side pods are removable to allow you to see the
engine detail and radiators with the plumbing once completed.
Now on to
the tub. I decided not to use the
driver so I set those parts in the spare parts box and moved on.
For this kit most of the parts were painted before the construction was
done. I painted the tub
aluminum with the dash flat black and highlighted the instrument gages with
silver, white and red. A drop of
crystal clear was placed in the gage faces and the tub was done.
The bottom of the chassis’s inside engine compartment was painted flat
black and the molded lower rear suspension painted chrome silver.
I used bare metal foil where the exhaust heat shields are on the chassis.
With that done it was time to glue in the tub and the engine after it was
painted and assembled to the lower chassis.
At this point decide which wing package you’re going to go with and place
the front wing in to place. Glue
the upper part of the front tub to the lower chassis and your ready for final
painting of the body. With this kit
the engine cowling and upper side pods are removable to allow you to see the
engine detail and radiators with the plumbing once completed.
| COLORS & MARKINGS |
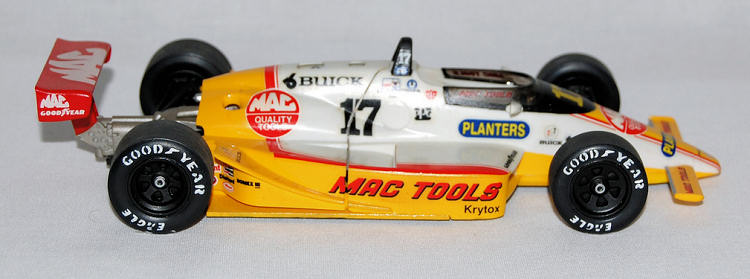
The body
of this car was over all white with yellow and red highlights.
The decals provide the yellow for the nose and red trim for the side pods
and rear engine cowling. Testors
Yellow and Red was spot on matches for the decals.
Yellow was painted on the
 side pods
and the portion of the lower sides of the nose along with the rear cowling.
The rear wing and wing supports were painted Red.
A coat of testers gloss and next was the decals.
Even though the decals were a little thick they went on with no problems.
With Monogram decals of this era I put a little Elmer’s white glue in the
water I used to wet them down with.
This helps the decals adhere better and not curl up on the edges.
I did use a setting solution on the rear wing decal and it worked well
with the decal, no problems there.
side pods
and the portion of the lower sides of the nose along with the rear cowling.
The rear wing and wing supports were painted Red.
A coat of testers gloss and next was the decals.
Even though the decals were a little thick they went on with no problems.
With Monogram decals of this era I put a little Elmer’s white glue in the
water I used to wet them down with.
This helps the decals adhere better and not curl up on the edges.
I did use a setting solution on the rear wing decal and it worked well
with the decal, no problems there.
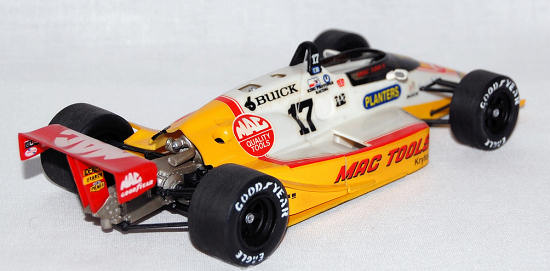
Keeping
with the look of the car Johnny Rutherford drove that year I painted the wheels
gloss black. I used acrylic white
to paint the Goodyear lettering on the tire, enamel never seems to dry on the
vinyl.
With the body painted and decaled I finished the rest of the assembly. I attached the upper parts of the front and rear suspension, then on went the tires and wheels.
| CONCLUSIONS |
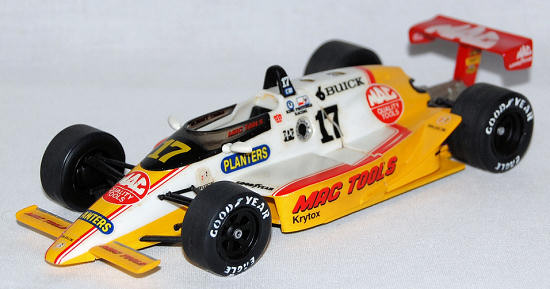
 I built
this kit straight out of the box without adding any extra details.
It went together without any fit problems and no need for filler and
hours of sanding. This kit has lots
of potential for “super detailing” and I do intend to build another one with
that in mind some day. This kit can
be built as a first time kit and you will get great results from it.
I built
this kit straight out of the box without adding any extra details.
It went together without any fit problems and no need for filler and
hours of sanding. This kit has lots
of potential for “super detailing” and I do intend to build another one with
that in mind some day. This kit can
be built as a first time kit and you will get great results from it.
| REFERENCES |
Photo
archives of the
IndianapolisMotorSpeedway.com
online photo archives.
Thanks to If you would like your product reviewed fairly and quickly, please contact the editor or see other details in the Note to Contributors.