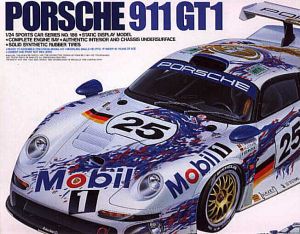
Tamiya 1/24 Porsche 911 GT1
Kit Number: Sports Car Series No. 186
Price: $28
Decals: Two cars, numbers 25 and 26 from the 1996 Le Mans race
Date of review: February 1, 1998
Review and photos by: Lee Kolosna
Porsche's 911 GT1 racer was first introduced for the 1996 Le Mans endurance race with great success. The two cars entered finished second and third. Porsche went on to win the manufacturer's championship that year, which was remarkable considering the GT1 marked the company's return to competition after an eight-year absence. GT1 rules state that cars that are raced must be based on production vehicles, so Porsche is making thirty for sale to the general public. At an asking price of 1.5 Million Deutsche Marks, (about $887,500), they are going fast. Eighteen have already been sold. The race version of the car has a six cylinder, twin-turbocharged engine that produces over 600 HP, and with proper gearing a top speed of 220 MPH can be achieved.
Tamiya came out with a kit late in 1997 in its sports car series. It is molded in white, black, chromed, and clear plastic. Also included are synthetic rubber tires, polycaps for attaching the wheels, and pre-cut masks for the window framing. Most impressively, a multi-colored decal sheet depicting the two 1996 Le Mans cars in their striking Mobil One paint jobs is included. This sheet might be the finest that I've seen provided in a car kit. Instructions outline 21 construction steps. A separate sheet indicating most of the placement of decals is also provided. Note that quite a few decals are applied in the middle of the construction process, so pay careful attention to the main instruction sheet for decal placement on the engine, instrument panel, drivers seat, wheels, and headlights. Painting instructions are listed in terms of Tamiya paint colors only. There is a lot of painting to do on this kit (nearly every single piece, in fact), so some of Tamiya's recommendations have to be made in terms of their goofy color blending ratios. I assumed that the recommendation for mixing one part chrome silver and one part gold for the brake calipers and drive shafts is Tamiya's way of defining brass, so I used the proper color in Testors' line.
First off, I detached pieces on the chrome sprue that didn't need to be chromed, like the fuel tank, turbochargers, exhaust pipes, and various engine components. I gave them a fifteen minute soak in Formula 409 cleaning fluid. The chrome plating was completely removed, with no need for scrubbing. For the non-chrome parts, the general rule is that the white plastic parts stay white, and the black plastic parts are painted in colors other than white. The exception to this is the floor of the driver's compartment, which is gloss white. I used the new Testors Model Master Acryl paint, and it covered remarkably well with one coat. A second blast from the airbrush and I had very nice glossy coverage. I was quite pleased with the performance of this paint.
 The
construction of the engine consumes a lot of time and makes for very slow
going at the start. This is attributed to the need for painting each small
piece in so many different colors. For example, the shock absorbers alone
require painting with gloss red, flat aluminum, semi-gloss black, chrome
silver, gold, metallic blue, and gloss black. Sheesh! Color pictures of the
engine bay that I have seen show that the composite body structure is flat
black instead of the semi-gloss black that Tamiya recommends, so I used Polly
Scale flat black on the floor pan and in the interior of all the body pieces.
Semi-gloss black was used on the suspension components and the air induction
ducting. I spent time carefully painting the fan belts and pulleys, but after
completing the model I noticed that you couldn't see any of this detail.
Chalk this one up to the "God knows it's in there" category. Despite Tamiya's
tremendous reputation for excellence in molding technology, each small part
still needs some cleanup to remove mold marks and seams. While not extreme,
the marks are visible and need to be dealt with. Some deep ejector pin marks
in the floor plan of the engine compartment are the most conspicuous. Also,
the interior of the rear body shell is rough and requires a bit of sanding
to make smooth. Note that doing this will make the modeler begin to understand
the words "anal retentive" all too well.
The
construction of the engine consumes a lot of time and makes for very slow
going at the start. This is attributed to the need for painting each small
piece in so many different colors. For example, the shock absorbers alone
require painting with gloss red, flat aluminum, semi-gloss black, chrome
silver, gold, metallic blue, and gloss black. Sheesh! Color pictures of the
engine bay that I have seen show that the composite body structure is flat
black instead of the semi-gloss black that Tamiya recommends, so I used Polly
Scale flat black on the floor pan and in the interior of all the body pieces.
Semi-gloss black was used on the suspension components and the air induction
ducting. I spent time carefully painting the fan belts and pulleys, but after
completing the model I noticed that you couldn't see any of this detail.
Chalk this one up to the "God knows it's in there" category. Despite Tamiya's
tremendous reputation for excellence in molding technology, each small part
still needs some cleanup to remove mold marks and seams. While not extreme,
the marks are visible and need to be dealt with. Some deep ejector pin marks
in the floor plan of the engine compartment are the most conspicuous. Also,
the interior of the rear body shell is rough and requires a bit of sanding
to make smooth. Note that doing this will make the modeler begin to understand
the words "anal retentive" all too well.
 For the most part, fit is excellent. I still didn't manage to get the exhaust
pipes to line up properly, so they are hanging in free air at the point where
they attach to the turbochargers. It's not really visible, so I didn't fret
about it. When attaching the completed engine to the floor pan, I recommend
not gluing parts A25 and A26 until after the engine is secure. You can then
attach the pieces with tweezers and CA glue, insuring a perfect alignment
with the engine firewall.
For the most part, fit is excellent. I still didn't manage to get the exhaust
pipes to line up properly, so they are hanging in free air at the point where
they attach to the turbochargers. It's not really visible, so I didn't fret
about it. When attaching the completed engine to the floor pan, I recommend
not gluing parts A25 and A26 until after the engine is secure. You can then
attach the pieces with tweezers and CA glue, insuring a perfect alignment
with the engine firewall.
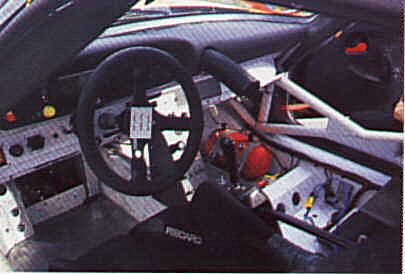 Moving
to the driver's compartment, the assembly is straightforward. Decals are
provided for the instrument panel and the seat. Decals also define the seat
harness, but applying them in the traditional way would make them unrealistically
two-dimensional. I cut the harness decals out of the decal sheet and touched
up the paper edges with a black Sharpie pen. I then cut off the buckles and
replaced them with photo-etched pieces from a 1/32nd scale Eduard set of
WWII aircraft seat belts (obviously not accurate, but close enough), and
glued the harness to the seat. A final shot of Dullcoat laquer toned down
the glossiness of the decals, and made for a nice three-dimensional look
for the driver's seat. Once the body is glued on, I found that the cockpit
area is remarkably dark and difficult to see, so attempts at super detailing
here will generally go unrewarded.
Moving
to the driver's compartment, the assembly is straightforward. Decals are
provided for the instrument panel and the seat. Decals also define the seat
harness, but applying them in the traditional way would make them unrealistically
two-dimensional. I cut the harness decals out of the decal sheet and touched
up the paper edges with a black Sharpie pen. I then cut off the buckles and
replaced them with photo-etched pieces from a 1/32nd scale Eduard set of
WWII aircraft seat belts (obviously not accurate, but close enough), and
glued the harness to the seat. A final shot of Dullcoat laquer toned down
the glossiness of the decals, and made for a nice three-dimensional look
for the driver's seat. Once the body is glued on, I found that the cockpit
area is remarkably dark and difficult to see, so attempts at super detailing
here will generally go unrewarded.
I attempted to sand a minor mold line off the four tires, but it can still be seen with the right angle of light. That synthetic rubber is tough stuff. The application instructions for putting the Michelin Pilot SXX decals on the tires are kind of awkward. I accelerated the process a little bit by dipping the sheet in water first, then holding it on the tire in the right position. The glue is on the topside of the decal, so be careful to get the decal on the tire quickly. Testors Dullcote Laquer reduced the shine of the decals after they dried.
Some filling of body seams is required. The rear spoiler area needs attention, as do seams behind the rear wheels. For this I used CA glue. Don't glue part C19, the hood air intake louvers, until after you paint and decal the main body. This will make it easier to apply the three decals that go on the louvers themselves.
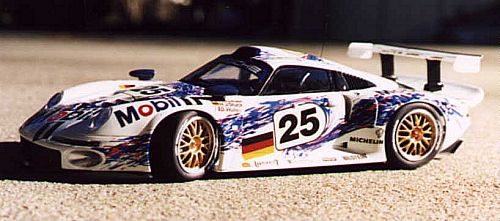
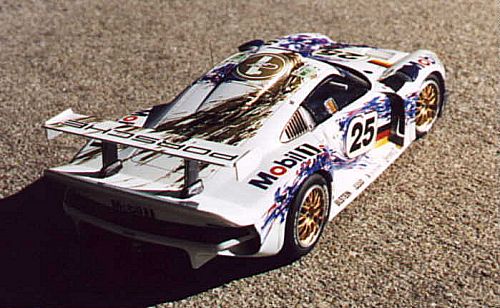
For the primary paint job, I used Testor's Model Master Acryl gloss white once again. I added one drop of French Blue to the bottle and mixed it well to insure that I got a nice, cool white. After spraying the body with a couple of coats, I set it aside to dry for a couple of days. The rear view mirrors were painted with darkened French Blue. I attempt to match the color of blue with that of the markings on the decal sheet, with minor success. No matter how hard I try, I always get the orange peel effect in my gloss finishes. This is not a big deal, as I used the Micro Mesh polishing kit to smooth everything out. Starting with 2400 grit paper, then 3200, 4000, 6000, 8000, and finally 12000, the miraculous transformation was done. This is the first time that I have ever used a polishing kit, and I am mightily impressed. The advantage of using acrylic paint is the amount of time needed to dry before the polishing process can begin. With regular enamels, modelers will often wait weeks or months before the finish is dry. Acrylic paints can be polished much more quickly. I accidentally polished through the finish in a couple of spots, so I repainted, waited overnight, and polished them out again.
Prepare for a long session with the decals. It is obvious that these were designed with a computer CAD program, because the fit was exceptionally good. I was able to get the very complicated markings into position with surprisingly little fuss. I recommend that all the clear areas around each decal be trimmed for better fit. Micro Scale Super Sol decal solution was used to get the decals to draw down on the surface of the car. A couple of decals need to be slightly cut to allow for a smooth application in the compound curve of the roof air scoop and on the hood. The only decal that gave me a slight problem was the white underlay for the huge "Porsche" on the windshield. It is larger than the decal that is placed on top of it, so I had to paint out the exposed underlay with black paint. The color of the white meatballs underneath the car number on the hood and each door is best described as "off white", which contrasts with the cool white of the body. There's not much I could do about it. After all the decals were dry, I applied a fairly heavy coat of Future to seal the markings. Keeping the coat thick insures a high gloss finish. To prevent the Future from developing runs, I accelerated the drying with a blast of warm air from a hair dryer. Amazing substance, that Future!
For the windows, Tamiya provides pre-cut masking templates. They worked fairly well, although paint bled underneath in a few places. I cleaned this off with a toothpick and all was fine. All of the clear pieces, including the headlights, turn signals, and taillights fit exceptionally well and are beautifully transparent. I attached a whip antenna on the roof made from a small piece of 2 LB test fishing line.
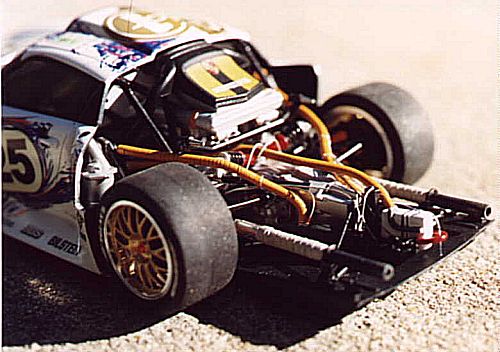
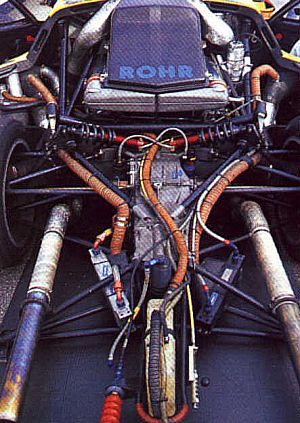
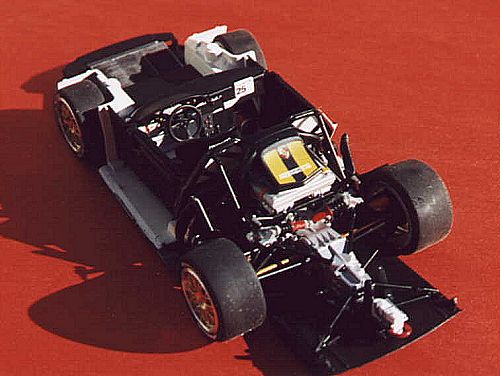
Tamiya's engine bay provides all the basics, but it doesn't capture the "busy" look of it, with cables and air ducts snaking all over the place. I fabricated a couple of oil coolers from sheet styrene, then attached fine wire to simulate the braided line. Finally, I added air duct tubing made from thick gardening wire that was painted flat orange. For only a couple of hours of work I was able to greatly enhance the appearance of the engine compartment.
All told, I spent over 50 hours on this model. The paint and markings look stunning on the sexy lines of the 911. I can't get over what a bargain this kit is. It entertained me for a long time, the fit was very good (especially for such a complicated car kit), and the decals were delightful to apply. While this isn't a kit for beginners, it rewards the skilled modeler with a great overall building experience. We, as modelers, can't ask for any more from the model companies than that. Highly recommended.
References: First Drive: Porsche 911 GT1, Car and Driver, August 1997
Rohr Porsche 911 GT1, Car and Driver, March 1998
Copyright Modeling Madness.com
Back to Reviews Page 2019