Aoshima 1/24 Mercedes SL63
| KIT #: | 047866 |
| PRICE: | 3800 yen SRP |
| DECALS: | Two options |
| REVIEWER: | Mark Hiott |
| NOTES: |
Optional hard top or
convertible. semi curbside |
| HISTORY |
 Aufrecht sold his remaining shares to DaimlerChrysler,
and since then it has been a wholly owned subsidiary.
Aufrecht sold his remaining shares to DaimlerChrysler,
and since then it has been a wholly owned subsidiary.
The Mercedes SL class
got a facelift for 2009 — most noticeable are the sinister new headlights — but
still uses the basic platform that made its debut for the 2003 model year. Which
means that the SL63
| THE KIT |
 Molded in several colors, the kit shows a nice level of detail and is
beautifully done. A set of aluminum plated wheels is included. Taillights are
provided in red plastic. A set of springs is included that I really don't
understand as the suspension is not moveable. Decals are provided for the dash,
instruments and engine as well as various decals for the car itself. Masks are
provided for painting the clear parts, but the instructions never mention them.
Molded in several colors, the kit shows a nice level of detail and is
beautifully done. A set of aluminum plated wheels is included. Taillights are
provided in red plastic. A set of springs is included that I really don't
understand as the suspension is not moveable. Decals are provided for the dash,
instruments and engine as well as various decals for the car itself. Masks are
provided for painting the clear parts, but the instructions never mention them.
Instructions are well done, providing 26 very clear assembly steps. The steps
are all pictures, but provide paint callouts and option notes as needed.
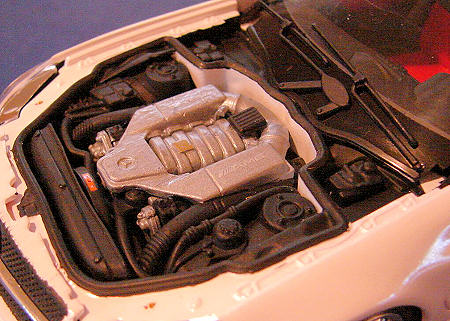
The kit is what I call a "semi curbside", as it provides most of the engine but in very simplified form.
| CONSTRUCTION |
I
deviated from the instructions in that, to ease painting, I assembled the whole
body first. You will have to leave off part #67 in step 18, but it can't be seen
in the end anyway. The headlights and taillights can be added afterwards, but
you have to be careful with them. The fit of the taillights is poor, so do some
test fitting before attaching the rear bumper. The fit of the hardtop is quite
 bad, with a rather large gap at the front. To get it to fit the windshield
header properly will take a bit of work. As I was building the convertible, it
really didn't matter to me but others should be aware of it.
bad, with a rather large gap at the front. To get it to fit the windshield
header properly will take a bit of work. As I was building the convertible, it
really didn't matter to me but others should be aware of it.
For
the rest of the build I more or less followed the instructions. The engine is
just a simple block with the intake manifold molded in. The fit of the engine
into the chassis is a bit tight, just make sure you get the drive shaft inserted
in its hole before attaching the engine to its mount. Next up is the suspension.
Aoshima provides real springs for the shocks, but I can't understand why they
did this. Once everything is installed, the rear suspension moves very little
and the front not at all. Take care of the rear suspension during the rest of
the build. The tops of the struts protrude from
 the tops of the wheel wells and
it is possible to pop the rear cross member loose. Fitting the tires is a bit
nerve racking, as they are a very tight
fit. Aoshima does it different then any other kits I have built in the past.
They use the normal poly caps, but there is nothing to hold them in the wheels,
they are just a press fit. Getting them onto the stub axles is a exercise in
caution, it would be very easy to muck up the whole works here.
the tops of the wheel wells and
it is possible to pop the rear cross member loose. Fitting the tires is a bit
nerve racking, as they are a very tight
fit. Aoshima does it different then any other kits I have built in the past.
They use the normal poly caps, but there is nothing to hold them in the wheels,
they are just a press fit. Getting them onto the stub axles is a exercise in
caution, it would be very easy to muck up the whole works here.
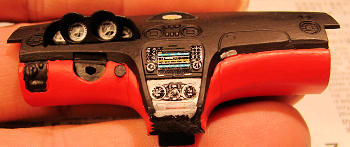
The
fit of the 3-piece dash is poor and I had to trim it a bit in order to get it to
fit together properly. The rest of the interior went together nicely.
 The
front bumper in my kit was warped, making installation a bit of a problem. I
ended up gluing one side, letting it dry, then gluing the other side. I also
wish Aoshima had made the front grill a separate part. It would have made
painting a whole lot easier! It's important to get the bumpers attached
correctly in order for the lights to fit. The rear bumper needed to be trimmed
to get a good fit. After painting, I installed the lights. If you choose to do
it this way, carefully snap the clear parts in place and then the chrome parts.
It is a very tight fit, but this way, fixing seams is not a problem. I find it
odd that Aoshima provided the taillights in red plastic, but the third brake
light is clear.
The
front bumper in my kit was warped, making installation a bit of a problem. I
ended up gluing one side, letting it dry, then gluing the other side. I also
wish Aoshima had made the front grill a separate part. It would have made
painting a whole lot easier! It's important to get the bumpers attached
correctly in order for the lights to fit. The rear bumper needed to be trimmed
to get a good fit. After painting, I installed the lights. If you choose to do
it this way, carefully snap the clear parts in place and then the chrome parts.
It is a very tight fit, but this way, fixing seams is not a problem. I find it
odd that Aoshima provided the taillights in red plastic, but the third brake
light is clear.
After the chassis and body were done, they were fitted together. Getting the
body to fit the mountings on the chassis is difficult as you can barely see the
front ones. The last bits installed were the convertible cover, door handles,
wipers, radio antenna and windshield. I had to remove the hood hinges as they
would not clear the windshield. That may have been my fault, I'm not sure.
| COLORS & MARKINGS |
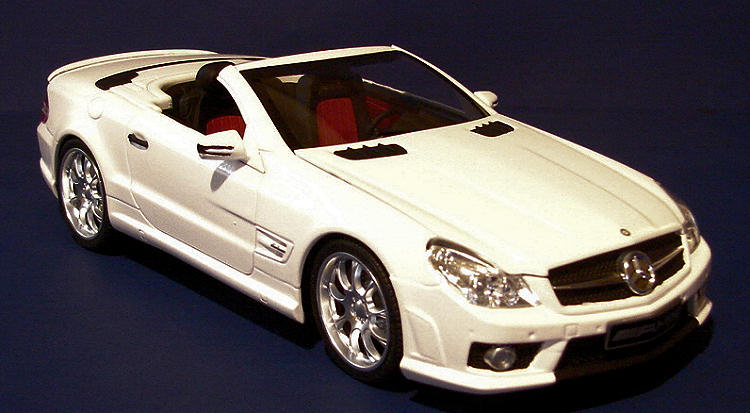
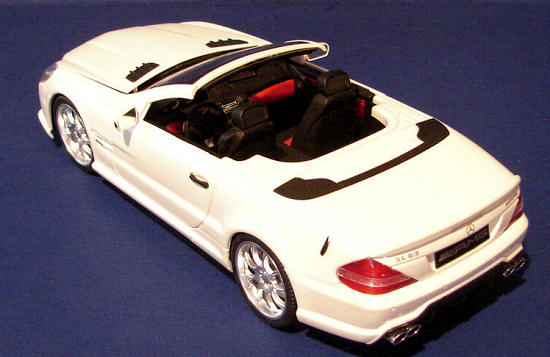
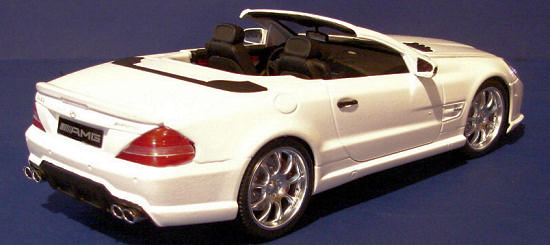
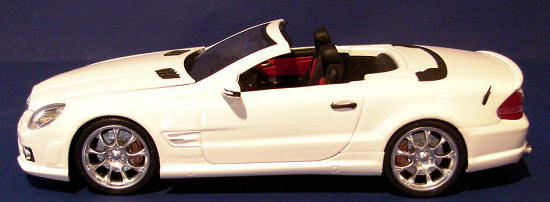
The
instructions recommend silver for the car, but I chose to paint mine white. I
think it just looks good in white. After the body as all assembled (front and
rear bumpers, rear spoiler and side pods), it was primed with MM gray. I then
shot a couple costs of MM Bright White. All the trim was painted flat black as
per the instructions.
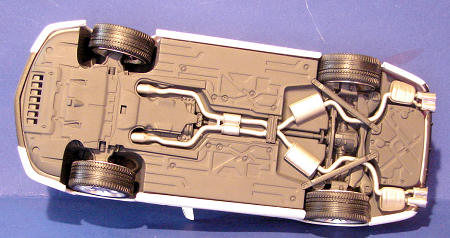 The
chassis was assembled and then painted Floquil Grimy Black as a whole. The
exhaust was painted MM Steel.
The
chassis was assembled and then painted Floquil Grimy Black as a whole. The
exhaust was painted MM Steel.
The
interior was painted flat black with red trim. I wanted something a bit more
"showy" than just black and I found a photo on the 'net of a car with a
black/red interior. I thought it looked cool.
A
lot of the engine can be left unpainted if desired. Most of it can't be seen
when the model is completed. This includes the lower block and transmission. I
did paint mine aluminum, but it was a waste of paint. The cam covers were
painted black as were the drive belts. Again, most of this can't be seen.
Pay close
attention to the instructions when building the kit, as there are decals that
need to be installed as you go. These include decals for the engine and the
decals for the interior. You have the option of license plates or
| CONCLUSIONS |
Nicely detailed, but simple to assemble, I recommend this to experienced
builders as well as those just wanting to give a car a try.
| REFERENCES |
Internet for the history
Mark Hiott
February 2012 If you would like your product reviewed fairly and fairly quickly, please contact the editor or see other details in the
Note to
Contributors.