| KIT #: | 8305 |
| PRICE: | $? |
| DECALS: | Two options |
| REVIEWER: | Mark Hiott |
| NOTES: | Kit decals yellowed. Indycals decals used |
| HISTORY |
 Renault, however, decided to give it a try in 1977 with their RS-01. No wins
were forthcoming, but Renault continued to improve the engine. In 1979 the RE-10
utilized twin turbos and ground effects. Jean-Pierre Jabouille won the French
Grand Prix and took four pole positions. In 1980, the RE-20 brought the team 3
wins and the writing was on the wall. So much so that Renault, Ferrari, Toleman,
Brabham and Alfa Romeo all entered 1.5 liter turbo cars in 1982.
Renault, however, decided to give it a try in 1977 with their RS-01. No wins
were forthcoming, but Renault continued to improve the engine. In 1979 the RE-10
utilized twin turbos and ground effects. Jean-Pierre Jabouille won the French
Grand Prix and took four pole positions. In 1980, the RE-20 brought the team 3
wins and the writing was on the wall. So much so that Renault, Ferrari, Toleman,
Brabham and Alfa Romeo all entered 1.5 liter turbo cars in 1982.
The
RE-30B, introduced in 1982, was a twin-turbo, intercooled 1492cc V-6 producing
560hp. An intercooler is only used on a turbocharged engine and helps cool the
intake air for better performance. It is said that for every degree in cooling
an increase of 1 horsepower is possible. The RE-30B made it debut at the South
African GP with Alain Prost winning. Prost and Arnoux finished 1 & 2 at the
French GP and they went on to win at
| THE KIT |
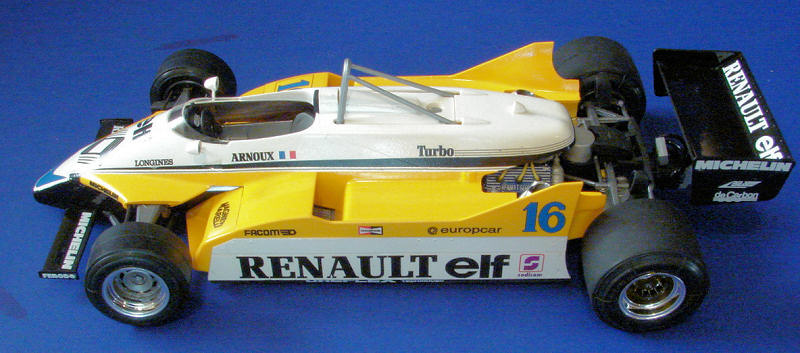
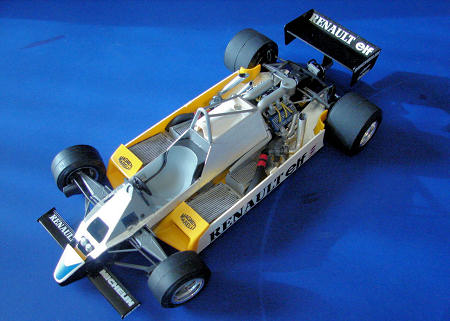
 Tamiya really is the standard for injection molded Formula 1 kits. Molded in
yellow and silver plastic with chrome wheels, four nice rubber tires are also
included. The chrome on the rear wheels doesn’t quite cover all the way, but
it’s really hard to tell. Detail is crisp with no flash on any of the parts. The
instructions are the usual Tamiya instruction book. Nicely done with 16 assembly
steps, photos of the assembled model are spaced through out the instructions.
Color callouts are giving for Tamiya paints and a 4-view decal placement guide
is on the last page. The decals in my kit were yellowed and even after bleaching
in a window, were unusable. One
version of the car can be done with either driver, Alain Prost or Rene Arnoux.
Tamiya really is the standard for injection molded Formula 1 kits. Molded in
yellow and silver plastic with chrome wheels, four nice rubber tires are also
included. The chrome on the rear wheels doesn’t quite cover all the way, but
it’s really hard to tell. Detail is crisp with no flash on any of the parts. The
instructions are the usual Tamiya instruction book. Nicely done with 16 assembly
steps, photos of the assembled model are spaced through out the instructions.
Color callouts are giving for Tamiya paints and a 4-view decal placement guide
is on the last page. The decals in my kit were yellowed and even after bleaching
in a window, were unusable. One
version of the car can be done with either driver, Alain Prost or Rene Arnoux.
| CONSTRUCTION |
I
really didn’t have much trouble with this kit. The only down side is that, given
the design of the car, the instructions jump around a bit. You go from engine to
rear end to chassis then back to engine. It takes a bit of work to get it all to
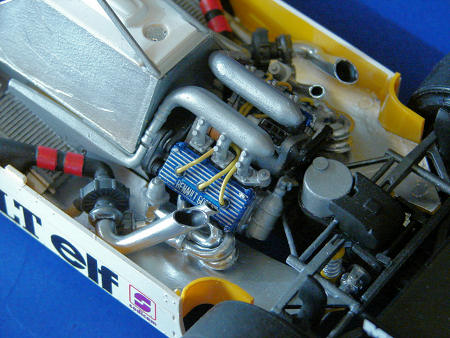
fit together just right. I began with the engine; it is quite a kit in itself,
being made up of a total of about 20 or so parts, not including the exhaust. I
assembled the block completely and then painted it. The rear suspension was
next, take care here as the parts are left and right handed.
 The
chassis tub, front suspension and cockpit are built as an assembly. After
assembly of the chassis and front suspension, I added the cockpit. The cockpit
is quite simple being made up of a one-piece seat and a shifter handle. The
front suspension is a bit fiddly and I can’t understand why Tamiya gives you a
piece of wire for the linkage. The steering is workable but making a plastic
part can’t be that hard!
The
chassis tub, front suspension and cockpit are built as an assembly. After
assembly of the chassis and front suspension, I added the cockpit. The cockpit
is quite simple being made up of a one-piece seat and a shifter handle. The
front suspension is a bit fiddly and I can’t understand why Tamiya gives you a
piece of wire for the linkage. The steering is workable but making a plastic
part can’t be that hard!
The engine is then attached to the back of the tub. The turbos and the intercoolers are assembled (but NOT attached) on the lower panel and allowed to dry. The turbo/intercooler is then attached to the bottom of the chassis tub. This is where the build gets interesting, fitting the exhaust. If you got everything assembled straight, the pipes should mate to the turbos with no trouble. The only real trouble I had was that the center pipe on left side would not fit to the block, I had to cut the pipe but I don’t think it’s too noticeable. The lower body panel is then glued into place. Allow this to dry overnight and then mate the rear suspension to the engine. You cannot attach the rear suspension prior to this as part of the lower panel passes through the suspension arms. At this point the intake plumbing is added and the side pods assembled. I left off the turbo and waste gate exhaust pipes until I had fitted the chassis top. I used the opening in the top panel to make sure of their positions. All that is left now is to attach the tires and rear wing.
| COLORS & MARKINGS |
 As
I stated before, my kits decals were not useable. I ordered a replacement set
from Indycals. I would advise anyone building an Indycar or an F1 car to give
Indycals a look.
As
I stated before, my kits decals were not useable. I ordered a replacement set
from Indycals. I would advise anyone building an Indycar or an F1 car to give
Indycals a look.
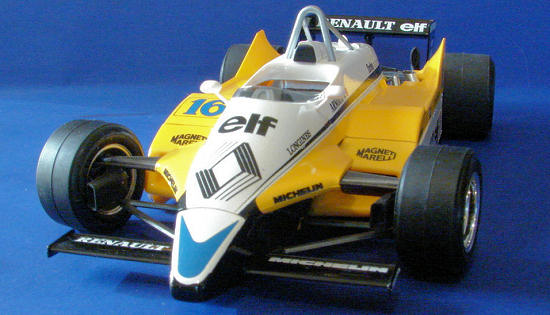
The
engine was painted MM Acryl French Blue and the suspension parts acrylic
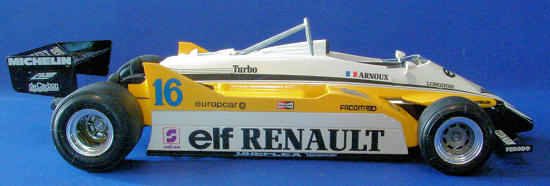
Gunmetal. The car was painted with MM Gloss White, Gloss Yellow and Gloss Black
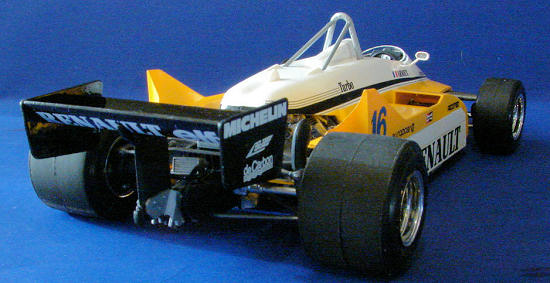
enamel. I shot the white first, masked it off and then shot the yellow. The rear
wing and nose were painted black separately and then added to the chassis. Bare
Medal Foil was used on the tub and lower body panel, with the lower front tub
section being painted Gloss Black.
I
chose to do the car up as the Rene Arnoux car. The only difference between the
two, are the driver name and number. I just like blue. The Indycals decals went
on with no trouble and needed no setting solutions. Mike even gives you a bit
extra on the rear cowl decal so you have some leeway in positioning. There were
2 black “Renault Elf” decals I could find no place for, but Mike informed me
they were for the sides of the fuel tank.
After decaling, the windscreen, mirrors and rear wing were attached.
| CONCLUSIONS |
Typical Tamiya Formula 1 kit. A bit fiddly at times, but an easy build. If you
like the F1 turbo era cars, you can’t go wrong with this one.
| REFERENCES |
 The
Internet
The
Internet
Instructions for the history
If you would like your product reviewed fairly and fairly quickly, please contact the editor or see other details in the Note to Contributors.