Revell 1/24 Porsche 962C
| KIT #: | 7251 |
| PRICE: | $30.00 MSRP ($25.90 at www.greatmodels.com ) |
| DECALS: | One option |
| REVIEWER: | Mark Hiott |
| NOTES: | SCurbside without Rothman's tobacco decals |
| HISTORY |
The Porsche
962 was based on the 956 and intended for IMSA GTP class competition.
To prepare the car for competition, the vehicle required changes to bring
it into alignment with ever-changing rules and regulations.
For 1984, rules stated that the pedal box had to be mounted behind the
front axle. To comply, the
wheelbase of the 956 was extended to accommodate additional
 space.
A steel roll cage was also integrated into the car at the time. Porsche
had to find a replacement for the twin K27 turbochargers since twin-turbo's did
not comply with GTP class racing regulations at the time.
In its place, a single Kühnle, Kopp und Kausch AG K36 turbocharger was
fitted. The newer 3.2L fuel injected Flat-6 would be placed in the 962 by the
middle of 1985 for IMSA GT. It would not be until 1986 that the 2.6L unit from
the 956 was replaced in the World Sportscar Championship, using 2.8L, 3.0L, and
3.2L variants with dual turbochargers. The cars run under World Sportscar
Championship regulations were designated as 962C to separate them from their
IMSA GTP counterparts.
space.
A steel roll cage was also integrated into the car at the time. Porsche
had to find a replacement for the twin K27 turbochargers since twin-turbo's did
not comply with GTP class racing regulations at the time.
In its place, a single Kühnle, Kopp und Kausch AG K36 turbocharger was
fitted. The newer 3.2L fuel injected Flat-6 would be placed in the 962 by the
middle of 1985 for IMSA GT. It would not be until 1986 that the 2.6L unit from
the 956 was replaced in the World Sportscar Championship, using 2.8L, 3.0L, and
3.2L variants with dual turbochargers. The cars run under World Sportscar
Championship regulations were designated as 962C to separate them from their
IMSA GTP counterparts.
Between 1984
to 1987 the 962 would win 46 IMSA races with the 962C winning Le Mans a total of
6 times. The 962 was raced into the mid 90’s.
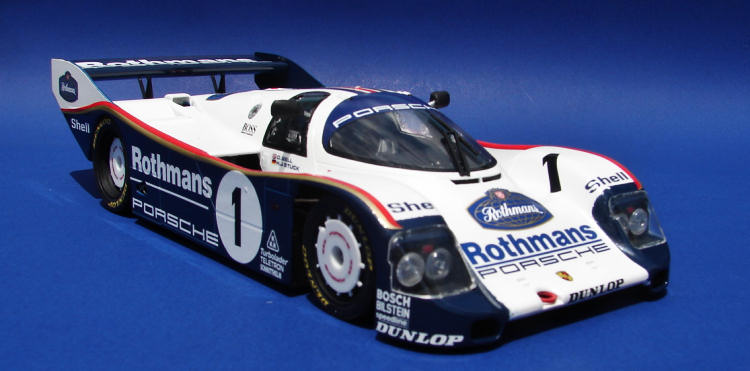
The car this kits depicts was driven by Derek Bell and Hans Stuck to victories in the 1986 1,000km at Monza as well as the 1986 and 1987 24 hours of Le Mans.
| THE KIT |
The kit is molded in white with a tree of clear parts. Four nice rubber tires are also included. The decals are nicely done, but as mentioned are incomplete. The instructions are typical Revell in that they are 2 pages with simple illustrated assembly steps. Color callouts are given in the steps and, according to my references, are accurate. Clear parts are nicely done, although a bit thick. For a look at the sprues, please visit the preview.
| CONSTRUCTION |
 Construction
begins with the chassis. Since this is a curbside, there is really very little
to do here. The rear control arms and rear framework were attached to the
chassis. The entire chassis was then painted flat black.
Construction
begins with the chassis. Since this is a curbside, there is really very little
to do here. The rear control arms and rear framework were attached to the
chassis. The entire chassis was then painted flat black.
The
wheels were mounted on the one-piece rims and then the center covers were added.
The rear center covers, according to my references, should be larger in diameter
as well as flush with the outer edge of the rim. The 962 did race without the
rear covers on occasion, but the front covers were almost always used. The tire
emblem decals were then added. The seat was glued into the one-piece cockpit and
the shifter installed. Seat belt decals are supplied for the seat and they are
passable given the limited view through the windows.
The exhaust tips, tow hooks and windows were added after painting. I attached all the clear parts with Testors window glue. The cockpit was then attached inside the body shell and the body mounted on the chassis. The last parts I added were the mirrors, tires and rear wing.
| COLORS & MARKINGS |
As
stated earlier, if you want to make this car accurate, you will need to get the
Rothman decals or do a different version. I obtained a set of the Speedline
Rothman decals and will use these for my build.
 There are
a few mold seams that will need to be taken care of around the front area, but
nothing a few swipes with sandpaper won’t fix. Painting is really quite simple;
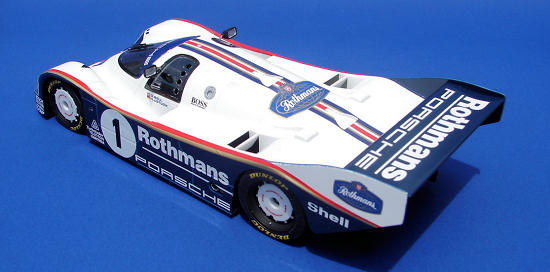
paint the car gloss white, mask off the areas to stay white and paint the dark
blue areas. Take care with the upper edge of the blue, it stops at the turn of
the body and does not extend onto the top of the body. Study the painting guide
closely and make sure the demarcation between white and blue falls under the
decal. I painted the inside of the body flat black to minimize the dreaded
“see-through” look common to these Group C curbside kits.
There are
a few mold seams that will need to be taken care of around the front area, but
nothing a few swipes with sandpaper won’t fix. Painting is really quite simple;
paint the car gloss white, mask off the areas to stay white and paint the dark
blue areas. Take care with the upper edge of the blue, it stops at the turn of
the body and does not extend onto the top of the body. Study the painting guide
closely and make sure the demarcation between white and blue falls under the
decal. I painted the inside of the body flat black to minimize the dreaded
“see-through” look common to these Group C curbside kits.
I
used Krylon paint on this kit. I normally have no trouble with Krylon, but this
time it acted very strangely. After painting the body gloss white, I masked off
the parts to stay white and sprayed the gloss dark blue. The body came out
looking great, but the wing gave me fits. The dark blue paint came out dull.
Even after a shot of clear coat, it was still dull. I striped the paint and
thought perhaps the white paint had something to do with it. So I painted the
wing gloss white, waited 24 hours and painted it dark blue again. The top came
out looking ok, but the bottom cracked like a dry lakebed! DOH! I sanded the
bottom down a bit and reshot the dark blue. It looks ok now, but you can still
see hints of the cracks on the bottom side. I just don’t understand what
happened… same kit, same paint.
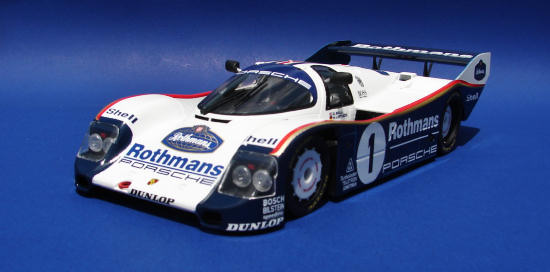
 The decals
are beautifully printed and have almost no carrier film outside the color. A
couple will need to be cut in order to use the Speedline set, but nothing a
straight edge and a sharp blade can’t take care of. I applied the corner strips
first. Take care here, as they are 2-piece decals. I kinda botched the left one,
but learned from my mistake on the right side. They reacted well to Microset and
I had no trouble getting them to conform to the curves. I was concerned that the
top stripe would not line up with the intakes in the roof, but here is were the
decals show their quality. The top stripe fit perfectly! The Speedline blue
Rothman nose decal is just a bit lighter then the kit decals but it’s hard to
tell.
The decals
are beautifully printed and have almost no carrier film outside the color. A
couple will need to be cut in order to use the Speedline set, but nothing a
straight edge and a sharp blade can’t take care of. I applied the corner strips
first. Take care here, as they are 2-piece decals. I kinda botched the left one,
but learned from my mistake on the right side. They reacted well to Microset and
I had no trouble getting them to conform to the curves. I was concerned that the
top stripe would not line up with the intakes in the roof, but here is were the
decals show their quality. The top stripe fit perfectly! The Speedline blue
Rothman nose decal is just a bit lighter then the kit decals but it’s hard to
tell.
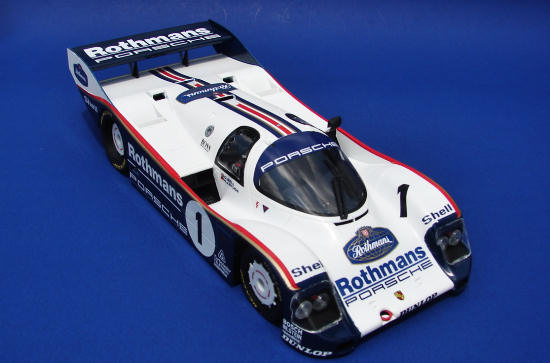
It’s a shame the kit didn’t include the Rothman decals because these were, by far, some of the nicest decals I have ever used. They fit, went down with no trouble and look great!
| CONCLUSIONS |
A
nice kit that the novice, as well as car guys, will like. The build is very
similar to the build of the Hasegawa 88C that I did recently. Anyone who has
build one of the Group C kits will find it quite easy to build.
To
make it accurate you will need to obtain Rothman decals or do a different car.
There are a lot of decals available for the 956/962 series and replacements
should not be hard to find.
| REFERENCES |
Wikipedia for the history
You can get this and other fine kits and accessories at www.greatmodels.com
If you would like your product reviewed fairly and quickly, please contact me or see other details in the Note to Contributors.