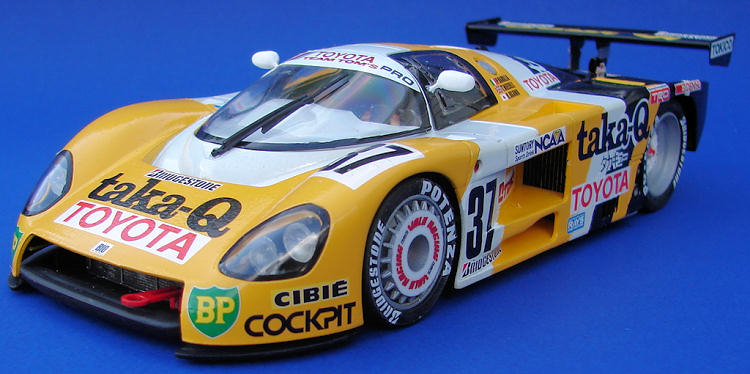
Hasegawa 1/24 Taka-Q Toyota 88-C
| KIT #: | 20237 |
| PRICE: | $19.25 |
| DECALS: | One option |
| REVIEWER: | Mark Hiott |
| NOTES: | Curbside, some parts and decals not used |
| HISTORY |
The
roots of the Group C category lie in both
 By 1989,
the Group C series popularity was nearly as great as Formula One. When C1 cars
were found to be breaking over the 240 miles per hour mark at Le Mans' Mulsanne
Straight — the WM Peugeot recorded the highest at 254 mph (over 400 km/h) — the
By 1989,
the Group C series popularity was nearly as great as Formula One. When C1 cars
were found to be breaking over the 240 miles per hour mark at Le Mans' Mulsanne
Straight — the WM Peugeot recorded the highest at 254 mph (over 400 km/h) — the
The 1994
24 Hours of Le Mans was the last one in which Group C cars were permitted.
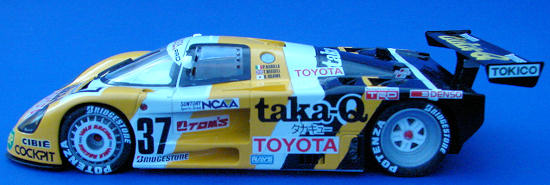
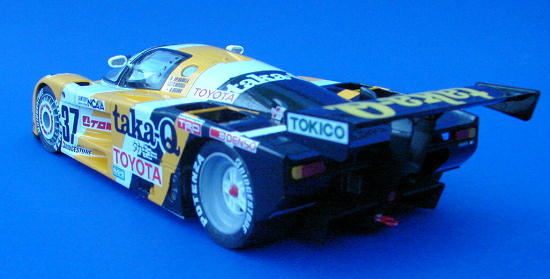
For 1988, the Toyota 88C was raced. It was a development of the 87C and cars differed from race to race. The subject of this kit, the #37 Taka-Q car, posted a best finish of 5th place. While it wasn’t a big LeMans winner, later versions of the chassis when on to great success in the IMSA GTP series.
| THE KIT |
Most of the kit is molded in white with the body is
molded in a somewhat see-through yellow. The large decal sheet includes all the
white areas of the body and appears to be nicely done. There are different side
pods and some decals not used, so there may be other versions available. Decals
are supplied for the tires and they are NOT dry-transfers. They work similar to
dry-transfers, with removable backings, but require wetting to stick to the
tires. The “
| CONSTRUCTION |
 First up was the chassis. Most of it is painted flat
black so a lot of it can be assembled before painting. There is very little
detail here, so assembly went quickly.
First up was the chassis. Most of it is painted flat
black so a lot of it can be assembled before painting. There is very little
detail here, so assembly went quickly.
The differential was assembled, painted aluminum and then glued to the rear section. I then painted the cockpit aluminum and attached it to the chassis. The seat was painted flat black, with the molded in belts painted flat red. The instrument panel is attached to the underside of the body shell. I attached this after the chassis was finished and then the body was test fit to make sure the panel was centered properly, as the shifter passes through it. The gauges are all done with decals and the result is quite nice.
I then started on the tires. I messed up one of the
rear wheels when I tried to glue the front wheel cover to the wrong rim. OOPS! I
pa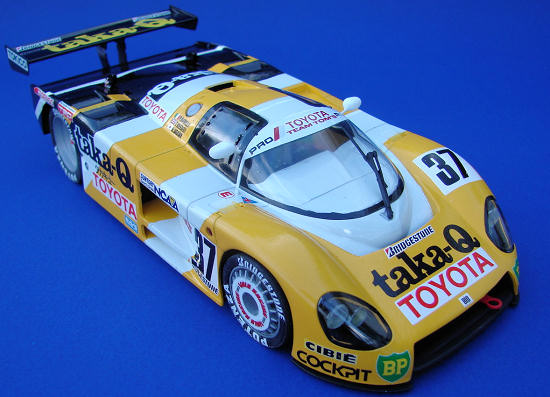 inted the rims and assembled them as called for in the instructions and then
mounted the tires. At this point I added the tire emblems. They work like
dry-transfers, but require water to stick. They are mounted to a backing that is
removed from the main sheet. A protective “cover” sheet is then removed,
exposing the emblem attached to a see-through backing. The emblem is positioned
on the tire and water applied. The backing is then carefully removed and the
emblem sticks to the tire. I added water after positioning the emblem, but I
suppose you could wet the tire first.
inted the rims and assembled them as called for in the instructions and then
mounted the tires. At this point I added the tire emblems. They work like
dry-transfers, but require water to stick. They are mounted to a backing that is
removed from the main sheet. A protective “cover” sheet is then removed,
exposing the emblem attached to a see-through backing. The emblem is positioned
on the tire and water applied. The backing is then carefully removed and the
emblem sticks to the tire. I added water after positioning the emblem, but I
suppose you could wet the tire first.
I assembled the various body inserts and added the tailpiece. On this part I would deviate from the instructions. There are two panels available for the left side, one with louvers and one without louvers. Even though it is incorrect, I would install the one without louvers, as it is impossible to get the decals to conform to the one with louvers. I then sanded down whatever seams there were and I was ready for paint. After painting and decaling, the body was attached to the chassis and the rear wing was added.
| COLORS & MARKINGS |
I decided early on to paint the body as opposed to
using the white decals. I debated painting the white or yellow first, but I
figure 6 of one a half dozen of the other. I painted the yellow first. Once the
yellow was dry I masked it off and painted the white. I then
 masked it off again
and painted the black. The masking is difficult around the door areas but I was
unwilling to take the risk the white decals wouldn’t cover properly. Turns out,
I did the right thing. Even if I had used the white decals, some masking would
still be necessary.
masked it off again
and painted the black. The masking is difficult around the door areas but I was
unwilling to take the risk the white decals wouldn’t cover properly. Turns out,
I did the right thing. Even if I had used the white decals, some masking would
still be necessary.
The decal sheet for this kit is BIG. It contains a total of 65 decals, although some of those are the white body sections. All the white areas on the car that require a decal have a white decal for a background that must be installed first. Why Hasegawa did it this way is beyond me, but it makes decaling the body a PITA. (I suspect it is to help prevent the underlying color from being visible through the decal. Ed) The only decals I had trouble with were the car numbers and their white backgrounds. Even after solvent, they would not conform to the body. I ended up having to slice them to get them to settle.
The white decal areas are a bit transparent, but most of the ones I used fall on a single color and don’t look too bad.
| CONCLUSIONS |
All in all not a bad model. The paint job may put off some people, but there are always the decals. I would have liked to have a bit of engine detail but it builds easy and is a kit kids, as well as serious car builders, will enjoy.
If you opt to paint the car as I did, photocopy the
decal sheet and use it to mask off
| REFERENCES |
 A bit from Scott’s preview
Stuff off the net
Wikipedia for the history
June 2009
Copyright ModelingMadness.com
Thanks to your editor for providing the review kit.
If you would like your product reviewed fairly and fairly quickly, please contact the editor or see other details in the Note to Contributors.