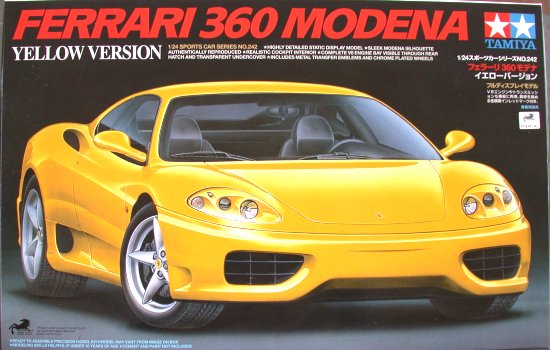
Tamiya 1/24 Ferrari 360 Modena
|
KIT # |
242 |
|
PRICE: |
AUD $60.00 |
|
DECALS: |
Side badges and plates |
|
REVIEWER: |
|
|
NOTES: |
'Yellow Version' |
|
HISTORY |

The 360 Modena is the fifth incarnation of the highly successful V8 Berlinetta (coupe) that debuted at the 1975 Paris Salon de l’Automobile. It was released in March of 1999 at the International Geneva Motor Show of that year. Sergio Pininfarina, who has collaborated with Ferrari for the past fifty years, designed the body and it is the 163rd Ferrari to be designed by Sergio. At first glance the car looks like a standard salon configuration with the passenger compartment being roughly centrally located between the two axles, however the most striking part of this design is the glass-installed hatch that places the engine in full view.
The design allowed the passenger compartment to be quite roomy with a space behind the seats for a couple of suitcases or other smaller paraphernalia. The driving position was designed for taller drivers and the access was made easier for those of the lanky persuasion. The interior is designed with a mix of traditional and technological, using leather upholstery combined with sporty aluminium trim, including the sporty accelerator throttle and brake pedal, plus the inclusion of a footplate for the passenger who wants to outbrake the driver! This also reflects the innovative chassis construction, which was designed by Ferrari in collaboration with Alcoa. The use of variable-section aluminium extrusions are welded together via 12 cast aluminium nodes that provide an extra 40% structural rigidity and gives a 28% weight reduction when compared to the previous F355. This is in spite of an increase in overall dimensions. The chassis is assembled using the same technique as was used in the construction of the F50. With all of this the 360 Modena exceeds all the passive safety requirements imposed by the world regulatory authorities and still provides excellent handling. It is after all a Ferrari!
 The handling and stability come about
as a result of the all aluminium double wishbone suspension layout and combines
to provide driving pleasure. Suspension geometry controls pitch, roll and yaw
(wait a minute we are talking aircraft after all!) and is backed up by
electronic damping. This is further enhanced by Bosch integrated ABS/ASR along
with EBD (braking effort correction), which is something installed on BMW cars
and the latest BMW K1200RS motorcycle. In the latter case this means shifting
the effect from the front brakes to also include the rear, when only the front
brake is applied. If the rear is applied there is no correction to the front
brakes. In the 360 Modena the use of torque return control prevents wheel lock
up when decelerating – remember we are talking a very fast sports car here and
shifting from top (6th gear) down to third and letting out the clutch
would normally result in big black tyre marks on the road! To help in slowing
the beast down it is fitted with 330mm ventilated and cross-drilled brake discs
to enhance resistance to fade without forced cooling. I want some of these on my
Celica please.
The handling and stability come about
as a result of the all aluminium double wishbone suspension layout and combines
to provide driving pleasure. Suspension geometry controls pitch, roll and yaw
(wait a minute we are talking aircraft after all!) and is backed up by
electronic damping. This is further enhanced by Bosch integrated ABS/ASR along
with EBD (braking effort correction), which is something installed on BMW cars
and the latest BMW K1200RS motorcycle. In the latter case this means shifting
the effect from the front brakes to also include the rear, when only the front
brake is applied. If the rear is applied there is no correction to the front
brakes. In the 360 Modena the use of torque return control prevents wheel lock
up when decelerating – remember we are talking a very fast sports car here and
shifting from top (6th gear) down to third and letting out the clutch
would normally result in big black tyre marks on the road! To help in slowing
the beast down it is fitted with 330mm ventilated and cross-drilled brake discs
to enhance resistance to fade without forced cooling. I want some of these on my
Celica please.
The power plant of this machine is located in a central position behind the passenger compartment, or mid-engine, as it is commonly known. The unit is a 5-valve per cylinder V8 and has a power output of 400 bhp @ 8,500 rpm and is billed as the most naturally aspirated Ferrari V8 ever built. It has a variable geometry intake manifold, valve timing with titanium con-rods and forged aluminium pistons, a Bosch ME 7.3 dual engine management system and drive-by-wire throttle. You know this is sure sounding like a modern jet isn’t it? It comes with a choice of manual or F1-style 6 speed gearbox; the latter is where the change down and up is located on the steering wheel, allowing for ultra fast gear changes. The F1 transmission is electro-hydraulically operated with the gearbox management integrated with the engine and traction control resulting in maximum stability even under the hardest driving. The overall result of this fire-breather is that it has a top speed in excess of 295 kph (183 mph) and can accelerate from 0 to 100 kph (62 mph) in 4.5 seconds and does the standing quarter (400 metres) in 12.6 seconds. Now please compare this with my K1200RS BMW motorcycle that weighs 285 Kilograms and accelerates from 0 to 100 kph in 3.6 seconds. The performance of this car is stunning to say the least!
The body underwent vigorous and protracted testing in the wind tunnel, some 5,400 hours to be exact, and resulted in excellent Coefficient of Drag figures without compromising the styling of the car. The down-force increases as the speed increases and at 180 mph there is enough such force, evenly distributed between the two axles, to do away with the need for aerodynamic aids. This also helps with safety considerations by increasing the natural load on the steering as the car’s speed is increased.
Yes, it’s a Ferrari and it is one very impressive piece of machinery with all the high tech gadgetry hidden in all the best places – out of the way just doing its job.
|
THE KIT |
This kit is the special version and contains yellow, grey, black, chrome and clear sprues along with the decal sheet and rubber tyres and polycaps. Tamiya have included a set of masks to be used during the painting of the windscreen, side windows and rear hatch. The decal set includes two sheets, one contains normal slide decals and the other contains the metal ones. This second set also includes the mirror surfaces for both side and interior mirrors. The kit also comes with a mesh sheet that is used to cover both side intakes leading into the engine bay. The clear sprue contains not only the lenses, screens and light covers but also includes a see-through under pan for the engine, this piece is to be sprayed with Tamiya enamel spray TS29, Semi Gloss Black.
 The instruction sheet is quite
extensive and in standard Tamiya fashion has explicit directions when
decals are to be attached during the construction phase.
The instruction sheet is quite
extensive and in standard Tamiya fashion has explicit directions when
decals are to be attached during the construction phase.
There are some ejector pin marks although most are easily removed. Some, especially those on the rods and suspension units, are quite large and require a fair degree of attention to either remove them completely or sufficiently discreet enough to be not visible when the part is installed. The ones on the suspension units are very painful to remove as they also remove a portion of the spring unit contained within.
The kit is well presented in a sturdy box with a few close up shots of the real deal. This is very useful when the references for this particular car are somewhat scarce.
|
CONSTRUCTION |
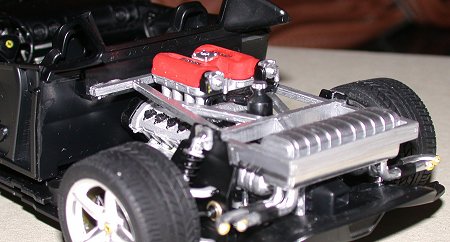
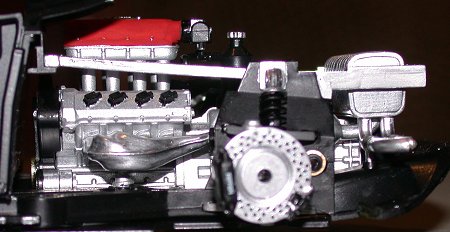
The Engine
As in most vehicle kits, bikes or cars that is, the first unit to be assembled is usually the engine. This was quite true of this kit and it is a relatively simple procedure to assemble the block, heads and gearbox/final drive as one unit. The primary colour is Tamiya XF16, Flat Aluminium, with the spark plugs, injection cooling system and gearbox end plate painted Tamiya X18, Semi Gloss Black. For the first time you don’t have to mix gold and silver in differing ratios to obtain the correct colour tones, Tamiya have supplied new colours called Titanium Silver (X32) and Titanium Gold (X31). This is great for me especially as I tend to build Japanese bikes where these two colours abound. The engine has both of these colours at strategic points.
 Engine construction continues to a
point where it is installed in the sub frame, at a much later stage. The one
concession was to attach the fuel injectors, and the rocker covers, the latter
painted in Tamiya XF7, Flat Red. The two metal decals were also attached
at this point and the whole assembly put aside to await the construction of the
sub frame.
Engine construction continues to a
point where it is installed in the sub frame, at a much later stage. The one
concession was to attach the fuel injectors, and the rocker covers, the latter
painted in Tamiya XF7, Flat Red. The two metal decals were also attached
at this point and the whole assembly put aside to await the construction of the
sub frame.
Once the engine is attached to the sub frame the exhaust pipes and mufflers were attached along with the upper engine frame. This latter unit was painted with Tamiya X11, Chrome Silver enamel. On the outside of the kit box is included a nice photograph of the engine of the Modena, this was used to confirm colours and positioning of bits and pieces. It is a nice touch on the part of the manufacturer.
The Interior
There are two colour options to
choose from in the kit, one is a beige-like colour made up of orange and matt
flesh (X6: 1 + XF15: 10) and the other is Tamiya X18, Semi Gloss Black.
There really wasn’t a choice as there is no way would I even consider painting
the interior in some pucey pink-orange colour. It is therefore a simple process
to paint the entire interior pieces as well as suspension and body pan in one
hit. This included the clear floor pan that covers the engine bay. All parts
were trimmed of the injection moulding lines using very fine sandpaper and then
attached to an assortment of blue tack covered cocktail sticks and the immensely
useful multiple hand unit. Instead of using the trusty air brush, which suffered
a melt down during the building of this model, it was easier to spray the pieces
with Tamiya TS29, Semi Gloss Black.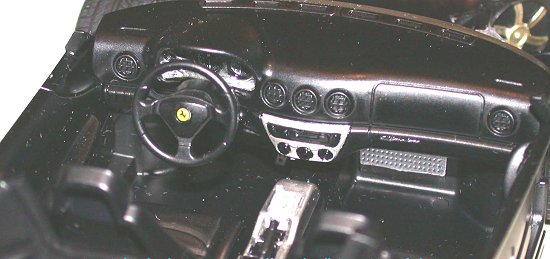
Again it was necessary to use Tamiya X32, Titanium Silver to highlight the instrument panel and then attach the instruments, which are represented as decals and then filled with Testors Clear Parts Cement. The radio and climate control console is also painted in Titanium Silver and the radio dial was painted Gunze Sangyo Clear Green. A metal decal is attached to the passenger’s side of the dashboard.
The steering wheel is painted with Tamiya X18, Semi Gloss Black and has a Ferrari decal on the steering wheel boss. The passenger side has a foot plate that is painted in X11, Chrome Silver and the console is painted in Titanium Silver with Semi Gloss Black areas. The accelerator and brake pedals are also painted in Chrome Silver, with the accelerator pedal drilled for weight reduction. This and the fact that most petrol-heads want the pedals to look sporty, and this is definitely a sports car!
Both seats are painted in Semi Gloss Black, as are the door interiors. The speaker installed in the front lower part of the doors is painted Flat Black. At the rear of the interior compartment is a storage compartment represented by a decal – it’s supposed to be a fabric mesh holder. The decal went on fine and came off just as fine to disappear into the great decal repository in the sky, no amount of looking could find the little sucker and, as it is so dark in the interior (no puns intended) I elected to forget about it.
Curiously there are no seat belts or places for them to be fitted. I decided to leave them off being unable to locate my aftermarket seat belt kit at the time. Sports car it may be but obviously the Italians aren’t that safety conscious! Only kidding Enzo!
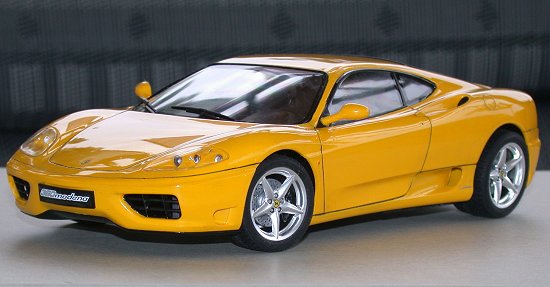
Early in the construction the body
was painted using the colours recommended by Tamiya enamel spray, TS16,
Yellow and this was done for all relevant body parts, including such things as
the mirror pods, rear hatch, front light pods and the lower side body pieces.
The body was sprayed allowed to dry and then given a polish to bring up the
sheen. The clear glass pieces
 were masked off and sprayed with Tamiya
enamel spray TS29, Semi Gloss Black and were also allowed to dry before being
attached to the body. It was also necessary to paint the side window surrounds
on the body but this was done by freehand brushing using Tamiya X18,
Semi Gloss Black. The two front grill panels were painted in Semi Gloss Black
and attached from inside the body and the mesh vent openings on the rear of the
car were also attached. The kit supplies a template to aid in the cutting of
these vents, which is straightforward.
were masked off and sprayed with Tamiya
enamel spray TS29, Semi Gloss Black and were also allowed to dry before being
attached to the body. It was also necessary to paint the side window surrounds
on the body but this was done by freehand brushing using Tamiya X18,
Semi Gloss Black. The two front grill panels were painted in Semi Gloss Black
and attached from inside the body and the mesh vent openings on the rear of the
car were also attached. The kit supplies a template to aid in the cutting of
these vents, which is straightforward.
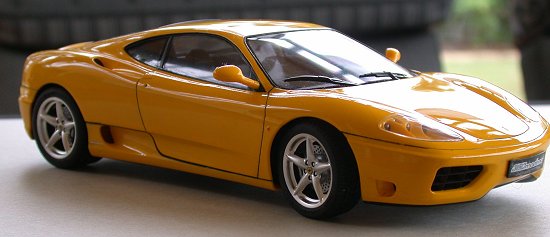
The lens pods for the front lights had the three lenses attached and the rear of each was painted with Chrome Silver X11, although the instructions call for painting the front of the lens, the rear was painted to give a better representation of the real lights. Once the paint had dried the lens pods were attached to the body and then covered with the appropriate clear parts. The taillight lenses were painted with Clear Orange and Clear Red with the area under the lights being covered with Bare Metal Foil prior to attaching the lights. The final effect is fairly convincing.
The rear hatch assembly is allowed to open and close and is hinged under the rear of the roof. This was attached prior to painting the interior roof with Tamiya XF19, Sky Grey. The decals were added, which included the metal decals as well as some slide decals, the latter being the braking lights on the rear of the hatch. Once this was completed the panel lines were then treated to watercolour used to highlight these zones. The wheels were also treated to a watercolour wash, especially around the wheel nuts.
 The body pan was painted with
Tamiya enamel spray TS29, Semi Gloss Black, including the engine sump guard
(presented as a clear part). The completed sub assembly of the passenger cockpit
was attached to the body pan and the front suspension and rear engine/suspension
assembly also attached. Each shock absorber was painted semi gloss black with
the piston painted with Chrome Silver. The springs were painted with Tamiya
X18, Semi Gloss Black. The discs were drilled and painted with Tamiya X11,
Chrome Silver with the
callipers painted semi gloss
black. The latter also has a Ferrari decal attached.
The body pan was painted with
Tamiya enamel spray TS29, Semi Gloss Black, including the engine sump guard
(presented as a clear part). The completed sub assembly of the passenger cockpit
was attached to the body pan and the front suspension and rear engine/suspension
assembly also attached. Each shock absorber was painted semi gloss black with
the piston painted with Chrome Silver. The springs were painted with Tamiya
X18, Semi Gloss Black. The discs were drilled and painted with Tamiya X11,
Chrome Silver with the
callipers painted semi gloss
black. The latter also has a Ferrari decal attached.
|
CONCLUSIONS |
This is quite an easy kit to build straight out of the box, a rare thing for me given my bent towards hairy plane construction. The instructions were very easy to follow and the whole thing went together quite quickly. The only problems I experienced were self-inflicted, such as too much pressure from the Tamiya enamel spray can, something of which I am always wary but it still seems to catch me out every now and again. I get too used to setting the pressure on my airbrush compressor (sounds like I am blaming the tools don’ it?). Remember to always hold the item to be sprayed a decent distance away from the nozzle of the can, as the paint sure does come out in a hurry!
 I do have a couple of gripes to air
with regards the car and motorcycle kits however. The main problem is that the
ejector pin marks are always highly visible in these kits, usually on such
things as the suspension or body pans. Now I am well aware that as modellers we
should take the effort to remove those marks and blemishes that are visible, but
there are an unusual amount of them when compared to the same manufacturer’s
aircraft kits. Is this my imagination or is it real? If so, how come the
modellers
who build cars and/or bikes regularly don’t go banging on the door of Mr.
Tamiya, or have they been doing that and just been ignored? I am not fazed about
it as it is simply an observation, annoying yes, but a problem that is generally
resolved with work. My other major gripe is with
colours
that are being called out in the manufacturers coding. With kits such as cars
and bikes it is not so important, or is it? Again, I feel that we as
modellers
should be given the choice and not have to mix colours to get the correct one.
This is my usual complaint so if you’ve read it before then you know how
strongly I feel about this issue. Tamiya are starting to make amends by
releasing new colours to their range, but I would still prefer to use my
manufacturer of choice from time to time!
I do have a couple of gripes to air
with regards the car and motorcycle kits however. The main problem is that the
ejector pin marks are always highly visible in these kits, usually on such
things as the suspension or body pans. Now I am well aware that as modellers we
should take the effort to remove those marks and blemishes that are visible, but
there are an unusual amount of them when compared to the same manufacturer’s
aircraft kits. Is this my imagination or is it real? If so, how come the
modellers
who build cars and/or bikes regularly don’t go banging on the door of Mr.
Tamiya, or have they been doing that and just been ignored? I am not fazed about
it as it is simply an observation, annoying yes, but a problem that is generally
resolved with work. My other major gripe is with
colours
that are being called out in the manufacturers coding. With kits such as cars
and bikes it is not so important, or is it? Again, I feel that we as
modellers
should be given the choice and not have to mix colours to get the correct one.
This is my usual complaint so if you’ve read it before then you know how
strongly I feel about this issue. Tamiya are starting to make amends by
releasing new colours to their range, but I would still prefer to use my
manufacturer of choice from time to time!
Another bone of contention with Tamiya in respect to its car kits is that quite a few newer models come as “curb-side” kits. In other words the engine is a very simple representation from the underside only. This is not the case with this particular kit, and would not want to be for the money I may add, however it does apply to some of the more desirable kits. It is a shame as there is so much detailing that can be achieved on the engine with the proper references. Fujimi have just re-released a number of kits portraying the delicious and most desirable GT40, but not one of these kits has an engine as a separate sub assembly. The engine and gearbox are all represented as a simple sump/gearbox silhouette. It is a crying shame, especially for the likes of myself who drools over the mere sight of one of these fabulous machines. Perhaps Fujimi will release this car as one of the company’s Enthusiast Range of kits, which usually means everything except the kitchen sink is included, with the price tag to match.
Now everything aside, it is a very nice kit that builds into a pleasing model and one that certainly looks as if it came out of the stables of Ferrari. It oozes power and sensuality as cars from this famous manufacturer do so well. It is a very nice looking machine and one that I would be proud to own. Now where’s my ski mask?
|
REFERENCES |
Ferrari Web Site http://www.ferrari.it/
December 2002
Copyright ModelingMadness.com
If you would like your product reviewed fairly and quickly, please contact me or see other details in the Note to Contributors.
Back to the Reviews Index Page2019