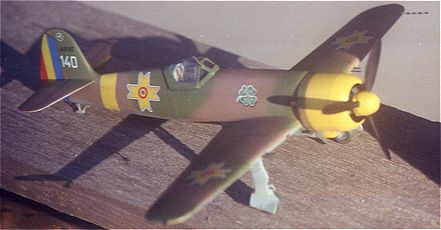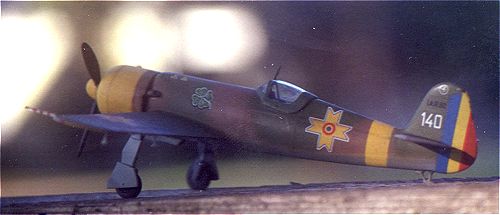
LTD 1/48 IAR-80A
PRICE: $23.98 (in 1996, can now be found for as little as $5!)
KIT NUMBER: 9804
DECALS: Three versions--IAR-80 flown by Lieutenant Ion Galea of Grupul 9, Escadrila 47; IAR-80 flown by Lieutenant Ioan Micu of Grupul 8; and an IAR-80A flown by adjutant aviator Pomut of Grupul 5, Escadrila 53
OVERALL IMPRESSION: as a limited run kit, it has its problems, but the instruction sheet is excellent
DATE OF REVIEW: September 22, 1998
REVIEWED BY: Drew Nix

The Rumanian Air Force found itself flying obsolescent aircraft of mainly Polish design as warclouds gathered over Europe. Thus in 1937 the IAR company began work on an indigenous design for a fighter, designated IAR-80. The prototype first flew in April of 1939. Powered by a license-built French Gnome-Rhone engine, the production IAR-80 could reach a top speed of 342 mph. It was underarmed, having just four 7.9mm Browning machine guns in the wing. The armament was gradually increased through the -80A, -80B, -80C, and the IAR-81 series. The type’s moment of glory came during the American raids on the Ploesti oil fields (Operation Tidal Wave) when they shot down several of the attacking B-24 bombers. Plagued with reliability problems, there were never very many of any type in service throughout the war years. As the Russians pressed closer in the last days of the war, Rumania changed sides and became an ally of the Soviets. The IAR-80s that remained served into the 1950’s, mainly as training aircraft.
Ever since I translated an article about this aircraft from French to English for the old IPMS/USA Quarterly in 1988, I have wanted to do a model of this relatively unknown (in the West) aircraft. I ran across the LTD Models limited-run kit at a hobby show about three years ago. The price was high, but I wanted it. Upon getting it home, I found that the “limited” aspect of the model meant that the molding process was not up to what you expect from today’s major kit manufacturers. Still compared to, say, Merlin kits, this wasn’t that bad. Molded in a light gray plastic with engraved detail, the kit requires quite a bit of work to bring it up to standards. Most parts have at least some flash on them, the sprue gates are very thick requiring care in removing parts from the two sprue trees, many parts have to be sanded and/or trimmed to fit, some parts are better replaced, and the cockpit canopy is a vac-form (you get 2, thank goodness).
The instruction sheet is the strongest aspect of this kit. The drawings are excellent showing clearly where every part should go and even giving the color of each part, using both the color’s name and its corresponding FS number. The decal placement and overall color drawings are to 1/48 scale making it easy to determine the size and placement of the yellow fuselage band, for instance. There is even a discussion of scale color, citing several references!
Construction begins with the cockpit. Although basic, most of the main cockpit components are given. If the instructions say “trim to fit”, you better believe them and be prepared to do extensive sanding! I added seat belts and harnesses from Reheat Products. I also made a better instrument panel using Reheat instruments for the dials, gauges, etc. Using the aforementioned IPMS Quarterly as reference, I was able to add more detail to the cockpit area. A gunsight was also added using the Reheat brass set. After much sanding and dryfitting, I got everything together so that the fuselage halves could be joined.
The IAR-80 series used a tail skid rather than a tailwheel and this comes as a two-part assembly to be added to the fuselage. The wings come in three pieces, a one-piece lower and two uppers. A wheel well insert is added to the bottom wing. I substituted the Engines and Things 1/48 scale replica of the Gnome-Rhone engine. Since the back of the engine is visible through the wheel wells, the replacement engine was cut in half right behind the rear cylinder banks. A 1/8” hole was drilled in the gearbox front, the cylinder banks rear, and through the front of the fuselage. An approximate 1” length of brass tubing was super glued into the gearbox and it was passed through the hole in the fuselage and superglued into place before the wings were glued to the fuselage. Later on, after the rest of the engine was superglued into the cowl, this piece of brass allowed everything to line up nicely.
 Now
is when the instructions would have the main gear glued in place. Wait until
painting is complete to do this. True Details resin wheels were substituted
for the kit wheels. The wings had large stubs of sprue inside all three pieces.
It took a lot of sanding to eliminate these stubs, to get the wheel well
in place, and the top wings to fit the bottom wing. Even then putty was applied
liberally all along the leading edges and where the wings met the fuselage.
Finally, everything else is added. As has been reported elsewhere, the Engines and Things radial engines are too big to fit into most cowlings. The front part of the engine was chucked into a motor tool and sanded down until it fit the cowling. This removed a lot of the top of the cylinders but, since the IAR-80 was a closely cowled aircraft, this is not too noticeable once the engine is in place. The cowling itself is molded in two pieces and it took a lot of puttying and sanding and fiddling to get it to look right. Even then, it cracked on several occasions during test fits, painting, and with general handling. Super glue, accelerator, and sanding were required each time this happened. The kit-provided spinner did not fit the propeller at all well. It was cemented in place, putty was added, and the whole outfit sanded. As mentioned earlier, the kit comes with two vac-formed canopies. I immediately ruined one in trying to cut it from the backing sheet, but the other turned out well. The IAR-80 series was unusual in that the radio antenna post passed through the windscreen, so judicious drilling will have to be done to keep from ruining the canopy. Decal strips were used to replicate the framing of the canopy.
Chrome yellow is the suggested color for the cowling, the underwing tips, and the fuselage band. Several coats of acrylic chrome yellow were required to get coverage even after using an undercoat of white. I don’t know if this is a problem with using acrylics or just a problem with trying to get ANY yellow to cover.
The kit provided machine guns are not very well detailed and do not fit the holes in the wings provided for them. Styrene rod of suitable diameter was cut and used to replace the kit guns. The overall colors of IAR-80s was usually Dark Green and Tan over Light Blue. Pactra and Poly S acrylics were used to paint the aircraft. The old Poly S actually proved the better paint in this case!
The decal sheet is very colorful and in register. I don’t know who did the decals for LTD, but they did a good job. The first scheme given was chosen, this being the IAR-80 flown by Lieutenant Galea in April 1942. Galea survived the war with 10 victories claimed over American and Soviet aircraft. His mount had a prominent four-leaf clover on both sides of the forward fuselage as his personal marking. The decals are thick but go on well and snuggle down with the use of some Solvaset. The only problems encountered here was with the large fin flashes. These required several liberal coats of Solvaset to finally smooth out. A well-planned aspect of the decals is that the national crosses have a center blue dot to which separate red circle decals are added, preventing out of register decals.
If you can remember that the “LTD” in LTD Models means “limited run” (No, not La-Te-Dah!), then you will be prepared to do the extra work required to bring this model up to standards. It CAN be built into a nice rendition of a lesser-known fighter of the Second World War. Now, where are those Tamiya kits?!
Copyright ModelingMadness.com. All rights reserved. No reproduction in part or in whole without express Permission from the editor.