| KIT #: | 04181 |
| PRICE: | $8.50 MSRP |
| DECALS: | See review |
| REVIEWER: | Joe Youngerman |
| NOTES: |
| HISTORY |
The
Messerschmitt 262 was the first operational jet fighter of World War 2 and
without a doubt was an exceptional aircraft. Many design features such as
the swept wing concept
 would not be seen on other aircraft until some time
after the end of the war. The Me 262 could have been a serious threat to
Allied air power were it not for the lack for interest by Adolf Hitler and
his demand that it be used as a bomber.
would not be seen on other aircraft until some time
after the end of the war. The Me 262 could have been a serious threat to
Allied air power were it not for the lack for interest by Adolf Hitler and
his demand that it be used as a bomber.
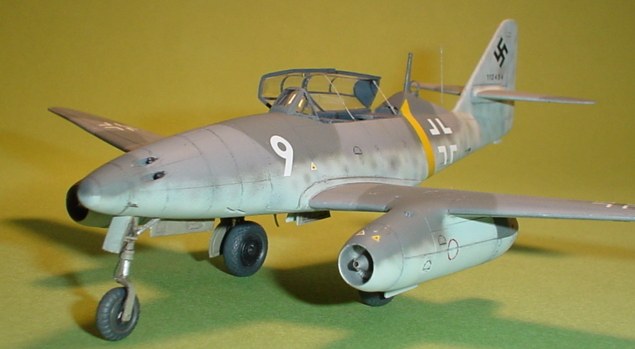
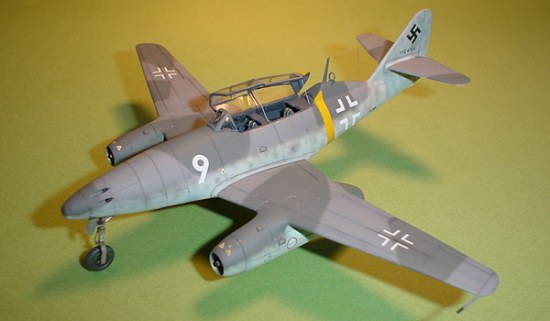
Powered by Jumo 004B the two seat Me 262B-1a was derived from the 262A single seat aircraft. The 262B-1a/U1 night fighter was to be an interim a/c until the introduction of the 262B-2a which had a lengthened fuselage for additional fuel. Short range being one of the shortcomings of the 262’s already in service. The Me 262 B-1a fighter trainer which I have modeled was built in small numbers and was used as a jet conversion trainer when it became clear that there were an alarming number of accidents taking place with the new jet. Only about 15 of the fighter trainers were reported to have been built, these having dual controls and a slightly different cockpit layout from the two seat night fighter version.
| THE KIT |
 Revell’s kit comes
molded in a couple of different colors. I have several examples with one
being molded in a dark green plastic and the others, including this one in
a much better light gray color. My kit was very nicely molded and was free
of any flash. The instructions are clear and easy to follow though the long
separate multi-sheet layout is not a favorite of mine. The major
shortcoming of the kit is the clear parts. This is true for all variants of
the 262 offered by Revell in this scale. The parts are thick and the
framing not well molded. It’s really a shame considering the otherwise high
quality of this kit. I solved this problem by using main canopy sections
from one of my Hasegawa kits. The decals, while a little thick, are well
printed and offer the modeler a choice of two night fighter a/c with
distinct paint schemes.
Revell’s kit comes
molded in a couple of different colors. I have several examples with one
being molded in a dark green plastic and the others, including this one in
a much better light gray color. My kit was very nicely molded and was free
of any flash. The instructions are clear and easy to follow though the long
separate multi-sheet layout is not a favorite of mine. The major
shortcoming of the kit is the clear parts. This is true for all variants of
the 262 offered by Revell in this scale. The parts are thick and the
framing not well molded. It’s really a shame considering the otherwise high
quality of this kit. I solved this problem by using main canopy sections
from one of my Hasegawa kits. The decals, while a little thick, are well
printed and offer the modeler a choice of two night fighter a/c with
distinct paint schemes.
There are no resin or photo-etch parts included with the kit though there are numerous detail bits offered by various manufacturers if one is so inclined.
| CONSTRUCTION |
The
construction of the kit is very straightforward with no real problems
encountered along the way. I began, as usual, with the cockpit area. Since
I wanted to build the fighter trainer version of the 262B-1a, the aft
cockpit control stick was installed and the radar instrumentation that sat
on the cockpit decking was left off. I used a few photo-etch bits from an
Eduard set to 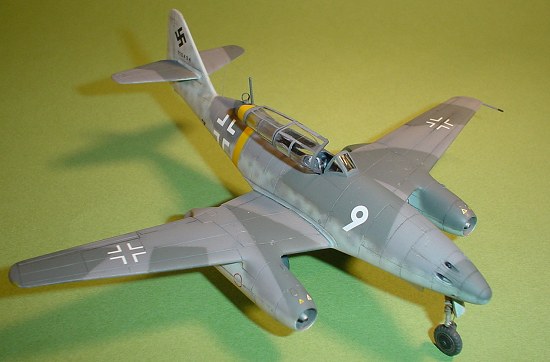 spruce up things just a bit such as seat belts, seat details
and other little odds and ends. The cockpit area was painted RLM 66. The
kit instrument panels were used as they are very nicely detailed. Each dial
face was carefully painted black and then the details brought out with a
very light dry brushing of white. Each dial face was then dabbed with a
tiny drop of Future to give the dial face a glass look. I wanted to improve
the look of the gun ports on my Stormbird so I carefully drilled out the
ports and added gun barrel tips from plastic tube before assembling the
fuselage.
spruce up things just a bit such as seat belts, seat details
and other little odds and ends. The cockpit area was painted RLM 66. The
kit instrument panels were used as they are very nicely detailed. Each dial
face was carefully painted black and then the details brought out with a
very light dry brushing of white. Each dial face was then dabbed with a
tiny drop of Future to give the dial face a glass look. I wanted to improve
the look of the gun ports on my Stormbird so I carefully drilled out the
ports and added gun barrel tips from plastic tube before assembling the
fuselage.
The fuselage halves were mated together and fit very well with just some minimal sanding and re-scribing needed. The rear deck fairing for the two seat version was the only part that needed some filler to take out some gaps. Having completed the fuselage assembly, the wings were assembled and attached to the fuselage. Again, the fit was excellent with only minor sanding and re-scribing needed to obtain the right look. After taking care of the wing to fuselage seams, I moved on to the assembly of the Jumo engine nacelles. These are well molded and a fairly simple affair consisting of only four parts each. There are compressor blades molded inside of the intakes but no turbine blade detail inside the aft end of the nacelles. This really is not an issue though as one can’t really see in the back side once the engines are attached to the wing. The engine nacelles and horizontal stabs were added and once again the fit was very good.
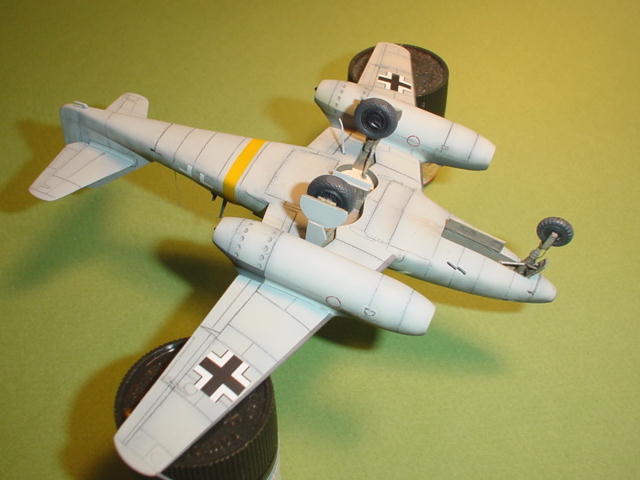
 I did want to add detail to the landing
gear so, after cleaning the mould lines from the parts, I added brake lines
made from fine wire though I did use stretched sprue for the small lines on
the inside of the main wheel hubs. The nose gear doors were
too thick so I sanded them down a bit to achieve the right look. I also
added retraction links to the forward gear door to the nose strut. The
landing gear is beautifully molded but the struts did not fit well into the
holes in the wheel bay. I little careful filing took care of this. Be sure
to get the angle of the gear correct. The main gear struts of the 262
angle-in slightly but the main wheels do not. They should be pretty much
vertical to the runway surface. I had a couple photos and three view
drawings close by to try to help me get it right. Strangely, Revell molded
details onto the bottom of the cockpit tub, but then put a flat floor in
the main gear wheel bay. Purists may want to open up the wheel bay for a
more accurate depiction but I chose not to due to time constraints.
I did want to add detail to the landing
gear so, after cleaning the mould lines from the parts, I added brake lines
made from fine wire though I did use stretched sprue for the small lines on
the inside of the main wheel hubs. The nose gear doors were
too thick so I sanded them down a bit to achieve the right look. I also
added retraction links to the forward gear door to the nose strut. The
landing gear is beautifully molded but the struts did not fit well into the
holes in the wheel bay. I little careful filing took care of this. Be sure
to get the angle of the gear correct. The main gear struts of the 262
angle-in slightly but the main wheels do not. They should be pretty much
vertical to the runway surface. I had a couple photos and three view
drawings close by to try to help me get it right. Strangely, Revell molded
details onto the bottom of the cockpit tub, but then put a flat floor in
the main gear wheel bay. Purists may want to open up the wheel bay for a
more accurate depiction but I chose not to due to time constraints.
| COLORS & MARKINGS |
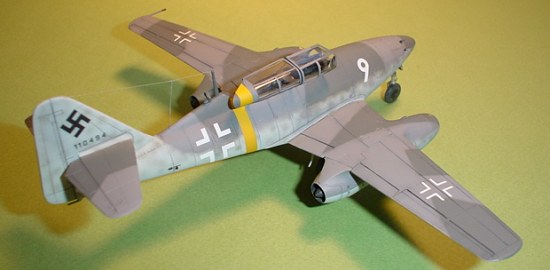
One of the main reasons I chose to model this particular aircraft was the early 74/75/76 scheme that it wore. I first applied Polly Scale flat black along the panel lines using my trusty Paasche H double action airbrush. The belly was then sprayed with a coat of Polly Scale RLM 76 being careful to let just a little shading remain and was left to dry for a few days. Next I carefully masked off a border just above where the fuselage mottling would begin using a paper template raised from the surface slightly with small rolls of Tamiya tape. This would prevent a paint ridge from building up along the line. I sprayed Model Master Enamel RLM 75 first and again let it dry for a few days. I then made paper templates for the splinter camouflage using Monogram’s painting guide as a reference. I used them same technique of raising the template slightly with tape as the edges of the top surface colors had a semi-soft edge to them.
 This step completed it was time to move
on to the dreaded German mottling! I have had better luck with mottling
when I use Enamels and that is why I chose them over acrylics for the top
surfaces. I use a considerably thinned mixture here to avoid paint speckles
that look way out of scale. The smaller the scale the more difficult this
is to achieve but it can be done. After making a couple obligatory goofs
and going back over them I finished the mottling and left the models sit
for several days…again. A much longer cure time is the downside to using
enamels. I should also mention that the canopy was masked with Tamiya tape
and sprayed with a coat of RLM 66 then painted with the rest of the
aircraft. The yellow fuselage stripe comes as a decal in the Eagle Strike
sheet I used but I always prefer to paint them on. Aeromaster RLM 02 enamel
was used for this task.
This step completed it was time to move
on to the dreaded German mottling! I have had better luck with mottling
when I use Enamels and that is why I chose them over acrylics for the top
surfaces. I use a considerably thinned mixture here to avoid paint speckles
that look way out of scale. The smaller the scale the more difficult this
is to achieve but it can be done. After making a couple obligatory goofs
and going back over them I finished the mottling and left the models sit
for several days…again. A much longer cure time is the downside to using
enamels. I should also mention that the canopy was masked with Tamiya tape
and sprayed with a coat of RLM 66 then painted with the rest of the
aircraft. The yellow fuselage stripe comes as a decal in the Eagle Strike
sheet I used but I always prefer to paint them on. Aeromaster RLM 02 enamel
was used for this task.
With painting complete it was time to coat the model with Future and get the decals on. I used a combination of Eagle Strike and Techmod decals for this aircraft. It represents a Me 262B-1a fighter trainer of which only about fifteen were produced. This aircraft was destroyed in a flying accident near Augsberg in January of 1945. It’s pilot, Ferdinand Sagemeister being killed in the crash. The decals performed well after adding some Micro-set and Micro-sol products to the process. At this point I did some final very light weathering to the aircraft undersides to simulate grime. This was done with washes and airbrushing with a very diluted mix of Modelmaster raw umber and dark gray colors. The flat finish was achieved using Testor’s flat enamel. The main canopy was carefully installed and the retaining wires added from stretched sprue carefully painted with Testor’s steel. The radio wire was also crafted from stretched sprue and also painted steel color.
| CONCLUSIONS |
This was a very enjoyable build and a kit that I would highly recommend to anyone looking to build a Me 262 in 1/72 scale. I find it slightly superior in detail to the Hasegawa offering though one will most likely want to replace the canopy with a vac or Hasegawa canopy. I have several more Revell 262’s and look forward to doing another sometime.
| REFERENCES |
Jet Planes of the Third Reich, Smith & Creek. Monogram Publications 1982.
Me 262 In Combat, Muranski, Kagero Publishing. 2003.
German Jet Aces of World War 2, Morgan & Weal. Osprey Publishing 1998.
December 2004
Copyright ModelingMadness.com
If you would like your product reviewed fairly and fairly quickly, please contact the editor or see other details in the Note to Contributors.