Hasegawa 1/72 He-111H-6
| KIT #: | E 21 |
| PRICE: | $32.95 |
| DECALS: | two options |
| REVIEWER: | Joe Youngerman |
| NOTES: |
| HISTORY |
 The Heinkel 111 series began well before
World War Two and its design borrows many of the shapes from the Heinkel He
70. First flown in 1935 the Heinkel 111 would seem to have been unlikely to
have been used throughout WW2 by the Germans but due to no successful
replacement emerging in time, it did exactly that. The He 111H-6 entered
Luftwaffe service early in 1941 as a replacement for the earlier versions.
It was the most produced variant of the 111 series and although capable of
carrying torpedoes it was most often used in the regular bomber role. It
had improved defensive armament and the Jumo 211F-1 powerplants. One has to
admire the bravery of the crews who flew this a/c in combat long after it
should have been replaced!
The Heinkel 111 series began well before
World War Two and its design borrows many of the shapes from the Heinkel He
70. First flown in 1935 the Heinkel 111 would seem to have been unlikely to
have been used throughout WW2 by the Germans but due to no successful
replacement emerging in time, it did exactly that. The He 111H-6 entered
Luftwaffe service early in 1941 as a replacement for the earlier versions.
It was the most produced variant of the 111 series and although capable of
carrying torpedoes it was most often used in the regular bomber role. It
had improved defensive armament and the Jumo 211F-1 powerplants. One has to
admire the bravery of the crews who flew this a/c in combat long after it
should have been replaced!
| THE KIT |
 The kit is
another of Hasegawa’s twin engine World War Two aircraft releases that
fills a void in 1/72 scale that has existed for some time. Italeri released
several versions of the He 111 some years ago and their kits while good are
getting dated, having minimal detail, raised panel lines and some accuracy
issues. The Hasegawa kit is a tremendous improvement though it’s not
perfect, (what kit is?). The panel lines are recessed but are a bit on the
heavy side. The top gunner’s glazing can only be displayed in the closed
position… presumably because the gunner’s position is devoid of detail. The
cockpit is well done though and Hasegawa even throws in some photo-etched
seat belts and other goodies in the kit. The landing gear and wheel wells
are nicely done and there will be no need for aftermarket wheels as the kit
examples are very well done. If you really want a good kit of this airplane
in 1/72 scale, this is the kit!
The kit is
another of Hasegawa’s twin engine World War Two aircraft releases that
fills a void in 1/72 scale that has existed for some time. Italeri released
several versions of the He 111 some years ago and their kits while good are
getting dated, having minimal detail, raised panel lines and some accuracy
issues. The Hasegawa kit is a tremendous improvement though it’s not
perfect, (what kit is?). The panel lines are recessed but are a bit on the
heavy side. The top gunner’s glazing can only be displayed in the closed
position… presumably because the gunner’s position is devoid of detail. The
cockpit is well done though and Hasegawa even throws in some photo-etched
seat belts and other goodies in the kit. The landing gear and wheel wells
are nicely done and there will be no need for aftermarket wheels as the kit
examples are very well done. If you really want a good kit of this airplane
in 1/72 scale, this is the kit!
| CONSTRUCTION |
 The construction was very straight
forward with no major glitches along the way. You must make the decision
early whether you intend to build the a/c with the internal bomb bay or the
more common external mounts for this variant. The bomb bay is well
represented but I wanted to build an Eastern Front a/c with externally
mounted SC 1000’s so I omitted the internal bomb racks as directed. The
cockpit is good but I spruced it up a bit by adding the massive throttle
levers found on the 111 as well as the mixture controls and other various
knobs and levers. Some wiring and plumbing was also added to the
The construction was very straight
forward with no major glitches along the way. You must make the decision
early whether you intend to build the a/c with the internal bomb bay or the
more common external mounts for this variant. The bomb bay is well
represented but I wanted to build an Eastern Front a/c with externally
mounted SC 1000’s so I omitted the internal bomb racks as directed. The
cockpit is good but I spruced it up a bit by adding the massive throttle
levers found on the 111 as well as the mixture controls and other various
knobs and levers. Some wiring and plumbing was also added to the
 cockpit.
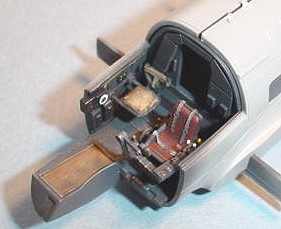
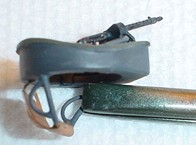
The aft crew area is pretty much devoid of detail and you really can’t see
inside anyway but I just had to add some detail. Using Aero Detail’s superb
He 111 book as a guide I added quite a bit of detail to the area. The rear
gunner’s seat is nothing more than a thick plastic tab so I cut it off and
made one from plastic rod, thin solder and tape for the sling. The seat is
asymmetrical so it was a little tricky but it turned out well I thought.
cockpit.
The aft crew area is pretty much devoid of detail and you really can’t see
inside anyway but I just had to add some detail. Using Aero Detail’s superb
He 111 book as a guide I added quite a bit of detail to the area. The rear
gunner’s seat is nothing more than a thick plastic tab so I cut it off and
made one from plastic rod, thin solder and tape for the sling. The seat is
asymmetrical so it was a little tricky but it turned out well I thought.
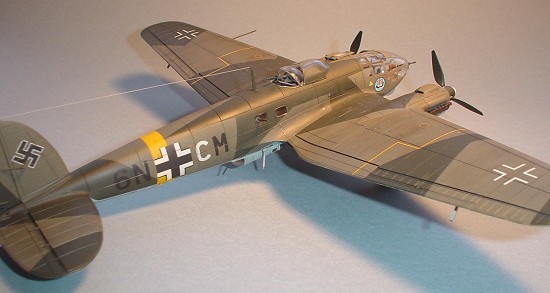
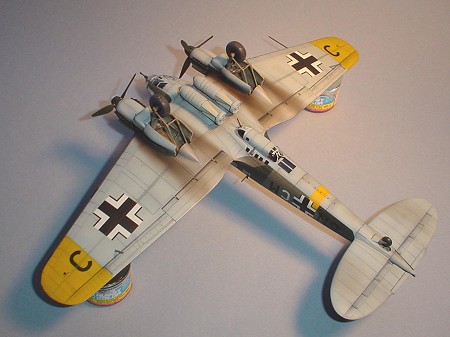
The fuselage halves fit very well with minimal filler needed though the top tracks for the pilot’s hatch and the gunner’s canopy got sanded off in the process. I simply re-built them using strip plastic and some very light sanding. From there the engine nacelles were assembled and they are a little tricky so be sure to test fit them before assembly! The wings are beautiful and fit very well as did the tail surfaces. The wheel wells are boxes that are inserted before assembling the wings. Though fairly basic, they do have some detail that improves the look considerably over Italeri’s release.
 The wing to fuselage joint is where I
encountered my first fit problem with this build. The wing to fuselage
joint leaves a gap on the underside that needs attention. I filled the area
with strip plastic and filled the gap with Zap CA+. A little sanding and
re-scribing and all was well again…I thought. Then I added the bomb racks
and found the did not fit at well at all They are too big for the space
where they go and needed to be sanded quite a bit to fit. Once installed
though, the racks really look the part. The SC1000’s were assembled added
the ring around the fins, way to thick, was thinned by sanding to about 1/3rd
its original thickness. The landing gear was left off until after painting
and is a little tricky to install. Again some sanding was required because
the main struts didn’t fit into their slots without adjustment. This is
also true of the gear doors which are slightly too long at the forward
ends. A little sanding took care of these problems but it was becoming a
bit annoying at this point that I kept running into this on a $32 kit!
The wing to fuselage joint is where I
encountered my first fit problem with this build. The wing to fuselage
joint leaves a gap on the underside that needs attention. I filled the area
with strip plastic and filled the gap with Zap CA+. A little sanding and
re-scribing and all was well again…I thought. Then I added the bomb racks
and found the did not fit at well at all They are too big for the space
where they go and needed to be sanded quite a bit to fit. Once installed
though, the racks really look the part. The SC1000’s were assembled added
the ring around the fins, way to thick, was thinned by sanding to about 1/3rd
its original thickness. The landing gear was left off until after painting
and is a little tricky to install. Again some sanding was required because
the main struts didn’t fit into their slots without adjustment. This is
also true of the gear doors which are slightly too long at the forward
ends. A little sanding took care of these problems but it was becoming a
bit annoying at this point that I kept running into this on a $32 kit!
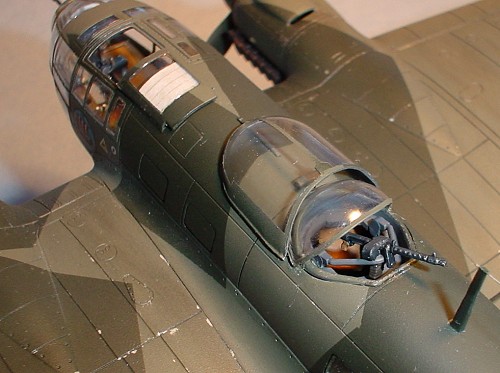
To spruce up the landing gear I added the brace wires made from stretched sprue to the extension struts and installed brake lines using fine wire. All of the little fiddly bits went on without a hitch just before the final flat coat. I added the pilot’s sun screen on his access hatch from lightly weathered, scribed paper. I simply white glued it in place just before attaching the hatch to the aircraft. The radio wire came from stretched sprue and the belly mounted navigation antenna was made from plastic rod and fine wire. I should also note that the gunner’s canopy was replaced with a Falcon vac replacement so that I could have it displayed in the open position.
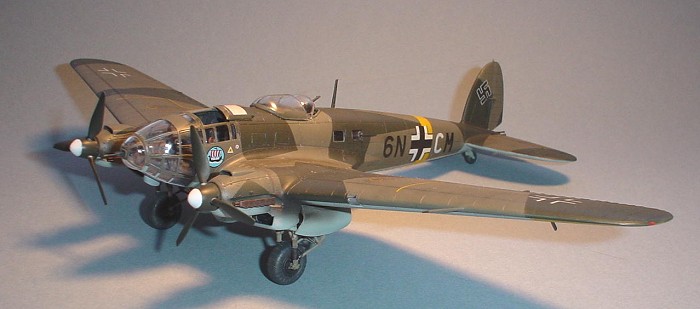
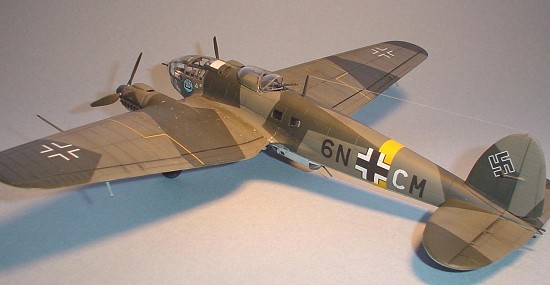
| COLORS & MARKINGS |
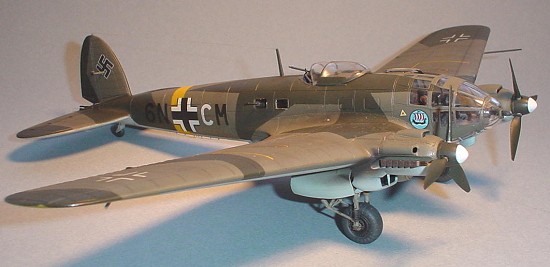 I used RLM 66 for the interior as this
a/c was manufactured after the changeover to that color from the earlier
RLM 02. The exterior was painted using Gunze RLM 70/71 over Pollyscale’s
RLM 65. The contrast seems to be a good match for the few color photos I
found on He 111H-6s in this theater. The RLM 02 yellow ID markings were
from Aeromaster’s enamel range. I pre-shaded and post-shaded the kit during
painting. I also used washes and artists pastels to add a worn look to the
finish. The exhaust stains, so characteristic of the 111, were a heavily
thinned 70/30 mix of Pollyscale black and dark brown. A coat of Future was
applied before adding the kit decals for an a/c operating in Russia with
4./KG100 during the fall of 1942. I use Modelmaster’s burnt iron on the
exhaust stubs and then wash them with heavily thinned Pollyscale black. The
bombs were typically painted RLM 65 and had a yellow stripe in between each
fin to identify them as general purpose bombs. No decals are provided for
this but as luck would have it the width of the yellow fuselage decals,
which I did not use, are exactly the length need for the bomb stripes! I
just had to cut thin strips from them and apply those strips to the bombs…a
real time saver!
I used RLM 66 for the interior as this
a/c was manufactured after the changeover to that color from the earlier
RLM 02. The exterior was painted using Gunze RLM 70/71 over Pollyscale’s
RLM 65. The contrast seems to be a good match for the few color photos I
found on He 111H-6s in this theater. The RLM 02 yellow ID markings were
from Aeromaster’s enamel range. I pre-shaded and post-shaded the kit during
painting. I also used washes and artists pastels to add a worn look to the
finish. The exhaust stains, so characteristic of the 111, were a heavily
thinned 70/30 mix of Pollyscale black and dark brown. A coat of Future was
applied before adding the kit decals for an a/c operating in Russia with
4./KG100 during the fall of 1942. I use Modelmaster’s burnt iron on the
exhaust stubs and then wash them with heavily thinned Pollyscale black. The
bombs were typically painted RLM 65 and had a yellow stripe in between each
fin to identify them as general purpose bombs. No decals are provided for
this but as luck would have it the width of the yellow fuselage decals,
which I did not use, are exactly the length need for the bomb stripes! I
just had to cut thin strips from them and apply those strips to the bombs…a
real time saver!
| CONCLUSIONS |
 I was very excited when Hasegawa
released this kit last year and immediately ordered one with the
expectation of building it right away. It did sit for a couple months
before I got to it but I’m glad I did. It was a relatively trouble free
build and the end result really looks the part, and isn’t that the whole
idea after all. With so many variants, Hasegawa will surely get some
mileage out of these molds. Even though they are a bit pricey, I found it
worth it. No photo-etch was need, no resin bits or even decals! When you
consider that it may be a better bargain than some think. I know I’ll buy
at least one more.
I was very excited when Hasegawa
released this kit last year and immediately ordered one with the
expectation of building it right away. It did sit for a couple months
before I got to it but I’m glad I did. It was a relatively trouble free
build and the end result really looks the part, and isn’t that the whole
idea after all. With so many variants, Hasegawa will surely get some
mileage out of these molds. Even though they are a bit pricey, I found it
worth it. No photo-etch was need, no resin bits or even decals! When you
consider that it may be a better bargain than some think. I know I’ll buy
at least one more.
January 2005
| REFERENCES |
Aircraft Monograph-Heinkel He 111. Robert Michulec. AJ Press 1994.
Aero Detail 18, Heinkel He 111. 1997.
Heinkel He 111 in Action. Uwe Feist. Squadron Signal Publications. 1973.
Warplanes of the Luftwaffe. Airtime Publishing USA. 1994.
If you would like your product reviewed fairly and fairly quickly, please contact the editor or see other details in the Note to Contributors.