| KIT #: | 1602 |
| PRICE: | $25.00 give or take a bit |
| DECALS: | Two options |
| REVIEWER: | Dennis Weber |
| NOTES: | Original Tooling |
| HISTORY |
The Dornier Do-17's development can be traced to a 1933 six-passenger mailplane
that was considered unsuited to the needs of Lufthansa because of its cramped
fuselage. The first three prototypes might have remained locked up in storage
and entirely unknown but for the recommendations and reputation of G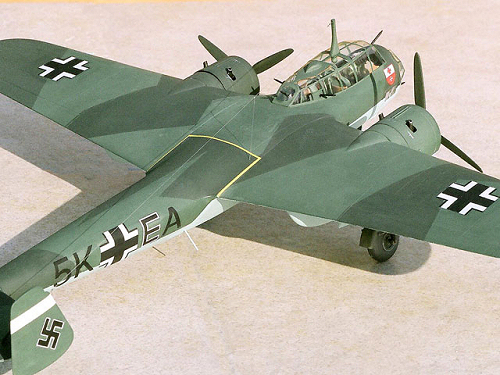 erman pilot Flugkapitan Untucht, a winner of eight international records. He managed to test
fly one of the prototypes and suggested that it could be developed into a
high-speed bomber. Further work was carried out and led to the Do-17E (bomber)
and Do-17F (reconnaissance aircraft), both powered with BMW VIs.
erman pilot Flugkapitan Untucht, a winner of eight international records. He managed to test
fly one of the prototypes and suggested that it could be developed into a
high-speed bomber. Further work was carried out and led to the Do-17E (bomber)
and Do-17F (reconnaissance aircraft), both powered with BMW VIs.
Impressed with the high-speed performance of a sample aircraft (that was
secretly lightened and using specially boosted engines) at the International
Military Aircraft Competitions in 1937, Yugoslavia decided to acquire its own
version and a number of Do-17Ks were built under license. Obvious changes were
made in the length of the aircraft nose and they used Gnome-Rhone 14N radials.
Further independent German development led to the Do-17M bomber (Bramo 323A-1
engines) and Do-17P recon plane (BMW 132N engines), each with upgraded equipment
and better powerplants. The overall shape of these airplanes truly resemble
flying pencils.
Very small numbers of other aircraft types (S and U) were tested until the
appearance of the Do-17Z. These aircraft adopted some very obvious redesign to
the crew area by making it deeper and allowing more defensive armament. Do-17Zs
usually had Bramo Fafnir 323P engines. Increased window glazing gives these
aircraft an appearance more commonly associated with the Ju-88.
A special export version was re-engined using two DB 601A engines and designated
Do-215 but diverted back to the Luftwaffe. It still closely resembles the Do-17Z
in overall size and shape except for the obvious shape changes caused by use of
the in-line engines.
| THE KIT |
Hobbycraft is, at the time of this submission, the only game in town if you are
interested in this subject matter in 1/48 scale and covers a good portion of the
Dornier Do-17 family. They have released three general kits: the Do-17E/F; the
Do-17M/P; and the Do-17Z. (One could probably extensively modify the Do-17M/P to
make a Do-17K or use the Do-17Z as the basis for making a Do-215, but it would
sure be a major bit of work).
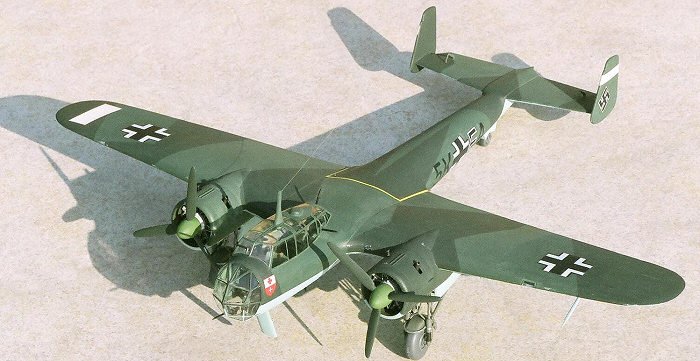
 The kit that is pictured and discussed in this article is a Do-17Z (HC1602) and
many aspects of construction are shared by the whole model series. I have
purchased the other kits (E/F and M/P kits) and many parts are common
throughout.
The kit that is pictured and discussed in this article is a Do-17Z (HC1602) and
many aspects of construction are shared by the whole model series. I have
purchased the other kits (E/F and M/P kits) and many parts are common
throughout.
The Do-17Z kit was purchased for about $25.00 CDN and
it was hard to get motivated to build it (I'm not sure why I even bought the kit
to begin with, to be honesty). And so, for a very long time, this kit sat and
gathered cobwebs.
Eons ago a participant in the Twin-Engine Group Build used his 1/48 Do-17Z
Hobbycraft kit to demonstrate the magical powers of scratch-building. I've never
quite looked at any kit the same way since. For some, the model makes the
modeller. And for others, the modeller makes the model. I was inspired, to say
the least.
After a year or so another group build came around, this time for the Battle of
Britain, and thought it time to get down to business to see if I could complete
the kit and manage to dress it up a little bit.
| CONSTRUCTION |
This kit is of Hobbycraft's "early" style. And that style reminds me of the pre-Alanis
Morissette albums that were marketed as simply Alanis. The kit is a thoroughly
aggravating build if you want either accuracy or a quick build. If you have this
kit and want to finish it, don't worry ab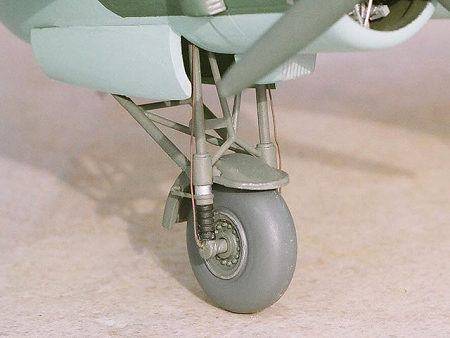 out the appearance of the interior
cockpit. It is easier to do a Rubik's cube after someone has ripped out your
fingernails. The detail is minimal and the parts that are provided are hard to
piece together. There isn't even a bombsite so prepare to do scratchbuilding.
out the appearance of the interior
cockpit. It is easier to do a Rubik's cube after someone has ripped out your
fingernails. The detail is minimal and the parts that are provided are hard to
piece together. There isn't even a bombsite so prepare to do scratchbuilding.
Also, skip fretting about the landing gear - just close the doors and make it an
in-flight kit. The gear is not easy to install because there are no reference
holes for some of the support bracing and it is poorly integrated with other kit
parts. I'd say that these areas are the worst problems with the kit.
On the other hand, if you are a bit of a modelling masochist and wish to correct
more problems, here are a few things to know:
Firstly, the bombsite fairing on the port side of the kit should be relocated to
the starboard side.
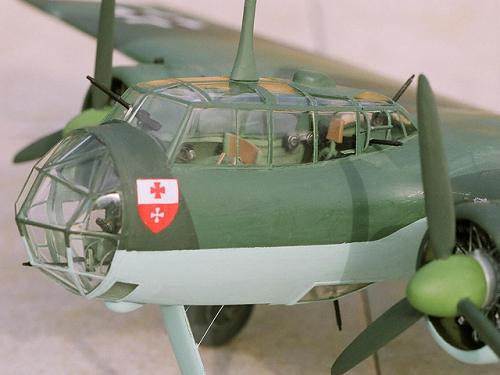
Secondly, a starboard window is entirely missing and needs to be drilled out and
added with clear scrap. I used the kit supplied canopies and glazing elsewhere
and found them to be clear but a bit too thick. The framing is inaccurate but
the parts mate quite well with the fuselage. Do yourself a favour and purchase
some aftermarket vacuum-form canopies from Squadron if you want something a bit
better.
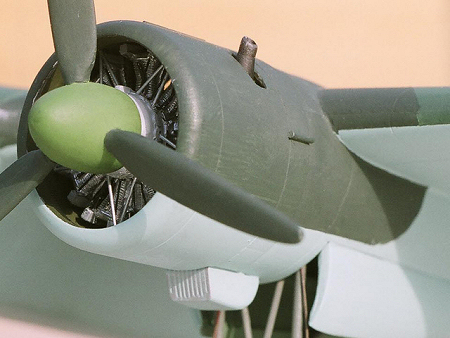 Thirdly, and I don't know why, but the cowls incorrectly suggest this aircraft
has individual cowl flaps. This error has been repeated over and over in artist
profiles and technical drawings for close to fifty years, so it came as a real
surprise to be told about this fallacy by Chris. I can't fault Hobbycraft too
much for this error. Find yourself some decent technical diagrams or clear
photos if you wish to tackle this problem. More easy to deal with are the carb
intakes (E4). They should appear on the starboard sides for both cowls.
Thirdly, and I don't know why, but the cowls incorrectly suggest this aircraft
has individual cowl flaps. This error has been repeated over and over in artist
profiles and technical drawings for close to fifty years, so it came as a real
surprise to be told about this fallacy by Chris. I can't fault Hobbycraft too
much for this error. Find yourself some decent technical diagrams or clear
photos if you wish to tackle this problem. More easy to deal with are the carb
intakes (E4). They should appear on the starboard sides for both cowls.
Fourthly, the engines that came with the kit (while quite nice on their own
terms), are not particularly faithful representations of either the Bramo 323A
or Bramo 323P. The piston rods seems oversized and clunky and there are some
details that seem to suggest they more closely resemble the BMW 132N used on the
Do-17P. However, they are not that hard to dress up. The star-shaped cowl braces
in my kit were made from scratch.
Lastly, a few other things are worth knowing. The kit has some parts common
throughout all three kits. But guess what? These same parts aren't included in
any of the kit instructions. How can that be? I still have not figured what they
are for.
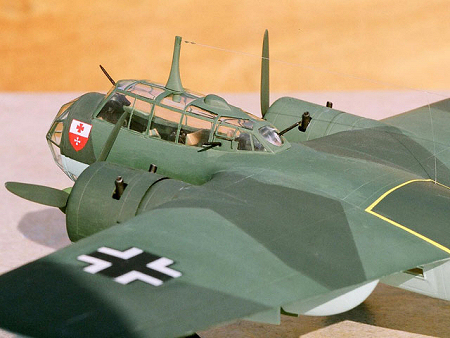
The round directional finder loop was too thick for my liking so I used a spare
bulge-like part to make a later style fairing that is located on the top of the
canopy. My fairing is undersized and the mast is too thick (but both from kit
parts). Elsewhere in the kit I've added evergreen rod and scraps wire and so
forth.
These kits are sometimes called flying bananas because the seem to turn up their
nose up at you. I buried my head in the sand about this because at least this
problem did not keep me from completing the kit. This cannot be said for the
problems with the cockpit assembly and landing gear, though. There are
instructions for converting these bananas into pencils if you purchase the
Squadron canopies - but I cannot say how easy (or worthwhile) this might be for
most people.
| COLORS & MARKINGS |
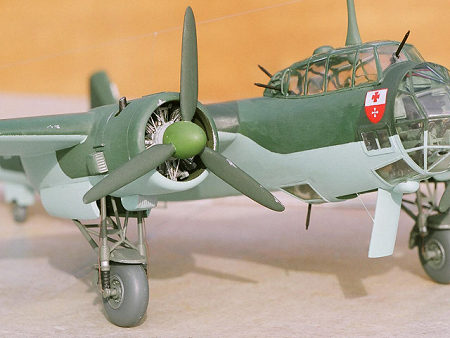 The decals were minimal and of Hobbycraft's early style: minimal, misregistered,
crude, and limited to only two choices (a German aircraft of Stab/KG 3 (5K+EA)
and a Finnish aircraft of PLeLv 46 (DN-60). Colour recommendations are not
mentioned throughout the build so you will have to guess at inside colours or
research them yourself. The colour scheme on this kit is RLM 70 and 71 over 65
undersides. I used Humbrol enamels H91 and H30 over H65 and brushed everything
by hand. The decals include white recognition bars but I painted my one - they
are actually supposed to be pink. Most people will want to get replacement
decals if they are going to the trouble of finishing this kit.
The decals were minimal and of Hobbycraft's early style: minimal, misregistered,
crude, and limited to only two choices (a German aircraft of Stab/KG 3 (5K+EA)
and a Finnish aircraft of PLeLv 46 (DN-60). Colour recommendations are not
mentioned throughout the build so you will have to guess at inside colours or
research them yourself. The colour scheme on this kit is RLM 70 and 71 over 65
undersides. I used Humbrol enamels H91 and H30 over H65 and brushed everything
by hand. The decals include white recognition bars but I painted my one - they
are actually supposed to be pink. Most people will want to get replacement
decals if they are going to the trouble of finishing this kit.
| CONCLUSIONS |
So, what did I think of this kit? Well... if you take a pig and put some
lipstick and eyeliner on it you still end up with a pig. You really have to be
prepared to get some silicone implants, high heels, and then spend heaps of
money on hair-removal products to make one adequately pass for your girlfriend.
You can take this creature out to a pub but sooner or later someone will figure
out what you've done. And that is pretty much what this kit is like. You have to
enjoy it on its own terms.
 Kidding aside, it was actually quite fun, and I would like to take another crack
at it, to be honest. But I'd say this kit is not for someone easily discouraged.
Kidding aside, it was actually quite fun, and I would like to take another crack
at it, to be honest. But I'd say this kit is not for someone easily discouraged.
Incidentally, there have been some rumblings about a re-tooled version of this
kit by Hobbycraft (HC1614) and it is supposed to offer decals choices for seven
aircraft. The amount of retooling required suggests to me that new-tooling is
what is really needed so I hope they rebuilt it from the ground up. But some
decent decals and better instructions would be good enough for this chap.
Anyways, I hope you have enjoyed my suffering and pictures of the kit. I must
acknowledge the help of Chris Floyd and Matt Swan for sharing their expertise on
this subject matter.
If you have made this kit, or tried to make this kit, don't hesitate to contact
me and tell me about your suffering. If we get enough people together, perhaps
we can get a special discount in group therapy.
Cheers.
April 2006
Copyright ModelingMadness.com. All rights reserved.
If you would like your product reviewed fairly and fairly quickly, please contact the editor or see other details in the Note to Contributors.