| KIT: | Hasegawa 1/48 Ju-87D-4 'Torpedoflieger' |
| KIT #: | 09348 |
| PRICE: | €36.95 |
| DECALS: | Two options |
| REVIEWER: | Sjon van der Heiden |
| NOTES: | Aires cockpit used |
| HISTORY |
During its considerate lifespan many innovations were tried out with the
airframe of the Junkers 87. Not all were successful. The D-4 was among one of
those. At a test centre at Travemunde converted Stuka's, carrying German or
Italian aerial torpedo's, were tested and evaluated. No doubt the results must
have been unsatisfactory, as most, if not all, D-4's were reconverted back into
D-3 types.
| THE KIT |
I purchased this kit about two and a half years ago and on initial inspection of
its content I was pleased to see so many parts. I was seriously disappointed to
find out that nearly 40% of these parts were not to be used. Hasegawa uses much
of the Ju 87B for their  other Stuka variants, so many of the parts can go
straight to the spares box. Oh well, still 98 pieces left to assemble.
other Stuka variants, so many of the parts can go
straight to the spares box. Oh well, still 98 pieces left to assemble.
Another disappointment was the models interior. It is kept rather simple and
does not appear to be all that accurate. The representation of the gun sights of
the twin machinegun at the rear of the cockpit looks especially crude. All this
may serve its purpose if the canopy is kept closed but since it is possible to
pose the four piece canopy open, I chose to substitute the interior by the Aires
Ju 87D cockpit replacement (4119).
Since this is a limited torpedo version of Hasegawa's usual D type offering, the torpedo is cast in resin. It looks absolutely awful on its sprue, but will turn out really fine. As will the rest of the model. The surface detail is superb, there is no flash whatsoever, virtually no sink marks, and ejector pin marks on surface areas are kept to an absolute minimum. The instructions are clear and idiot proof. Colour callouts are in Gunze Sangyo and Mr. Color.
| CONSTRUCTION |
Construction started with the Aires interior. This is really a model in itself.
And what a model indeed. The level of detail is excellent. The set comprises of
some 20 flawlessly cast resin parts and a fret of etched steel. There is also
included a piece of acetate for the backing of the instrument panel and the Revi
gun sight. The instructions aren't always as clear as one might like them to be,
 especially where it concerns the interaction between the Aires and Hasegawa
parts. A further drawback is the absence of any colour references. All you get
is a rather fuzzy colour photograph on the top of the box. Although I must admit
this was pretty helpful nevertheless.
especially where it concerns the interaction between the Aires and Hasegawa
parts. A further drawback is the absence of any colour references. All you get
is a rather fuzzy colour photograph on the top of the box. Although I must admit
this was pretty helpful nevertheless.
The only real trouble I experienced with this set was the installation of the
instrument panel. The Hasegawa part goes in after you've closed the fuselage
halves, but the Aires part is wider then its Hasegawa counterpart.
Unfortunately,.. the instructions don't tell you so. Needless to say you find
out yourself just right after you've closed the fuselage halves. Well,.. I was
unable to get the thing in place and I had to cut open that section of fuselage
to get the instrument panel to fit. All in all no real problem and everything
was invisibly repaired. it's also better to leave off the Revi gun sight as you
will likely break it off. Trust me. Speaking of which, leave off the twin
machinegun and the cartridge belts as well until the fuselage is closed and you
can test fit everything with the rear canopy piece. Even though it's real fiddly
to get the belts in place once everything is closed up, you will at least be
sure the canopy will be able to slide over it.
As a matter of fact, the interior is such a beautiful thing, I was almost
reluctant to put it in place, as little of it can still be seen after
installation. Even with the canopy open.
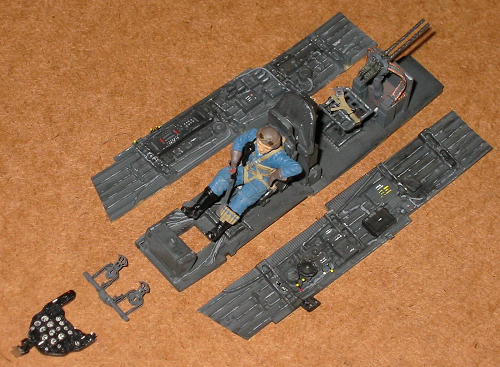 I had also bought a pilot to fly the plane, but when the fuselage was about to
be closed he turned out not to fit in-between, so I had to let him go. No
problem really. After all, it leaves more of the interior to be seen. Now I'll
just have to convince my wife I need another kit for him to pilot.
I had also bought a pilot to fly the plane, but when the fuselage was about to
be closed he turned out not to fit in-between, so I had to let him go. No
problem really. After all, it leaves more of the interior to be seen. Now I'll
just have to convince my wife I need another kit for him to pilot.
Hasegawa has done an impressive job in reproducing this Ju 87D-4. Overall fit is
great and little filler is needed. The only real problems lie in the fact that
the basis of this model is the B variant of the Ju 87, with replacement parts to
convert it into a D type. Not all replacement parts fit that well. This is most
noticeable in the nose section. The fit with the fuselage is quite bad and
leaves a huge gap. I filled it with thin styrene strip and putty and sanded
everything smooth. I then rescribed the panel lines with an Xacto knife using a
little piece of cut to size and taped down sheet styrene as a ruler.
Another problem of the models B variant history is the fact that some details
have not been altered to conform to the D type. The walkways on the wing roots
are still those typical for the B type. Hasegawa represents the right type with
three decals which have to be applied on top of the wrong type moulded onto the
wings. I opted to scrape the wing roots smooth and applied thin strips of sheet
styrene to represent the proper type of walkways. I also applied some applique'
armour around the cockpit. One of the references I used stated that this armour
was applied from the D-3 type on, but I must admit I have only seen the side
armour on G versions on photographs, so my reference (and subsequently my
model!) may be wrong. It most likely is. I've searched the web and asked
questions for Heaven knows how long when I was building this model, only
to find a picture of a torpedo carrying Stuka when the model was finished. And
you've guessed it: No side armour. Oh well,.. I still think it looks good.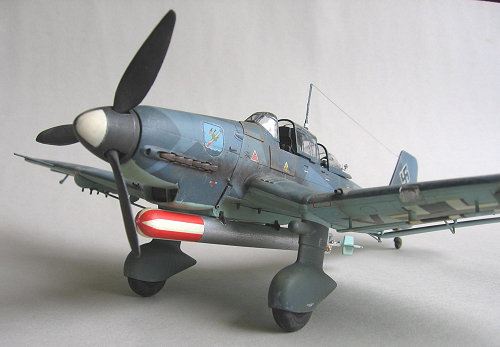
I replaced some of the cruder detail by scratch build items. The actuator rods
of the flaps are represented by solid pieces of plastic. I tediously removed
those and replaced them by pieces of steel bended to size. I also replaced some
moulded-on hand railing by bended steel ones.
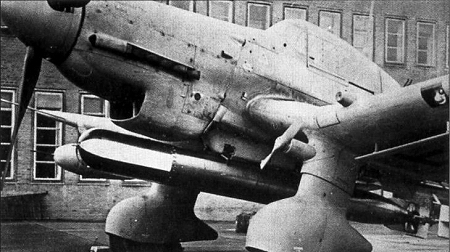
The torpedo is cast in resin. Probably due to the fact this is a special (read
limited) version. On the sprue it looks truly horrendous. I actually had
difficulty discerning what pieces were the actual parts and which pieces were
part of the sprue. But looks were deceiving and once everything was cleaned up,
the torpedo looked really fine and fitted just great. I did however remove all
the resin between the torpedo and its mount with a jig-saw. This way the torpedo
is suspended just by its clamps, as I thought it was supposed to be. On the new
found picture it can be seen that the overall shape of the torpedo mount leaves
much to be desired. It appears to be much wider and it's far less angular then
the models piece.
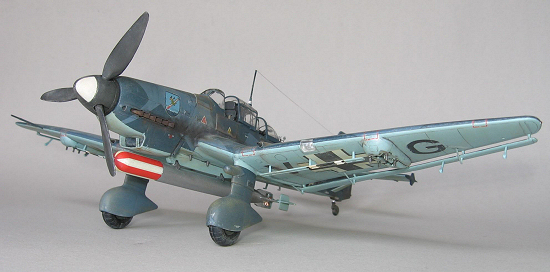
 The instructions tell you to install the dive sirens on the wheel spats but I
had my doubts about that. Having sirens on a torpedo plane seemed a bit
nonsensical. The same could be said about the dive brakes. I chose to replace
the sirens with rounded caps (actually one of those many spare parts) often seen
on photographs of various versions of the Stuka, but I left the dive brakes in
place. I figured that this plane was a regular D type which had been modified to
perform the role of torpedo plane. Even if this plane still had its sirens, I
thought they would be easily replaced by the rounded fairings. Removing the dive
brakes would be more complicated and they were probably more easily left in
place. As I said, I found a picture of a torpedo equipped plane right after I
finished. Of course it has its dive sirens in place. Next time, I'll put a
little more faith in Mr. Hasegawa's research team. Fortunately I didn't throw
them out, so one of these days, I'll be attaching those once more. One can also
see that the attachment points of the bomb trapeze have been removed or cut away.
My assumption on the dive brakes turned out to be the correct one. Sometimes
you're lucky, and sometimes... I also left off the two drop tanks as I think the
plane looks way better without them.
The instructions tell you to install the dive sirens on the wheel spats but I
had my doubts about that. Having sirens on a torpedo plane seemed a bit
nonsensical. The same could be said about the dive brakes. I chose to replace
the sirens with rounded caps (actually one of those many spare parts) often seen
on photographs of various versions of the Stuka, but I left the dive brakes in
place. I figured that this plane was a regular D type which had been modified to
perform the role of torpedo plane. Even if this plane still had its sirens, I
thought they would be easily replaced by the rounded fairings. Removing the dive
brakes would be more complicated and they were probably more easily left in
place. As I said, I found a picture of a torpedo equipped plane right after I
finished. Of course it has its dive sirens in place. Next time, I'll put a
little more faith in Mr. Hasegawa's research team. Fortunately I didn't throw
them out, so one of these days, I'll be attaching those once more. One can also
see that the attachment points of the bomb trapeze have been removed or cut away.
My assumption on the dive brakes turned out to be the correct one. Sometimes
you're lucky, and sometimes... I also left off the two drop tanks as I think the
plane looks way better without them.
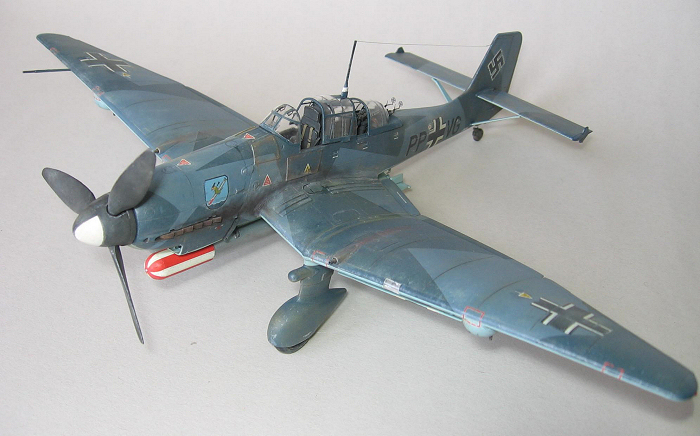
| COLORS & MARKINGS |
The model is hand painted with Humbrol enamel paint. My old airbrush died about
15 years ago and when at the end of this build I finally decided to get the
replacement parts needed, they turned out to be more expensive then the most
basic airbrush available (air canister driven, mind you). So I bought that
instead and used it to gloss up the model prior to decaling, and to give it its
final coat of Testors Dull coat. Now some of you people may have noticed the
plane appears to be sort of blue instead of the usual RLM whatever. That's
because it is. Some two years back I finished Tamiya's Swordfish and since I
entered the world of the internet about a year ago I discovered that its colour
callouts were totally off. So I figured that if I followed the instructions to
the letter only to end up with an incorrect Swordfish, I could just as well mess
this one up on purpose. I didn't like the green for this coastal plane so,.. sue
me.
Because the model is hand painted the applied layers of paint are much thicker
then they would be when spray painted. This causes a very noticeable step at
most edges of the camouflage scheme (even though I only masked the first layer
of paint and used the straight edge as a guide the "second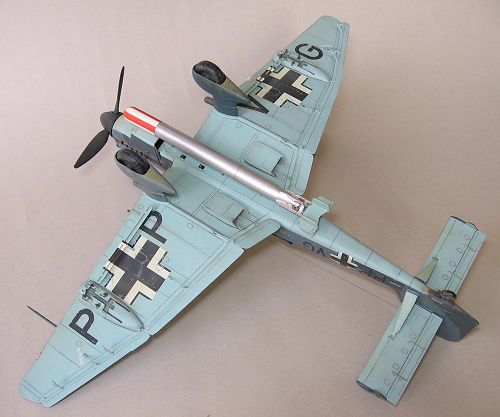 time round"). I
scraped all those edges smooth with an Xacto no. 11 blade. This leaves an ugly
sheen, but this was dealt with once the last layer of dull coat was applied. All
in all pretty time consuming but definitely worth the effort.
time round"). I
scraped all those edges smooth with an Xacto no. 11 blade. This leaves an ugly
sheen, but this was dealt with once the last layer of dull coat was applied. All
in all pretty time consuming but definitely worth the effort.
The canopy is hand painted as well. Some of the actual framework is on the
inside of the canopy. I first tried to apply strips of decals on the inside but
was unsuccessful in getting them to stay put. Then I tried strips of bent metal.
This looked next to spectacular but I only just in time realised this extra
thickness would interfere with posing the canopy open. The sliding canopy sits
too high as it is. So I gave up on that and went for the only remaining option
which was to hand paint the inner framing as well. I simulated the rivets by
tiny spots of paint on the outside of the canopy.
The decals were really bad. They're extremely thick and some of them still
silver. Although thankfully the most prominent ones don't. I was unable to get
some of them to stick to the model at all. Like the ones on the aerial mast and
the dive brakes. I simulated the text on the aerial with some white stripes and
dots and masked of and painted the ones on the dive brakes. Another problem was
the fact that some of the decals didn't quite straighten out all the way
after the application of MicroSol. Since I tend to weather my models quite a
bit, I painted the wrinkles the colour of the underlying fuselage (and ended up
with something like chipped markings). This way you camouflage the fact the
wrinkles are raised. Although this is an improvement over the 'bare' wrinkles I
think this is one of the less satisfactory points of the model. Next time I
think I'll try and cut the wrinkles and touch up the marking colours.
To further simulate chipped paint I use a silver pencil before the application
of the gloss and flat varnish. This way you get a really subtle effect once
those layers are in place. You can then highlight the places prone to very heavy
wear and tear afterwards. Panel lines were traced with a soft graphite pencil.
Any excess is easily removed with a moistened fingertip. Really difficult to
reach spots were washed when the model was glossed up.
After the last layer of dull coat was applied I used pigments to simulate dirt,
smoke and some rust (although the rust was started out using paint). The man at
my local hobby shop convinced me to give these a try so this is the first time I
used those and I am really impressed with the results. I probably grossly
overdid it (especially the rust) but I hope to get the hang of it eventually.
| FINAL CONSTRUCTION |
 When I put on the final bits I barely escaped from a minor disaster. When I was
gluing on the aerial (one of the few still black hairs from my quiff, by the
way), I pulled the line taught, felt I had managed to get it hooked onto
something and listened to something very small snapping of and propelling itself
into the great unknown. This very small something turned out to be one of the
gun sights of the rear machinegun. Remember, the reason I bought the Aires set
in the first place! After quite extensive swearing and cursing I forced myself
to start a little and unsuccessful search. I decided to call it a day. But when
I was cleaning the tabletop the unscathed gun sight suddenly appeared from under
the rim of the piece of cloth I use for cleaning my brushes. Somebody up there
must have been smiling down on me that day! Happy as a lark, I re-glued it back
into place and presto: It was finished.
When I put on the final bits I barely escaped from a minor disaster. When I was
gluing on the aerial (one of the few still black hairs from my quiff, by the
way), I pulled the line taught, felt I had managed to get it hooked onto
something and listened to something very small snapping of and propelling itself
into the great unknown. This very small something turned out to be one of the
gun sights of the rear machinegun. Remember, the reason I bought the Aires set
in the first place! After quite extensive swearing and cursing I forced myself
to start a little and unsuccessful search. I decided to call it a day. But when
I was cleaning the tabletop the unscathed gun sight suddenly appeared from under
the rim of the piece of cloth I use for cleaning my brushes. Somebody up there
must have been smiling down on me that day! Happy as a lark, I re-glued it back
into place and presto: It was finished.
| CONCLUSIONS |
This wasn't an easy build. But one I thoroughly enjoyed. Besides, nearly all the
difficulties I encountered were self induced. I'm convinced this model will look
great just out of the box, but with a little extra effort it builds into
something really special. For me, the Stuka is one of the best looking planes
ever designed.it's real nice Hasegawa gives us an opportunity to build this
somewhat obscure version of one of the best known planes of the Second World
War.
I would like to thank Mr. Yong for patiently helping me along and urging me into
writing this review. And of course my wife, just for putting up with me.
| REFERENCES |
Just about every website I could find about the Ju 87.
If you would like your product reviewed fairly and quickly by a site that has over 300,000 visitors a month, please contact me or see other details in the Note to Contributors.