Dragon He-162Z 'Volkszwilling'
|
KIT # |
5508 |
|
PRICE: |
$60.00 (it requires two kits) |
|
DECALS: |
See review |
|
REVIEWER: |
Bryan Tucker |
|
NOTES: |
True Details cockpit
and wheels. |
|
HISTORY |
Spring 1946:
Upon arrival at the newly re-formed ZG 1, Major Emil Demuth (formerly of JG 1) strolled around his new mount thinking to himself that this was a beast of an aircraft for two engines. The possibility of one engine flight in this monster was doubtful at best, even though the BMW 005 had finally had most of the bugs worked out of it. He did, however, like the looks of the upgraded main armament. He had always felt that the He 162 A series was too lightly armed to be much use in the bomber attack mission. This was especially the case when the B-36’s first appeared over the continent. On more than one occasion he had run out of ammunition for his twin MG 151’s while raking the B-36’s from tail to nose with apparent nil effect on the lumbering monster. The 162 Z’s Four MG 151’s and two MK 108’s would even the sides considerably.
 Speed was now on the side of the Zerstorer squadrons, as the
introduction of jets into the niche totally made up for their aircrafts former
lack of maneuverability. It was this lack of maneuverability, which saw ZG 1
decimated by single engine escort fighters in late 1944. The 162 Z had proven
itself to be faster and more maneuverable than the contemporary Meteor II,
although the pilot had to have his wits about him if an F-80B were
encountered. Jet escort fighters were not a concern at the present moment, as
they still had insufficient range to escort the B-36’s from Iceland and the
propeller planes were helpless to intercede. As Major Demuth completed
his walk-around, a Kette of 162 Z’s scrambled to intercept the B-36’s inbound
from their Iceland bases. He would be with them soon………
Speed was now on the side of the Zerstorer squadrons, as the
introduction of jets into the niche totally made up for their aircrafts former
lack of maneuverability. It was this lack of maneuverability, which saw ZG 1
decimated by single engine escort fighters in late 1944. The 162 Z had proven
itself to be faster and more maneuverable than the contemporary Meteor II,
although the pilot had to have his wits about him if an F-80B were
encountered. Jet escort fighters were not a concern at the present moment, as
they still had insufficient range to escort the B-36’s from Iceland and the
propeller planes were helpless to intercede. As Major Demuth completed
his walk-around, a Kette of 162 Z’s scrambled to intercept the B-36’s inbound
from their Iceland bases. He would be with them soon………
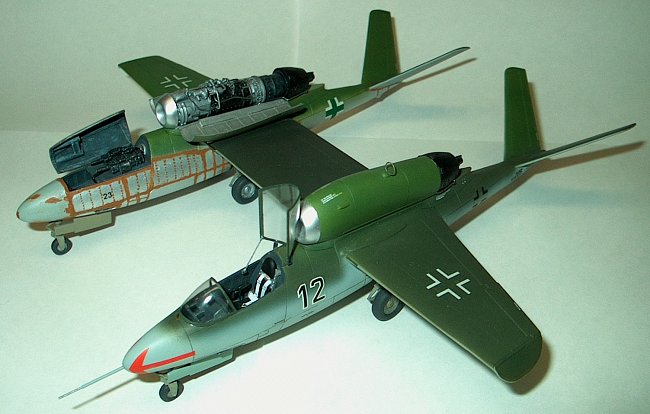
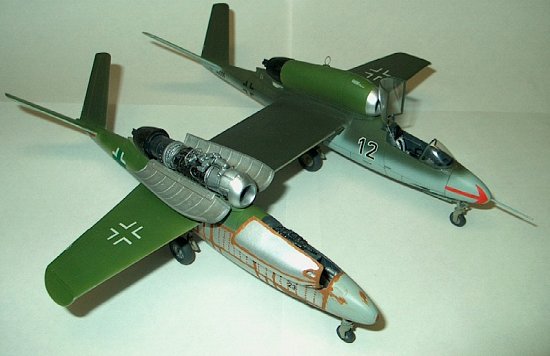
Although the He 162 Z never existed, it certainly could have. The idea would have been sound for the time, as the German trend of combining two of everything was well established by late 1944. The “Twins” were audacious and cumbersome to fly, but generally successful. The most successful was the Heinkel 111 Z glider tug. A Bf 109 Z was built, but was damaged in a strafing attack and never flew. There were plans to combine two Do 335’s (Do 635), two Me 209’s (Me 609) and even the monster Me323 Gigant transport! I had always wanted to build a “Zwilling” of the Heinkel 162. The task would prove to be a little harder than expected.
|
THE KIT |
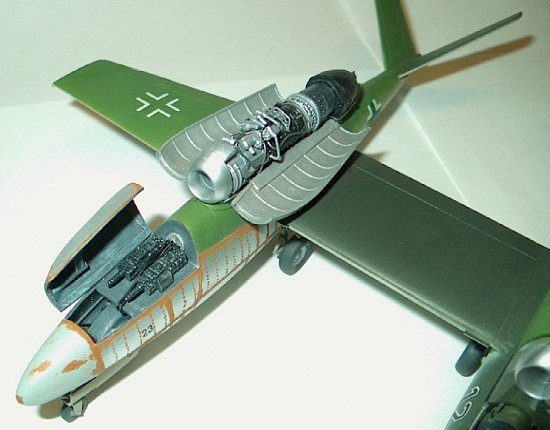
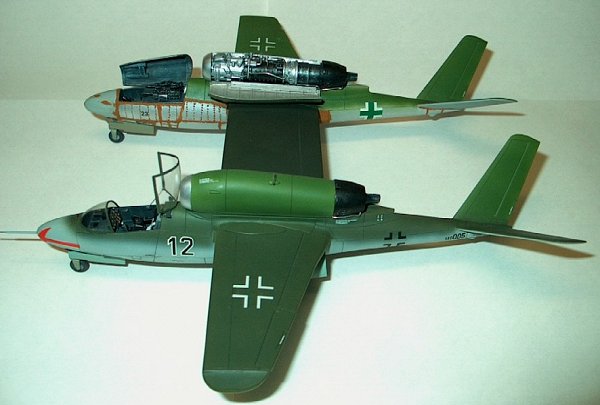
DML/Dragon’s He 162 is the reboxed version of the former Trimaster offering with the exception of no white metal parts and less photo-etched details. This is currently the only injected molded plastic model of this plane in this scale. Although listed as out-of-production, I have seen a resurgence of these kits in local hobby shops. The parts are molded in moderately hard light gray plastic with little or no flash and finely recessed panel lines. The clear canopy pieces of both of my kits had a swirl defect that would be impossible to correct, hence the aftermarket item. The kit photo-etched fret provides various small details as well as the instrument panel. The jewels of the kits are the very intricately detailed main landing gear bays and the exposed BMW 003 engines.
|
CONSTRUCTION |
 I began construction, of course, with the cockpits. The
pilot’s (right fuselage) cockpit was built out of the box with the exception of
the photo-etched Me 262 instrument panel (for dual instrumentation),
photo-etched seatbelts, twin scratch built throttles and fine solder added to
the ejection seat to replace the kit hand/foot rails.
I began construction, of course, with the cockpits. The
pilot’s (right fuselage) cockpit was built out of the box with the exception of
the photo-etched Me 262 instrument panel (for dual instrumentation),
photo-etched seatbelts, twin scratch built throttles and fine solder added to
the ejection seat to replace the kit hand/foot rails.
The gun bay (left fuselage) was created by cutting the left fuselage sides to open up a more square opening, as opposed to an ellipsoidal cockpit type opening. A floor was scratch built from sheet styrene and white metal MK 108 guns and breeches were added from a Trimaster ME 262 (I hear the gasps, but don’t worry, I have replacements from other kits…relax!). A trip to the spares box added a few details that are supposed to look like compressed air bottles for operation of the 108’s. A few gun control wires made out of fine solder completed the gun deck and I turned my attention to the gun bay cover. I created a master for the gun bay cover from basswood cut and sanded to shape. Squadron Thermaform was used to create the cover, and styrene stock trips were added for framing/bracing. I added brass tube for the gun troughs/ports and the cover was complete. The final touch was to add new shell ejector chutes for the MK 108’s on the underside of the fuselage.
The remainder of construction for both left and right fuselages went per instructions. I assembled the landing gear bays and painted them in differing colors to represent two separate aircraft being thrown together. More on the painting later. After both fuselages were complete I turned my attention to the turbojets. I decided to open only one engine so as not to overkill the exposed internals. The exposed turbojet was built per instructions with only a few minor detail wires added for additional detail. The other turbojet was omitted with only the intake and turbine (outlet) sections glued to the cowlings.
 The most challenging aspect of this conversion was the
construction of the center wing. The DML kits’ wing to fuselage joints are a
complex key-in type assembly. I got around this by using my razor saw to remove
the plastic wing root from both inner wings of the twin. These plastic roots
were then joined to a piece of basswood that had been cut and sanded to and
airfoil shape (this was harder than I thought). Pactra wood sealer was used to
coat the basswood to eliminate the wood grain. For extra strength, brass rod
was used liberally
The most challenging aspect of this conversion was the
construction of the center wing. The DML kits’ wing to fuselage joints are a
complex key-in type assembly. I got around this by using my razor saw to remove
the plastic wing root from both inner wings of the twin. These plastic roots
were then joined to a piece of basswood that had been cut and sanded to and
airfoil shape (this was harder than I thought). Pactra wood sealer was used to
coat the basswood to eliminate the wood grain. For extra strength, brass rod
was used liberally
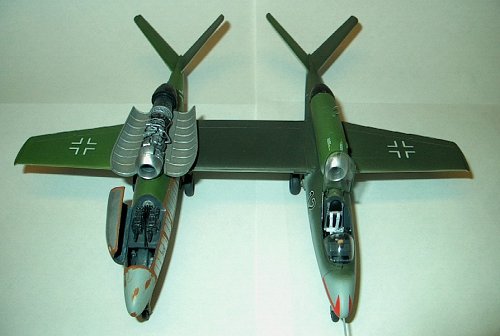
on the plastic to wood joints, as well as the completed wing to fuselage joints. Epoxy was used to glue the plastic roots/brass rods to the basswood section and super glue used for the fuselage to wing connection. Slow setting epoxy and super glue was a necessity, as was an assembly jig to get the fuselages lined up symmetrically. After much careful assembly, the twin was taking shape. The rest of the kits were built out-of-the-box with the exception of the aftermarket wheels. I chose to use the V-tail options provided in the kit, as very few zwillings had their tail units joined via a constant chord section. The V-tail also adds a certain “Luft ‘46” aspect to the kit as well.
|
PAINT & DECALS |
From the beginning, I wanted to do an eye catching paint job on this unusual aircraft. My intention was to represent a factory fresh plane (partially painted) that had been combined with a returned operational plane (fully painted) at some fictitious factory conversion center. German aircraft were often painted in components before final assembly, such as wings, tail surfaces, engine cowlings etc. Also, although there were “official” color schemes and mandates for the planes, late in the war the manufacturers often just used what was lying around. Bearing that in mind, here is the paint scheme in a nutshell:
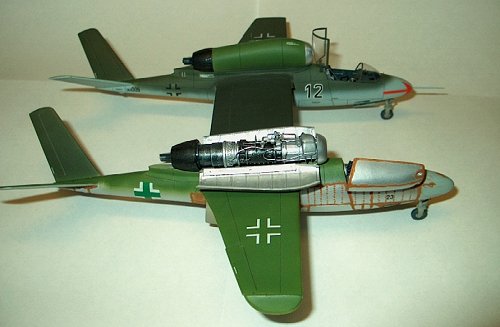 The left plane was finished in natural metal (Testors
Aluminum buffable metallic enamel) with crudely applied “filler” (Floquil Rust
enamel) over the panel joints. Extreme upper portions of the fuselage and left
wing were painted RLM 83 (Aeromaster enamel) to provide some measure of
camouflage from the air. The right fuselage was painted in “standard” RLM 82/83
(Aeromaster enamel) in the pattern specified in official documents. The wing
center section was painted in RLM 70 (Aeromaster enamel) to imply that the
fictitious factory conversion center just used whatever paint they had lying
around. Decals came from the spares box and once again, they were varied from
plane to plane in order to achieve the desired effect. I had some minor
silvering of decals, but nothing I could not live with. The aftermarket canopy
was attached as were the resin wheels. Of course, the plane did not sit
properly, so the entire plane was set on sandpaper and the wheels sanded until
all set relatively level.
The left plane was finished in natural metal (Testors
Aluminum buffable metallic enamel) with crudely applied “filler” (Floquil Rust
enamel) over the panel joints. Extreme upper portions of the fuselage and left
wing were painted RLM 83 (Aeromaster enamel) to provide some measure of
camouflage from the air. The right fuselage was painted in “standard” RLM 82/83
(Aeromaster enamel) in the pattern specified in official documents. The wing
center section was painted in RLM 70 (Aeromaster enamel) to imply that the
fictitious factory conversion center just used whatever paint they had lying
around. Decals came from the spares box and once again, they were varied from
plane to plane in order to achieve the desired effect. I had some minor
silvering of decals, but nothing I could not live with. The aftermarket canopy
was attached as were the resin wheels. Of course, the plane did not sit
properly, so the entire plane was set on sandpaper and the wheels sanded until
all set relatively level.
|
CONCLUSIONS |
This was a fun project that took much more time than I had expected (about 8 months), due to the complex fit and adjustments to the wing center section. The paint scheme also ate up lots of time. However, it is an eye catcher and draws lots of questions and comments. Now all I need to do is work up enough courage to try a Me 323 Z!!! (and build an extension on your house to put it! Ed) This was the first time I used a digital camera and took photos of my own model. I hope the pictures came out OK!
Copyright ModelingMadness.com. All rights reserved. No reproduction in part or in whole without express permission from the editor
If you would like your product reviewed fairly and quickly, please contact the editor or see other details in the Note to Contributors.