|
KIT: |
Supermodel 1/72 B138C-1 |
|
KIT # |
017 |
|
PRICE: |
$25 (swap meet) |
|
DECALS: |
Two aircraft |
|
REVIEWER: |
|
|
NOTES: |
poor decals, tricky fit, raised surface details |
|
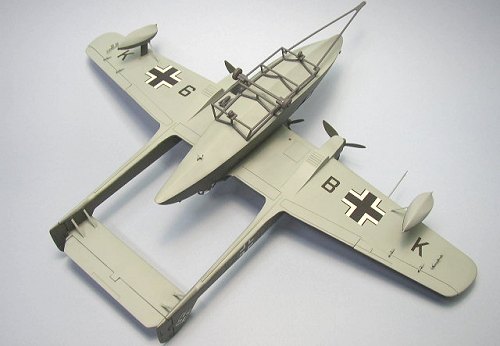
HISTORY |
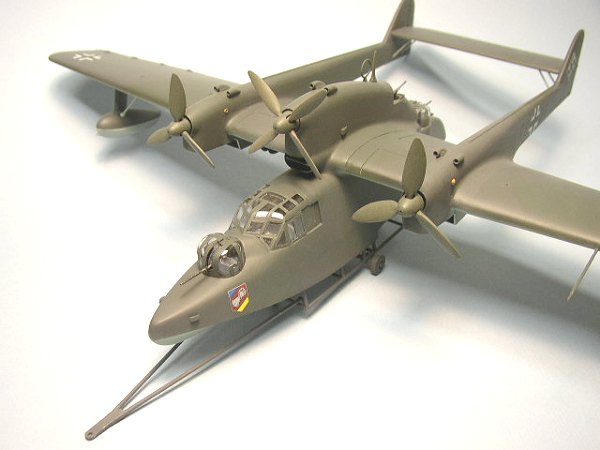
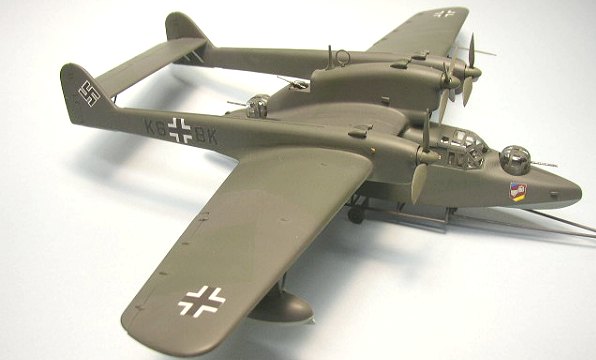 The Blohm und Voss Bv 138 C-1 ‘Seedrache’ (Sea Dragon) was
originally designed as a transatlantic mail carrier and passenger craft. The
initial prototype had gull wings and was powered by three Junkers Jumo 205
diesel engines. Water and air trials ensued, and it was apparent the flying
boat was lacking both structural and hydrodynamic areas. A general redesign
followed, with major refinements to the hull and significant structural
strengthening. The most noticeable change was the elimination of the gull
wings, which allowed a single tubular spar to run the length of the wing.
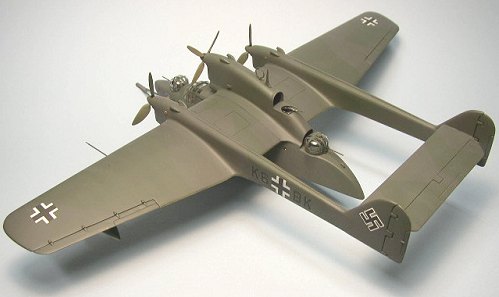
Fully loaded, the BV 138 could fly up to 16 hours, and was used extensively for
maritime reconnaissance, U-boat coordination and convoy escort. Armed with two
MG 151 20mm cannons in nose and tail turrets and an MG 131 heavy machine gun in
the upper dorsal position, the ‘flying clog’ was far from defenseless. Armament
could also be supplemented with side window mounted MG 34 infantry machine guns
and a small load of bombs or depth charges. BV 138’s operated over Europe, the
North Sea, Skagerrack and Kattegatt, Baltic Sea, Arctic Ocean, Norwegian Sea,
Bay of Biscay as well as the Black Sea and the Mediterranean. Only one example
survives today: a barely recognizable wreck salvaged from the seabed off the
coast of Denmark.
The Blohm und Voss Bv 138 C-1 ‘Seedrache’ (Sea Dragon) was
originally designed as a transatlantic mail carrier and passenger craft. The
initial prototype had gull wings and was powered by three Junkers Jumo 205
diesel engines. Water and air trials ensued, and it was apparent the flying
boat was lacking both structural and hydrodynamic areas. A general redesign
followed, with major refinements to the hull and significant structural
strengthening. The most noticeable change was the elimination of the gull
wings, which allowed a single tubular spar to run the length of the wing.
Fully loaded, the BV 138 could fly up to 16 hours, and was used extensively for
maritime reconnaissance, U-boat coordination and convoy escort. Armed with two
MG 151 20mm cannons in nose and tail turrets and an MG 131 heavy machine gun in
the upper dorsal position, the ‘flying clog’ was far from defenseless. Armament
could also be supplemented with side window mounted MG 34 infantry machine guns
and a small load of bombs or depth charges. BV 138’s operated over Europe, the
North Sea, Skagerrack and Kattegatt, Baltic Sea, Arctic Ocean, Norwegian Sea,
Bay of Biscay as well as the Black Sea and the Mediterranean. Only one example
survives today: a barely recognizable wreck salvaged from the seabed off the
coast of Denmark.
|
THE KIT |
I picked up my kit at a swap meet without ever knowing it
had been produced. My excitement quickly diminished when I opened the box and
saw the horribly overdone raised surface detail. The kit comes with a decent
interior, with all major bulkheads and floors for the front pilots/radio
operator’s compartment. The interior detail is sparse, but it is impossible to
see the majority of it. The main canopy is in three parts: the main canopy and
separate side windows. These windows can be posed open or closed.
 The front
and rear turrets are simplistic in construction. They are intended to traverse
and elevate and not be accurate to the original. Again, serious scratch
building would be required in order to improve these. The upper rear gun is
inaccurate and out of scale and was replaced with a gun from the spares box.
There is a modest amount of flash and ejector-pin marks on the parts, but if you
have done a few limited run kits, this is not an insurmountable problem. A full
beaching cart is provided, and there are parts to make the BV 138 MS
minesweeping version (only 2 were built). The fuselage halves are molded
without the major sharp lip on the hull bottom, which is a separate part (this
is a hard to describe, but when you see the kit, you’ll understand). This
separation of parts allows for the sharp step to the concave shape of the hull.
Separate rudders, elevators and ailerons are provided. The outer floats are
well molded and look to present no problems. Decals are provided for 2 boats,
but appear inaccurate in numerous ways in regards to my resources. They were
also old and discolored when I purchased my kit.
The front
and rear turrets are simplistic in construction. They are intended to traverse
and elevate and not be accurate to the original. Again, serious scratch
building would be required in order to improve these. The upper rear gun is
inaccurate and out of scale and was replaced with a gun from the spares box.
There is a modest amount of flash and ejector-pin marks on the parts, but if you
have done a few limited run kits, this is not an insurmountable problem. A full
beaching cart is provided, and there are parts to make the BV 138 MS
minesweeping version (only 2 were built). The fuselage halves are molded
without the major sharp lip on the hull bottom, which is a separate part (this
is a hard to describe, but when you see the kit, you’ll understand). This
separation of parts allows for the sharp step to the concave shape of the hull.
Separate rudders, elevators and ailerons are provided. The outer floats are
well molded and look to present no problems. Decals are provided for 2 boats,
but appear inaccurate in numerous ways in regards to my resources. They were
also old and discolored when I purchased my kit.
|
CONSTRUCTION |
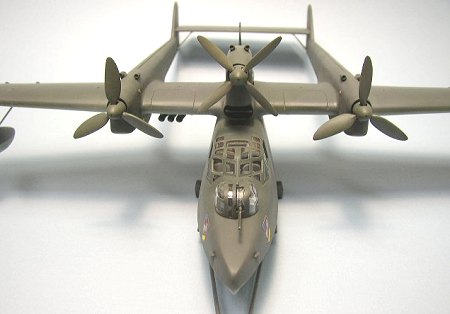 I began construction by sanding off all the raised surface
detail. This was a chore, but worth it in the long run. I have never had good
luck with re-scribing panel detail, so I chose to leave the parts sanded
smooth. I glued major subassemblies together, such as wings, tail booms, etc.
The tail boom halves did not line up well, and care had to be taken while gluing
them. The ailerons did not fit well into the wings and had to be trimmed and
sanded until they fit. The end result was still not good, but I lived with it.
The cockpit was assembled and painted RLM 66 and lightly dry brushed with RLM
66. The instrument panel is a decal, and was applied without incident (It is
impossible to see it). I chose to modify the turrets so I could install them
after painting. The kit parts are designed to be trapped between the fuselage
halves in troughs. I glued the turrets together (with guns) and proceeded to
chip off the tongue that holds their turret into the fuselage. That way I could
insert it from the top after painting was complete. I closed the fuselage
halves and then installed a sheet styrene piece through the turret openings into
the troughs that
I began construction by sanding off all the raised surface
detail. This was a chore, but worth it in the long run. I have never had good
luck with re-scribing panel detail, so I chose to leave the parts sanded
smooth. I glued major subassemblies together, such as wings, tail booms, etc.
The tail boom halves did not line up well, and care had to be taken while gluing
them. The ailerons did not fit well into the wings and had to be trimmed and
sanded until they fit. The end result was still not good, but I lived with it.
The cockpit was assembled and painted RLM 66 and lightly dry brushed with RLM
66. The instrument panel is a decal, and was applied without incident (It is
impossible to see it). I chose to modify the turrets so I could install them
after painting. The kit parts are designed to be trapped between the fuselage
halves in troughs. I glued the turrets together (with guns) and proceeded to
chip off the tongue that holds their turret into the fuselage. That way I could
insert it from the top after painting was complete. I closed the fuselage
halves and then installed a sheet styrene piece through the turret openings into
the troughs that 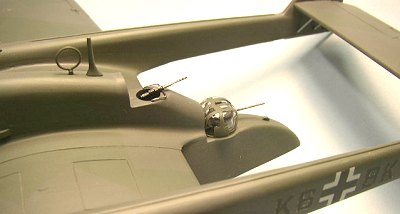 would have held the turret tongues. This gave the turrets
something to rest on so they would not be too deep. I masked the turrets with Ambriod Liquid mask, cut the frames with a new x-acto blade and set the turrets
aside for painting. After seams were cleaned up on the fuselage, I added the
side panel/hull pieces mentioned earlier. These required multiple filling and
sanding sessions to get them faired into the fuselage. I understand why they
molded these parts the way they did, but they are still hard to clean up. The
wings were attached to the fuselage with minimal gaps (thankfully!). I then
added the tail booms to the tops of the wings, which fit very poorly. I ended
up having to let these dry in the correct position to insure proper alignment.
This resulted in massive filling and sanding at the joints where the tail booms
met the wings, and was the most difficult part of construction. The outrigger
floats were assembled without incident. These were also left off until
completion to ease painting. I then assembled the beaching cart. The parts
needed cleanup and careful alignment while gluing, but it was not an overly
difficult assembly. The cart was hand painted RLM 66 and dry brushed with
silver and rust to wear it out a little (silly considering I did not weather the
model).
would have held the turret tongues. This gave the turrets
something to rest on so they would not be too deep. I masked the turrets with Ambriod Liquid mask, cut the frames with a new x-acto blade and set the turrets
aside for painting. After seams were cleaned up on the fuselage, I added the
side panel/hull pieces mentioned earlier. These required multiple filling and
sanding sessions to get them faired into the fuselage. I understand why they
molded these parts the way they did, but they are still hard to clean up. The
wings were attached to the fuselage with minimal gaps (thankfully!). I then
added the tail booms to the tops of the wings, which fit very poorly. I ended
up having to let these dry in the correct position to insure proper alignment.
This resulted in massive filling and sanding at the joints where the tail booms
met the wings, and was the most difficult part of construction. The outrigger
floats were assembled without incident. These were also left off until
completion to ease painting. I then assembled the beaching cart. The parts
needed cleanup and careful alignment while gluing, but it was not an overly
difficult assembly. The cart was hand painted RLM 66 and dry brushed with
silver and rust to wear it out a little (silly considering I did not weather the
model).
|
CAMOUFLAGE & MARKINGS |
 All paints were Model Master Acrylics. I used the
Monogram Painting Guide for German Aircraft, 1939-1945 for the camouflage
pattern. I airbrushed RLM 72/73/65 with Model Master Gloss for the decals.
The canopies were painted with RLM 66 first, followed by the appropriate surface
colors. The propellers were then hand painted. The center prop is metal and
should be painted RLM 71 blades with RLM 70 spinner while the outer blades are
wooden and are painted RLM 70 with RLM 70 spinners. After the gloss coat dried
I applied the decals, which were very thick and unresponsive to Solvaset.
According to my references, the “K” on this boat’s codes should be red. As I
had no suitable spare and could not make my own, I applied them as-is. Even
with my very thick gloss coat, the code letters silvered badly. I went back and
touched up these areas with hand-brushed paint, but the results were
unsatisfying. This aircraft was supposed to have either yellow or white tail
bands (again, different references contradict the color), but I was not about to
risk yellow or white over spray on the rest of the model. A coat of dull coat,
installation of the cart, turrets, upper gun, props and outrigger floats and I
was done.
All paints were Model Master Acrylics. I used the
Monogram Painting Guide for German Aircraft, 1939-1945 for the camouflage
pattern. I airbrushed RLM 72/73/65 with Model Master Gloss for the decals.
The canopies were painted with RLM 66 first, followed by the appropriate surface
colors. The propellers were then hand painted. The center prop is metal and
should be painted RLM 71 blades with RLM 70 spinner while the outer blades are
wooden and are painted RLM 70 with RLM 70 spinners. After the gloss coat dried
I applied the decals, which were very thick and unresponsive to Solvaset.
According to my references, the “K” on this boat’s codes should be red. As I
had no suitable spare and could not make my own, I applied them as-is. Even
with my very thick gloss coat, the code letters silvered badly. I went back and
touched up these areas with hand-brushed paint, but the results were
unsatisfying. This aircraft was supposed to have either yellow or white tail
bands (again, different references contradict the color), but I was not about to
risk yellow or white over spray on the rest of the model. A coat of dull coat,
installation of the cart, turrets, upper gun, props and outrigger floats and I
was done.
|
CONCLUSIONS |
If you have built limited run kits before, the challenges this kit offers will be no different. Take your time, and you will have a nice, rare flying boat to add to your collection. To put some scale reference as to how big this plane was, it is as big in length and wingspan as my Revell-Germany 1/72 Heinkel He 177 bomber. If you can find one of these boats, and do not mind a kit that requires some work, I recommend you pick it up.
Bryan “Tuck” Tucker
March 2003
|
REFERENCES |
The Monogram Painting Guide to German Aircraft 1939-1945, Creek and Hitchcock
Warplanes of the Third Reich, William Green
Your editor also plugged away at the Clog kit back in 1984. If you'd like a second opinion, please visit his review.
If you would like your product reviewed fairly and quickly by a site that has 200,000 visitors a month, please contact me or see other details in the Note to Contributors.