Revell 1/72 Ju-87G 'Tank Buster'
| KIT #: | 4692 |
| PRICE: | Less than 100 ARS (two years ago) |
| DECALS: | Two options |
| REVIEWER: | Francisco Santoro |
| NOTES: |
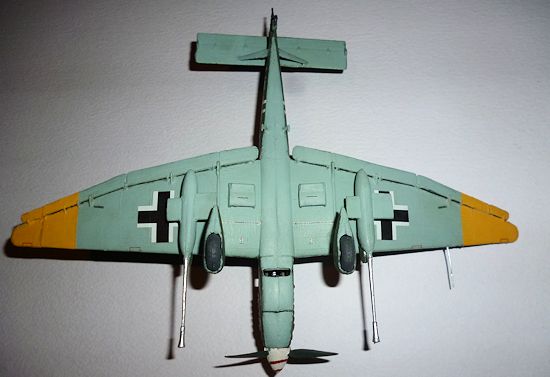
Irregular upper Balkenkreuzes, tricky fit for the wing tips, weak
connection of the flaps to the wings |
| HISTORY |
After only one
year of war, the High Command of the German Luftwaffe realized that, despite its
great success, the Junkers Ju 87B no longer met the demands in many areas of
use. Its defensive armament against enemy fighters was as inadequate as its
armour-plating against anti-aircraft fire. The lack of engine performance with
only 1100HP was in the meantime also indisputable.
The Stuka (standing for “Sturzkampfflugzeug”, dive-bomber) was
completely over-hauled and was designated Ju 87D-1. Difficulties with the Jumo
211J engine (a 12 cylinder engine with a cubic capacity of 35 Litre and 1420HP
take off power) led to long delays. The firsts Ju 87D´s were received by the 1st
Group of Stuka Wing 2 (St.G. 2) in Russia during the January of 1942.
 The
winter conditions in Russia of snow, ice, airfields covered in mud and extremely
low temperatures, took a great toll on the new Stuka. The first propeller - a
Heine variable pitch with wooden blades – received cracks due to the extremely
low temperatures, and was replaced by a Junkers VS 11 variable pitch blade
constructed of metal. The undercarriage of the D model proved also to be
unsatisfactory. The undercarriage of the B model was therefore used on the first
production aircraft which, due to the reduced size of the wheels led to a
dramatic reduction of the Maximum Take-off weight to 5009Kg. The “new” normal
undercarriage of the Ju 87D model was only incorporated later during series
production. Until the end of 1942 a total of 559 Ju 87D-1 were produced.
The
winter conditions in Russia of snow, ice, airfields covered in mud and extremely
low temperatures, took a great toll on the new Stuka. The first propeller - a
Heine variable pitch with wooden blades – received cracks due to the extremely
low temperatures, and was replaced by a Junkers VS 11 variable pitch blade
constructed of metal. The undercarriage of the D model proved also to be
unsatisfactory. The undercarriage of the B model was therefore used on the first
production aircraft which, due to the reduced size of the wheels led to a
dramatic reduction of the Maximum Take-off weight to 5009Kg. The “new” normal
undercarriage of the Ju 87D model was only incorporated later during series
production. Until the end of 1942 a total of 559 Ju 87D-1 were produced.
By this time, it was
already clear that the Ju 87 could no longer be used only as a dive bomber.
Moreover it was also apparent that it should have the ability to conduct low
level missions in support of ground forces. In order to do justice to this role,
the Ju 87D-3 was developed in Berlin and Bremen from the middle of 1943 onwards.
A total of 1559 aircraft were built. It had considerably stronger armour plating
around the engine and the cockpit. The propeller that was mounted on the
undercarriage legs for the siren (also known as “Jericho Trumpets”) and the
stubs either removed or encased. During the course of the war the Ju 87 had been
continually distance from its role as a dive-bomber. Air-to-Ground attack became
its new primary mission. Attacks on armoured vehicles constituting an extremely
high threat to ground troops and supply units became even more prominent.
Considering that the new Russian T-34 now had very effective armour plating, the
Ju 87´s bomb load proved to be completely inadequate for this mission.
The solution was the BK 3.7 (3.7cm calibre on board canon), which
originated from further development of the Flak-18. Two of these weapons were
attached under wings of the Ju 87 firing around the propeller as early as the
summer of 1942. Each magazine held six rounds, each weighing 1.46kg with a
Wolfram core in a Toroidal jacket to help reduce reflection. Conversion of
currently available Ju 87D-3 and D-5 into Tank Hunters G-1 and G-2 finally began
in the spring of 1944. The first Wing to receive the new Junkers Ju 87 was St.G.
2 “Immelmann”, commanded by Colonel Ruddel. Up to the end of the War they
accounted 519 Russian tanks. On 7th
March 1944,
4. /StG. 2 was renamed 10. (Pz)/SG 3 and transferred to
Jacobstadt and Libau with its Ju 87G n order to support the 18th
Army in the Courland Battles.
| THE KIT |
It comes in Revell
of Germany standard blue side opening box. The box art shows the Junkers Ju 87G,
coded S7+EN, firing its canons to the Russian tanks down below, in the
background, large clouds of black smoke elevate from the destroyed T-34´s.
The kit is presented to you in five sprues, four of them being in an RLM
70 Black Green and one clear sprue, containing a single canopy to be glued in
the close position. Since this is not a moder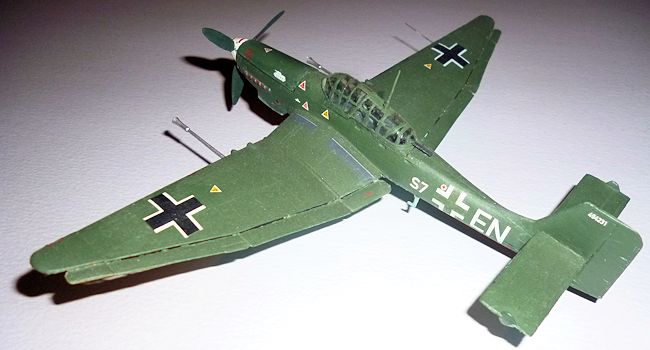 n
release, it has raised but nicely done panel lines, which don´t bother me,
neither the rivets do.
n
release, it has raised but nicely done panel lines, which don´t bother me,
neither the rivets do.
The booklet
instructions is given to you in 9 pages, the first three covering the warning
signs and the symbols for each thing, the fourth page gives the painting guide,
all of them in Revell Colours and, from the page five to nine, the assembly
itself, divided in 31 steps.
Although
the painting guide shows you in the D (dive-bomber) model the short wing-tips,
only the late long wing tips are available, but you can build the model with
both, since it wasn´t strange to see the dive bomber with the longer wing tips.
It comes with bombs and dive-brakes for the D model, and with the BK 3.7 for the
G model.
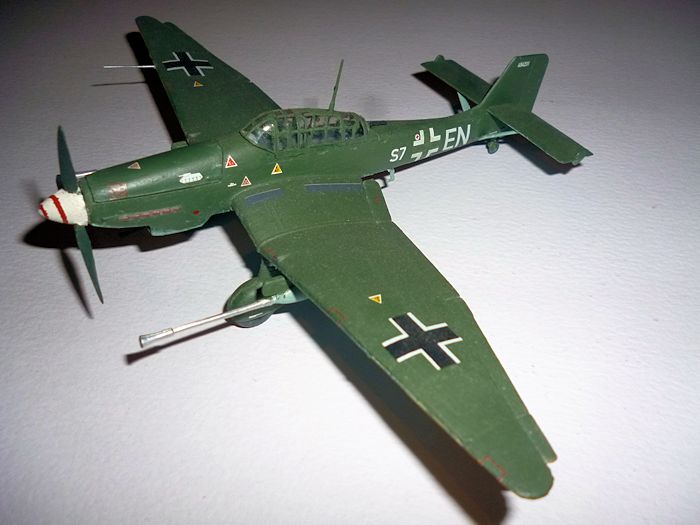
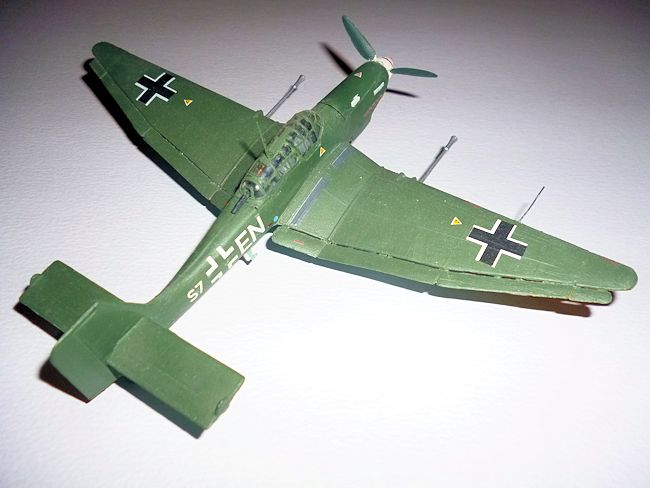
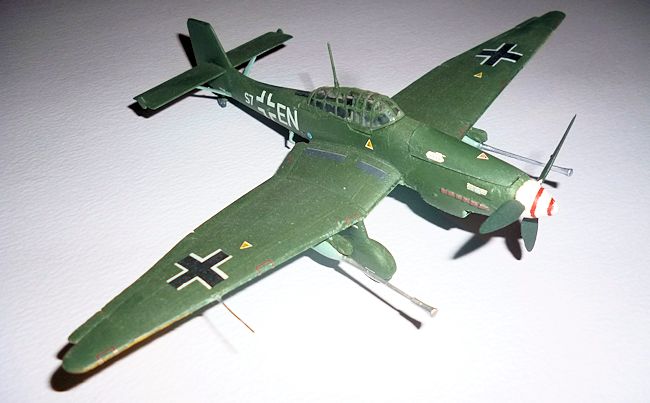
There are two decal
options available, one for the plane in the box art:
·
S7+EN, Junkers Ju 87G-2 of 10(Pz)/St.G. 3, Jacobstadt, Lettland, in July
1944, painted entirely in RLM 71 (Revell Matt 39) Dark Green for the wings and
fuselage, RLM 65 (Revell Matt 49) for the undersides, and yellow RLM 04 (Revell
Matt 15) for the wing tips. The nose cone is painted in white with a red spiral.
Propeller is in RLM 70.
·
T6+BM, Junkers Ju 87D-3 of 4./St.G. 2, Russia, 1944. Painted in the
never changed splinter pattern for the European Stukas of RLM 70 (Revell Matt
40), RLM 71 (Revell Matt 39), RLM 65 (Revell Matt 49), and with yellow RLM 04 (Revell
Matt 15) for the wing tips and the fuselage band. The propeller is painted in
RLM 70, while the nose cone is in blue RLM 24 (Revell Matt 56).
The decal sheet looked to be well printed, with the decals in perfect register and nothing else bad. The control panel comes as a decal also.
| CONSTRUCTION |
It started with the
cockpit, which is assembled by gluing five pieces: the pilot seat, control
stick, radio, and gunner seat. I started by painting the cockpit floor and the
seats in RLM 66 (Revell Matt 77). After that, I painted the molded seat belts
with a Light Grey and the buckles in Aluminium. The Pilot headrest was painted
with Revell Matt 39 (Revell´s equivalent for RLM 71). Then I painted and glued
the radio and the gunner seat, all of them in RLM 66. The last piece was the
control column, painted in RLM 66 with black.
Since the model is old, it comes with an engine for you to paint and
show, and it´s also needed because it holds the mounting shaft for the
propeller. The engine was painted as per instructions in Steel, then you
 have to
glue the mounting spars that connect the engine to the bulkhead (the three
pieces in RLM 02, Revell Matt 45).
have to
glue the mounting spars that connect the engine to the bulkhead (the three
pieces in RLM 02, Revell Matt 45).
The fuselage is next
and the instructions tell you to paint it in RLM 66. The housing for the engine
is painted in RLM 02.
Before gluing the
engine and it´s bulkhead, I glued the radiator, painted in black. After adding
the radiator and the bulkhead (with its engine), I painted with RLM 66 (Revell
Matt 77) the control panel, after it dried, I added the decal. Then it was time
to glue the cockpit. While the cockpit was drying, I glued the other side of the
fuselage, holding the parts with tape. Then it was the turn for the depth
ailerons and it´s mountings (don´t do as me, since it will be very difficult to
mask and paint the fuselage with the stabilizers in your way).
When you reach the
steps 10/11, you are offered the option of opening holes in the single unit wing
to attach the canons (G-2) or the dive breaks and the bombs (D-3). After that,
you have to glue the wing tips, which present a more or less fit, which ends in
two gaps. Try to fill them.
I then assembled the
landing gear with its wheels. The interior of the landing gear was painted in
Revell Matt 77 Dust Grey, while the wheels were painted in the inner ring with
black, and the tire in Revell Matt 78 Tank Grey.
Steps 19 to 23 give
you the option to assemble the D-3 version with bombs and dive brakes, while the
steps 24 to 25 are for the G-2. The option depends of which holes you opened in
the lower wing. I chose the G-2. Then I glued the tiny bits (parts 45 and 46,
the radiators of the wings, I attached the gun to the canopy, the canopy to the
fuselage, both with Revell Contacta, and it´s a miracle for me to have avoided
the fume of the part, or spilling some Revell glue on my finger and putting it
over in the canopy by accident. I painted it in the camouflage given by the
instructions and put it in my shelf, with no decals, because I was afraid to
ruin them. This was in 2012, when I bought this kit in Berlin, alongside some
more.
In 2013, and after experimenting my skills at decal application with a Horten 229 from Revell (my first plane, I think it came out pretty well, I used a matt varnish, after some other planes I started to use a gloss varnish for avoid silvering), I decided to grab this kit and finish it.
| COLORS & MARKINGS |
I removed all
the paint with rubbing alcohol, breaking some pieces in the process (not a
problem, since I kept them all). I removed the canopy with a cutter using a new,
sharp blade. I also removed the stabilizers struts, since they would interfere
with the cleaning and re-painting process, the rear gun of the canopy, also I
removed the landing gear and canons to give them a closer painting.
After letting it
dry, I masked the fuselage which would be painted in RLM 71for the upper part,
then I started hand brushing Revell Light Blue Matt 49 (RLM 65), using water to
dilute it a bit. After getting a good coverage and after drying, I masked the
wingtips and brush painted them with Revell Yellow Matt 15 (RLM 04) over the RLM
65.
Next was the
fuselage. Getting an equal separation line between colours is complicated, but
can be done with patience. I then brush painted the upper camouflage with Revell
Dark Green Matt 39 (RLM 71). After painting/repainting the removed parts, I
glued them to the now new painted fuselage, with the exception of the canopy,
for which I was like four or five days to paint it entirely (I hate that all
framed canopy of the Stuka). Then, after finishing with the canopy, I
re-attached it by using a Clear Glue from Humbrol.
Then it was the turn
for adding the decals. Since I was using only a matt varnish, there were
silvered decals.
 I
started by giving the model a full coverage with the matt varnish, since it
levels the old and new paint tones, giving the camouflage an equal colour.
I
started by giving the model a full coverage with the matt varnish, since it
levels the old and new paint tones, giving the camouflage an equal colour.
After the varnish
had dry, I began with the bigger decals, which where the Balkenkreuzes and the
code of the plane. The upper Balkenkreuzes were the first, and while placing
them, I noted that they were of irregular white borders. I placed them by mating
the white borders. I didn´t worried so much about that.
Next the lower
Balkenkreuzes, they presented no problems and came out of the backing sheet
fast. After being sure that the four crosses were in their correct panel lines
and were straight, I applied the fuselage white Balkenkreuzes (I used them as a
guide to locate the Code Letters, if they are straight when compared to those
fuselage crosses etc…).
Then it was time to
apply the plane code, S7+EN (I almost messed the code, since I wasn´t paying too
much attention while applying them, I placed them all pointing to the same side,
while it should be like this: left side of the fuselage S7+EN, the EN being
close to the tail, right side of the fuselage, the S7 is close to the tail. I
was desperate in trying to remove them with Micro-Set, but I ended up using a
sharp cutter blade and water to move the decals of the right side of the
fuselage to their correct place, there weren´t any missing decal parts, so I
touched up with white a zone with a little crack in the 7. It happened when the
plane was with the final varnish).
After all that, the
little simbols for the Tank Destroyer Unit (two tanks with the shape of a T-34)
where added to the cowling, checking twice to avoid losing one (it has
happened).
Then, the smaller
decals-the warning signs etc…- were added. I used some Micro-Sol to help the
decals to conform to the surface of the plane.
To finish, I masked
the sorroundings of the nose cone, I painted it in Revell Carmin Red 36 Matt,
then I made a mask for the spinner spiral, added it to the cone, and painted
Revell Matt White 05. The result is a hand painted nose spiral. I don´t trust to
much in the decals made for that kind of curves.
When everything was
dry, I checked if every decal was in place (they were), and gave the plane a
matt varnish coat to protect them from the dust, water etc... (This leads us to
that little incident with the right fuselage code).
| CONCLUSIONS |
Though I think it
will be shadowed by the new release from Hobby Boss of a Ju 87G, with engraved
panel lines and the same codes for the plane, I think that it´s a nice kit,
simple, and ideal as a weekend project.
| REFERENCES |
Historical
background is from the kit instructions.
And for a profile:
http://homepage.eircom.net/~nightingale/stuka.html
If you would like your product reviewed fairly and fairly quickly, please contact the editor or see other details in the Note to Contributors.