Revell AG 1/72 Me-262A-1a
| KIT #: | 04119 |
| PRICE: | @7 Euros |
| DECALS: | Two options |
| REVIEWER: | Fernando Rolandelli |
| NOTES: |
| HISTORY |
One of the myths surrounding the Me 262 that immediately comes to the mind is the supposedly advanced concept of its swept wing. It is now known that it has nothing to do with advanced aerodynamics: the projected speed could have been perfectly attainable with a straight wing (à la Ar 234, as the original, wind-tunnel proved P.1065 had) but it was the need to put the most possible mass behind the center of gravity to take it backwards that dictated the sweep. It was the thinness of the wing’s profile that was the real advanced aerodynamic feature, and responsible for the aircraft’s performance.
 Regarding this particular airframe:
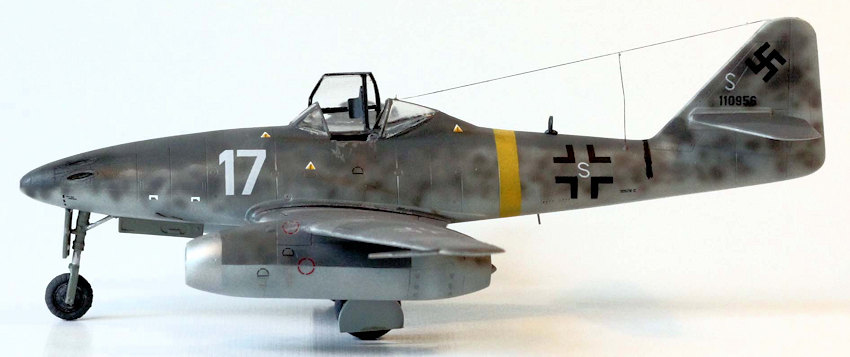
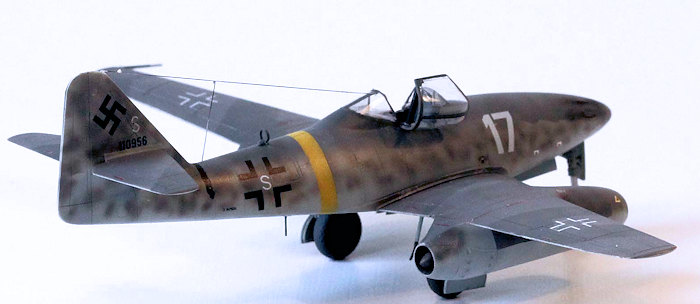
"110956 Me 262 A-1a. This III./EJG 2 training aircraft at Lechfeld was flown by
Fw. Franz Holzinger on 16 March 1945 in a high altitude flight, and the next day
on a cross country flight. Possibly also flown by Heinz Bär. It was captured at
Lechfeld 29 April. Marked 'White 17' and ‘White S' for Schulemaschine,
indicating a training aircraft." (Dan O'Connell)
Regarding this particular airframe:
"110956 Me 262 A-1a. This III./EJG 2 training aircraft at Lechfeld was flown by
Fw. Franz Holzinger on 16 March 1945 in a high altitude flight, and the next day
on a cross country flight. Possibly also flown by Heinz Bär. It was captured at
Lechfeld 29 April. Marked 'White 17' and ‘White S' for Schulemaschine,
indicating a training aircraft." (Dan O'Connell)
This particular 262 holds some importance because it can be ascertained to have been finished in RLM74/75/76, an early scheme once thought not applied to operative machines (see “Modelling the Messerschmitt 262” Osprey Publications, where the builder of this very machine regards it as most probably painted in RLM81/82 –though finishes it in the earlier scheme!) There are a couple of colour pictures that proves that conclusively. It is also unique in that it sports a Black open Balkenkreuz in the fuselage, instead of a White one.
| THE KIT |
 The diminutive Revell 1/72 Me 262 is
one of a series of budget kits issued in the 90s. They featured a clean and
accurate outline, good surface detail and good decals. Most of them were
hampered by a particular “shortcut” that compromised the quality of the
resulting model, in case you intended to make anything other than a simple OOB
one. Not that you cannot overcame it (with some aftermarket or simply with
sweat’n’tears), but some extra work was needed. I can mention the canopy in the
Fw 190A (with the metal frame solid with the fuselage) and the lack of intake
bulkheads in Tornadoes and Taifuns. In the case of the 262, the problem is the
wheel well, which has a solid “roof” (notwithstanding sporting a finely molded
cockpit bathtub and sidewall detail) and an awful canopy, which certainly looks
like taken from a Frog kit from the sixties. The first one is just a matter of
obliterating the “roof” by vigorously grinding it; but the canopy issued cannot
be righted without the help of an aftermarket piece. For this I summoned a Rob
Taurus replacement (or two, more on that later). An old Eduard copperish set was
also routinely added.
The diminutive Revell 1/72 Me 262 is
one of a series of budget kits issued in the 90s. They featured a clean and
accurate outline, good surface detail and good decals. Most of them were
hampered by a particular “shortcut” that compromised the quality of the
resulting model, in case you intended to make anything other than a simple OOB
one. Not that you cannot overcame it (with some aftermarket or simply with
sweat’n’tears), but some extra work was needed. I can mention the canopy in the
Fw 190A (with the metal frame solid with the fuselage) and the lack of intake
bulkheads in Tornadoes and Taifuns. In the case of the 262, the problem is the
wheel well, which has a solid “roof” (notwithstanding sporting a finely molded
cockpit bathtub and sidewall detail) and an awful canopy, which certainly looks
like taken from a Frog kit from the sixties. The first one is just a matter of
obliterating the “roof” by vigorously grinding it; but the canopy issued cannot
be righted without the help of an aftermarket piece. For this I summoned a Rob
Taurus replacement (or two, more on that later). An old Eduard copperish set was
also routinely added.
| CONSTRUCTION |
 For a change, I started by dynamiting the wheel
well “roof”; smallish as it is, it took a session of Dremel. I kept the leg
bays, but the auxiliary struts are “left in the void”. Then you face options.
You can keep the (wrongly rounded shaped) bulkhead already in the kit, or
obliterate it and make your own. I followed the second, harder path; rebuilding
a detailed bulkhead. The work altogether is not difficult and overly enjoyable.
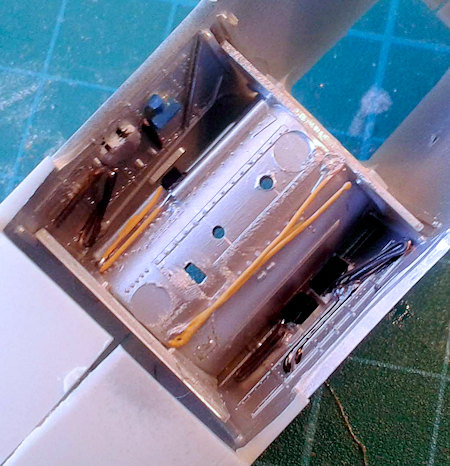
Then I moved into the cockpit tub (both upper and lower surfaces) and the
fuselage sides detailing them with some wiring and accoutrements. All was
painted Alclad Aluminum. I had hoped that the ugly ejection marks (and the
various mounting holes) in the lower bathtub would be masked by the wheel well
central frame, but they weren’t, so I had to fill and sand them. The Eduard set
was not particularly well fitting, especially the instrument panel (typical of
first generation sets). The gunsight was scratchbuilt. The fuselage is
surprisingly complex for its size, but assembles well. Remember this is a
Messerschmitt product, so it shows the characteristic upper and lower rear
fuselage longitudinal seams. The model is a notorious tail sitter; I stuffed the
nose with shot (to the point of fearing the nose strut would collapse) and even
so its center of gravity is marginally adequate: a strong stare and it falls
back on its tail! The turbojets’ central bosses were a chore to fit, especially
the rear ones, which lack a positive fit and are difficult to center. I just
painted the interior of the turbojet’s nacelles Black and that made short work
of any see-inside effect.
For a change, I started by dynamiting the wheel
well “roof”; smallish as it is, it took a session of Dremel. I kept the leg
bays, but the auxiliary struts are “left in the void”. Then you face options.
You can keep the (wrongly rounded shaped) bulkhead already in the kit, or
obliterate it and make your own. I followed the second, harder path; rebuilding
a detailed bulkhead. The work altogether is not difficult and overly enjoyable.
Then I moved into the cockpit tub (both upper and lower surfaces) and the
fuselage sides detailing them with some wiring and accoutrements. All was
painted Alclad Aluminum. I had hoped that the ugly ejection marks (and the
various mounting holes) in the lower bathtub would be masked by the wheel well
central frame, but they weren’t, so I had to fill and sand them. The Eduard set
was not particularly well fitting, especially the instrument panel (typical of
first generation sets). The gunsight was scratchbuilt. The fuselage is
surprisingly complex for its size, but assembles well. Remember this is a
Messerschmitt product, so it shows the characteristic upper and lower rear
fuselage longitudinal seams. The model is a notorious tail sitter; I stuffed the
nose with shot (to the point of fearing the nose strut would collapse) and even
so its center of gravity is marginally adequate: a strong stare and it falls
back on its tail! The turbojets’ central bosses were a chore to fit, especially
the rear ones, which lack a positive fit and are difficult to center. I just
painted the interior of the turbojet’s nacelles Black and that made short work
of any see-inside effect.
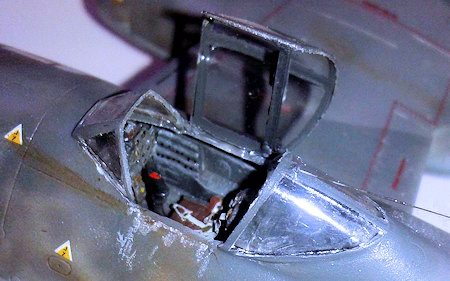 I am no newcomer to vacuform
canopies, routinely replacing kits’ canopies with them; but my usual practice is
keeping the fixed parts from the kit while replacing just the openable hood. In
this case, I had to replace everything, such is the mess of the kit’s canopy
(pun intended). I had not exactly problems but a lot of putty and sand work to
fair windscreen and rear part into the fuselage to an acceptable degree. Then I
managed to screw the moving hood; not having a direct replacement (and the
proper piece being sold out) I resorted to the corresponding part in a Rob
Taurus set intended for the Academy kit. It was completely different in
proportions; I almost manage to screw it again, but finally manage to get a
presentable result. Opened as it is the difference doesn’t show; but it couldn’t
have been posed closed! The head armor was fitted on a styrene transversal bar
which looks a bit chunky, but not overly so. Main wheels are particularly finely
molded.
I am no newcomer to vacuform
canopies, routinely replacing kits’ canopies with them; but my usual practice is
keeping the fixed parts from the kit while replacing just the openable hood. In
this case, I had to replace everything, such is the mess of the kit’s canopy
(pun intended). I had not exactly problems but a lot of putty and sand work to
fair windscreen and rear part into the fuselage to an acceptable degree. Then I
managed to screw the moving hood; not having a direct replacement (and the
proper piece being sold out) I resorted to the corresponding part in a Rob
Taurus set intended for the Academy kit. It was completely different in
proportions; I almost manage to screw it again, but finally manage to get a
presentable result. Opened as it is the difference doesn’t show; but it couldn’t
have been posed closed! The head armor was fitted on a styrene transversal bar
which looks a bit chunky, but not overly so. Main wheels are particularly finely
molded.
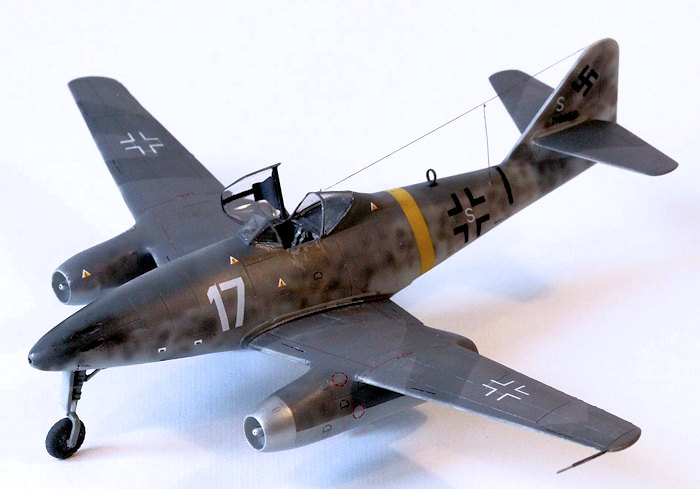
| COLORS & MARKINGS |
I kept it simple. Over the Grey
primer, a Raw Umber preshade. Then RLM76 overall; masking the fuselage, I
painted the wings; masking the wings, I painted the fuselage. Turbojet nacelles
have some complex painting I solved with some extra masking, including the
Aluminum replacement intake cover. The Yellow band was painted afterwards,
providing “instant weathering”; the Black paint over… a repair? was brush
painted. Interior was painted with Humbrol 67 (mimicking RLM66); the NMF parts
in Alclad; the rest of the paints
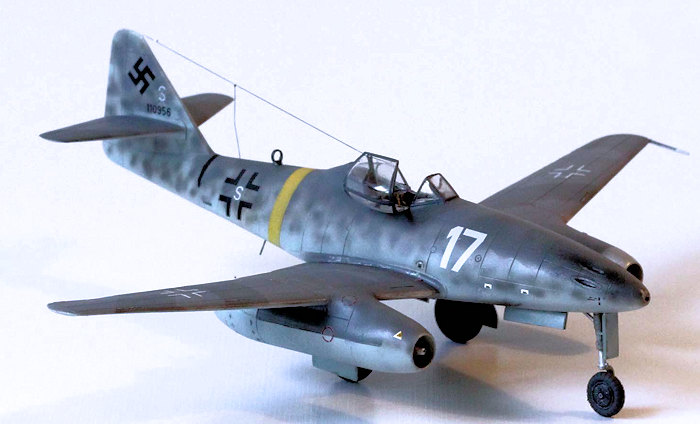 were Xtracrylixs. A MiG Grime Streaks bottle
provided, well, some grime streaks; a Silver pencil some chipping and some
pastels light dust.
were Xtracrylixs. A MiG Grime Streaks bottle
provided, well, some grime streaks; a Silver pencil some chipping and some
pastels light dust.
Well, the kit’s decals, though very usable, lacks swastikas; they must be from the times when the prohibition to depict them already stood but decal makers had not yet come to the present-day way of circumvallating it, printing them in parts that make them not immediately recognizable. Therefore, I was forced to buy aftermarket decals; already being in such a situation, I bought proper Me 262 decals instead of a specific swastika sheet (mistake). I got the HAD decals sheet, which proved well printed and good quality (they are thin and do not like to be moved around) as well as depicting interesting subjects. Guess what: I managed to screw a swastika! The multipart print hampered my ability to properly place it. Moreover, the second machine in the sheet had a different design! What I had to do? Buy a swastika sheet! I bought a Fantasy Shop sheet with swastikas aplenty; however, none matched exactly the original one on the other side, and I was too annoyed to get rid of it also (it entailed repainting the whole tail) Therefore, the model has swastikas of slightly different sizes! Stenciling came from the kit and worked fine.
| CONCLUSIONS |
A nice little kit; cheap (around seven euro in the toystore in my village –Bonn) and finely moulded. It looks great in the sprues and a good model can be made out of it.. The obvious (and unexplainable) shortcuts make getting a model as fine as potentially could be a bit more complicated than it should. However, the finished model shouts at you “Go and buy another, you moron!”
| REFERENCES |
- “Jagdwaffe: Luftwaffe Colours Vol.5 Sect.4: Jet Fighters and Rocket
Interceptors (1944-45)”, Richard Smith and Eddie Creek, Classic Colours
Publications
- “Me 262: The Erste Turbinenjäger der Welt”, Heinrich Hest, Waffen Arsenal Publications.
- “Me 262: Das Vielzweckflugzeug” Horst Schreiber (Editor), Waffen Arsenal Publications.
Fernando
Rolandelli 11 July 2016 Copyright ModelingMadness.com If you would like your product reviewed fairly and fairly quickly, please contact the editor or see other details in the
Note to
Contributors.