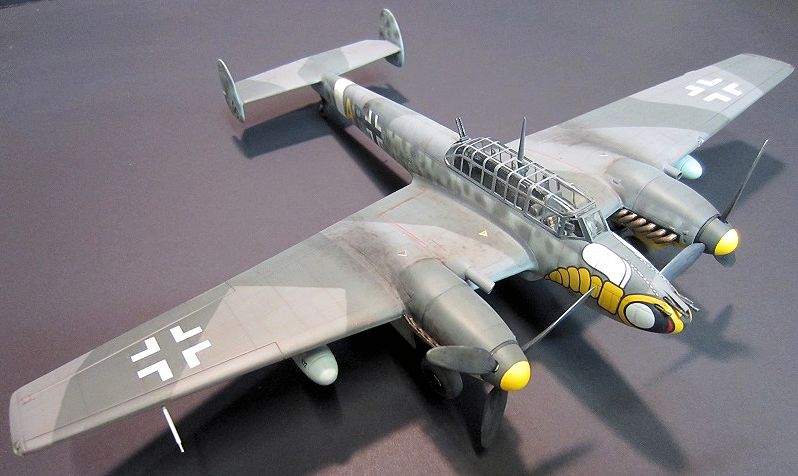
Revell 1/48 Bf-110G-2 Day Fighter
|
KIT #: |
$4164 |
|
PRICE: |
Currently out of production |
|
DECALS: |
Two options |
|
REVIEWER: |
Jonathan Prestidge |
|
NOTES: |
Injection molded kit with resin nose and cannon barrels. Eduard
Seatbelts used |
Built as a heavy fighter, the Messerschmitt Bf 110
was devastating in Poland, France and the Low Countries where coordinated single
engine fighter opposition was weak. However, the Bf 110 was totally outclassed
in fighter vs. fighter combat when it went up against the Hurricane and Spitfire
during the Battle of Britain. The type found new life on the Russian front and
in maritime patrol and really came i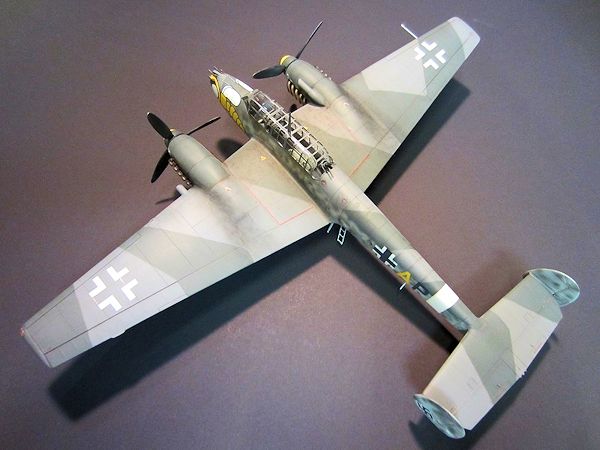 nto
its own as a bomber destroyer and night fighter. As a highly effective night
fighter its ability to carry radar equipment and a second crewman were crucial.
The Bf 110 was continually updated throughout the conflict and remained in
production when its successor (the Me-210/410) failed to live up to
expectations. The Bf 110G-2 was optimized as a fighter/bomber.
nto
its own as a bomber destroyer and night fighter. As a highly effective night
fighter its ability to carry radar equipment and a second crewman were crucial.
The Bf 110 was continually updated throughout the conflict and remained in
production when its successor (the Me-210/410) failed to live up to
expectations. The Bf 110G-2 was optimized as a fighter/bomber.
Released in 1997, the Revell-Monogram Bf 110 G-2 day
fighter is molded in gray plastic and comes with a resin nose plug and nose
cannon barrels. Panel lines are recessed and detail is adequate throughout. The
engraved detail is good but not as refined or extensive as that of the Eduard
kit. There is a moderate amount of flash on many of the pieces. The clear pieces
are of good quality and the only aftermarket items used were Eduard pre-painted
seatbelts for the pilot. The kit decals are thin, opaque and in register. Nicely
appointed and simple to build, the cockpit is really good. Realistically
weighted tires are a nice touch.
What you are looking at here is a seven year project.
No, I didn’t spend a solid seven years on it. Yes, I completed lots of other
kits in the process. Not the kits fault really, it is quite nice, I just kept
losing steam.
Construction begins with painting and detailing the
cockpit. As mentioned earlier, there is a fair amount of flash but it cleans up
easily with a swipe of the X-Acto. RLM 66 was painted throughout followed by
detail painting, a wash and drybrushing to bring out the nice detail. I added
the Eduard seatbelt for the pilot’s seat at this time and closed up the
fuselage. The tail assembly was then glued together and added at this time
without drama.
Since I was using the resin nose on this aircraft, I
had to remove the molded fuselage step from in front of the cockpit. Careful
cutting, filing and lots o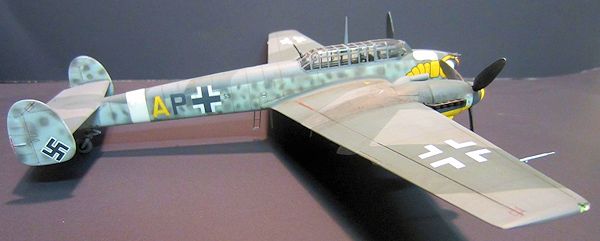 f
dry fitting produced an acceptable join between the resin nose and the fuselage.
I used white glue to attach the nose.
f
dry fitting produced an acceptable join between the resin nose and the fuselage.
I used white glue to attach the nose.
Next, the engine
nacelles were assembled and attached to the lower wings, requiring some filler
here and there. The radiators were then attached to the lower wings as well. I
replaced the vertical splitters for the radiators with styrene strip (the kit
pieces did not reach all the way to the wing). Finally I added the upper wings
to the assembly. Fit was good and required minimal putty. I attached the wings
to the fuselage at this time. One nice feature of this kit is that the starboard
wing is cast with the lower surface of the adjacent fuselage so that seams fall
on panel lines. Several sessions of adding putty & Mr. Surfacer followed by
sanding followed in preparation for paint.
As the final step in
preparation for paint, I added the canopy at this time. There are options to
pose the canopy open or closed. I built mine so that I can open it at a later
time if I choose. The clear parts were dipped in future prior to assembly. I
used Tamiya tape to mask the clear parts. Thankfully the Germans used straight
lines for the window framing!
I have a love hate
relationship with Luftwaffe color schemes - I love the way they look and I hate
painting them. This one is the standard RLM 74, 75, 76 scheme. Markings are for
an aircraft from II/ZG 1 “wespen”, Italy 1943. All paints used in this build
were Polly Scale acrylics. RLM 66 was sprayed on the canopy framing first,
followed by RLM 02 in the gear wells. The RLM 74, 75, & 76 were added in several
painting and masking sessions. The mottling was then added slowly & carefully
using RLM 74 & 75. It may not be the work of a master but I’m satisfied!
 At
this point I used pastels to emphasize the panel lines, add exhaust stains and
dirty the airframe up a bit. One thing I have started doing is adding structural
detail to my kits using the pastels to highlight the underlying stringers, etc.
I try to keep things subtle, adding just enough to enhance detail on simpler
kits. I use a reference book to locate the stringers, bulkheads, etc. I then
sealed everything with a coat of future in preparation for decals.
At
this point I used pastels to emphasize the panel lines, add exhaust stains and
dirty the airframe up a bit. One thing I have started doing is adding structural
detail to my kits using the pastels to highlight the underlying stringers, etc.
I try to keep things subtle, adding just enough to enhance detail on simpler
kits. I use a reference book to locate the stringers, bulkheads, etc. I then
sealed everything with a coat of future in preparation for decals.
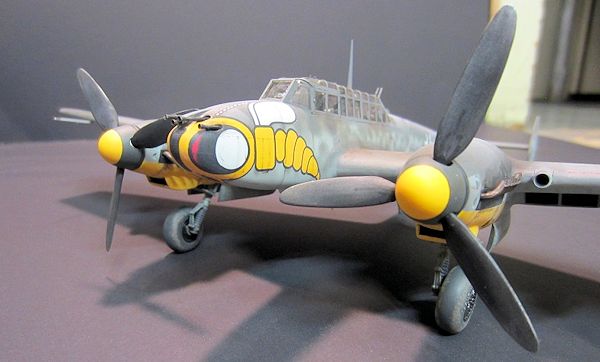
I used the kit decals
for this one with no problems. I had seven years to try to figure out how to get
that big yellow hornet onto the nose of this kit. I cut the head off each side
and applied them first. I made many small relief cuts in order to get them to
wrap nicely around the tapering nose. Micro Sol settled things down. When dry, I
added the bodies using the same method. I did have to go back and touch up these
decals with paint once they were dry. The rest of the markings and stencils were
added with minimal fuss. On planes with this many stencils I highlight the
instructions to show the decals I have already added to the airframe. I was
fortunate to have a good color photo of the plane I modeled. Other than the
hornets being a bit oversized, the markings are correct (with the possible
exception of the location of the “AP” on the starboard side of the fuselage).
After weathering the decals, I gave the plane a final flat clear coat.
The landing gear and
other final bits were added at this time. Final detailing was then completed -
bringing to conclusion my longest build to date.
 I
could not be happier with the end result. It looks impressive in the display
case! The airframe built up easily - much less fiddly than the Eduard offering.
The level of detail is good though not up to Eduard 110 standards. The clear
parts are nice and the decals work well. My delays aside, because of the size of
the plane and the logistics involved in finishing it, I spent about three times
longer on the Bf 110 than I do on a typical WWII single engine fighter.
Recommended for those with some model building
experience.
I
could not be happier with the end result. It looks impressive in the display
case! The airframe built up easily - much less fiddly than the Eduard offering.
The level of detail is good though not up to Eduard 110 standards. The clear
parts are nice and the decals work well. My delays aside, because of the size of
the plane and the logistics involved in finishing it, I spent about three times
longer on the Bf 110 than I do on a typical WWII single engine fighter.
Recommended for those with some model building
experience.
Jonathan Prestidge
December 2013
If you would like your product reviewed fairly and fairly quickly, please contact the editor or see other details in the
Note to
Contributors.
Back to the Main Page
Back to the Review
Index Page