| KIT #: | A0314 |
| PRICE: |
approx 30 DKK second-hand |
| DECALS: | Two options |
| REVIEWER: | Nicolai Plesberg |
| NOTES: |
Used Airfix replacement decals and instructions plus swastikas from an
Xtradecal sheet |
| HISTORY |
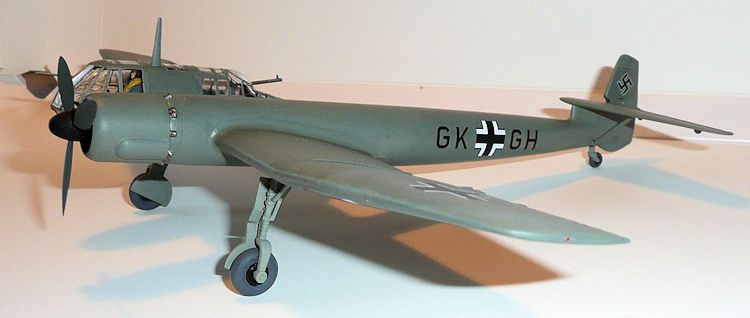
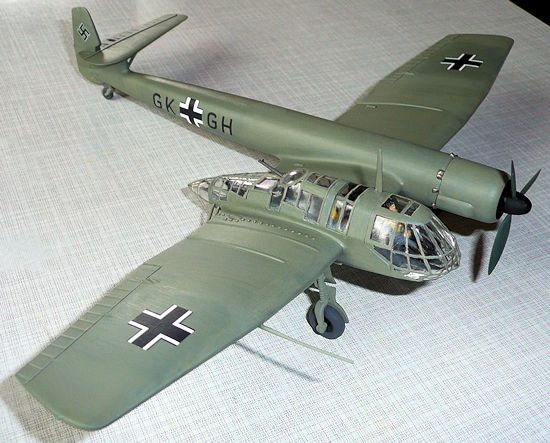
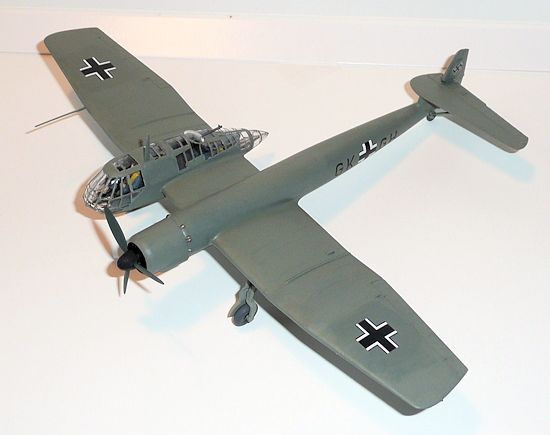
This asymmetrical airplane was the most unorthodox to appear during the Second
World War. Designed by the chief designer of Hamburger Flugzeugbau (the aircraft
division of the Blohm & Voss shipyard in Hamburg), Dr. Richard Vogt, it was a
proposal to meet a Luftwaffe requirement for a short range, reconnaissance and
light ground attack single engined aircraft. Initially conceived as a private
venture the design was chosen as the most appropriate way of achieving the best
possible all around vision from a single engined aircraft.
| THE KIT |
 This is a truly Airfix Classic kit with all what is remembered from the golden
age of Airfix in the 60’s and 70’s: chunky crewmembers, over scale surface
detail, crappy decals which breaks up when soaked into water, Spartan design of
sprues and… well actually I find it quite amazing that Airfix could produce a
pretty accurate kit (which is in fact the case) of this unusual aircraft without
having an original example to examine (all though I have read something about
the British recovering of one example when Allied forces advanced into Germany
in the final stages of the war) and it might have produced the material that
Airfix made their research on before tooling the mold.
This is a truly Airfix Classic kit with all what is remembered from the golden
age of Airfix in the 60’s and 70’s: chunky crewmembers, over scale surface
detail, crappy decals which breaks up when soaked into water, Spartan design of
sprues and… well actually I find it quite amazing that Airfix could produce a
pretty accurate kit (which is in fact the case) of this unusual aircraft without
having an original example to examine (all though I have read something about
the British recovering of one example when Allied forces advanced into Germany
in the final stages of the war) and it might have produced the material that
Airfix made their research on before tooling the mold.
| CONSTRUCTION |
-
the front canopy piece (part 19) unfortunately had a crack, presumably a molding
error
-
the decal sheet had yellowed over the years and seemed to be of the ‘breaking up
in water’ kind
-
the instruction sheet was little informative regarding some detail painting
(cockpit interiors, wheel bays etc
 Since I was bound to get a new canopy piece and decal sheet anyway, I decided to
throw in for a new set of instructions as well, hoping for some better
information regarding detail painting. While I waited for the spares to arrive,
I began construction by gluing wings and fuselage together, while some filler
took care of the sink marks that were present in the cockpit area. When cleaning
up the join lines some filling and sanding was necessary thus removing the
surface detail in the immediate area around the join lines (but so did the rest
of the rivets later!). Also the wing joints need some attention from
filler/sanding to be perfect. The issue with the too long supporting strut for
the horizontal tail plane was come around by almost removing the locating tab
going into the underside of the tail plane; the resulting ’half moon’ hole was
filled and sanded smooth.
Since I was bound to get a new canopy piece and decal sheet anyway, I decided to
throw in for a new set of instructions as well, hoping for some better
information regarding detail painting. While I waited for the spares to arrive,
I began construction by gluing wings and fuselage together, while some filler
took care of the sink marks that were present in the cockpit area. When cleaning
up the join lines some filling and sanding was necessary thus removing the
surface detail in the immediate area around the join lines (but so did the rest
of the rivets later!). Also the wing joints need some attention from
filler/sanding to be perfect. The issue with the too long supporting strut for
the horizontal tail plane was come around by almost removing the locating tab
going into the underside of the tail plane; the resulting ’half moon’ hole was
filled and sanded smooth.
 glued
with Humbrol Gloss Cote; only the rear piece (the half conical one covering the
rear machine gun) was glued with ordinary glue (the Gloss Cote being too slow
drying for this!). When completely dry the canopy framing was painted next using
the finest brush and the steadiest hand for this! However where paint did
accidentally get on the glazing, it was, when dry of course, removed carefully
with a piece of heat stretched sprue used as a scraper. The only places I use
masking tape were on the windows around the pilot, as they are not as properly
etched as the rest of the frames. The gear and bays were also painted at this
stage but I will later in the painting section state what paint I used for these
things (as is the case with the canopy framing).
glued
with Humbrol Gloss Cote; only the rear piece (the half conical one covering the
rear machine gun) was glued with ordinary glue (the Gloss Cote being too slow
drying for this!). When completely dry the canopy framing was painted next using
the finest brush and the steadiest hand for this! However where paint did
accidentally get on the glazing, it was, when dry of course, removed carefully
with a piece of heat stretched sprue used as a scraper. The only places I use
masking tape were on the windows around the pilot, as they are not as properly
etched as the rest of the frames. The gear and bays were also painted at this
stage but I will later in the painting section state what paint I used for these
things (as is the case with the canopy framing).
| COLORS & MARKINGS |
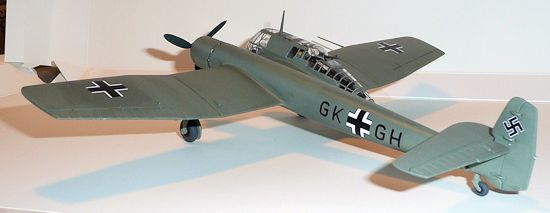
In the new set of instructions there were two different color schemes; one of
the tenth prototype in a standard RLM70/71/65 scheme (the same as in my boxing)
and the other in an all grey-green scheme (which caught my attention). The
grey-green color (which is also used for the gear, bays and canopy framing as
stated earlier) calls up for a mix of 60% Humbrol 64 Light Grey and 40% Humbrol
91 Black 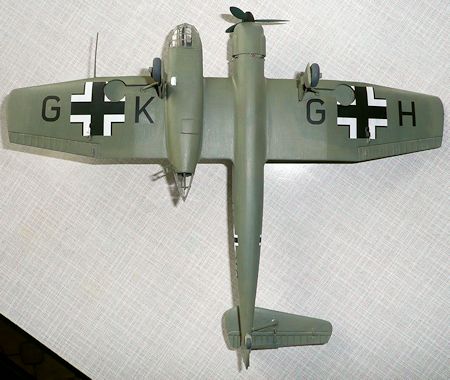 Green. Well I am not fond of mixing colors and especially not in these
quantities! So I decided going elsewhere to get around this issue. First I had
to decide what the color was. After a little research and considerations I came
to the conclusion that it could only be RLM02 Grau. Well then it was easy
because I recently came across some old Humbrol Authentic Colour tinlets. Among
them was the color ‘RLM Grau 02 HG.6’. It worked fine! After two layers the
model was prepared with Gloss Cote for the decals (actually it were only the
actual places were the decals were supposed to be or else I will soon run out of
Gloss!). The replacement decals themselves worked fine they just had to be
‘helped’ off the base paper. The only snag came when the large crosses on the
underside of the wing should be moved into position; they interfered with the
control linkages for the ailerons which I had left untouched. Cutting a slot in
the decal was necessary, but only with the second I did that before it was
soaked in water! White and Black touch up became necessary also (the linkage is
located in the borderline between the black and white on the cross), because the
cut off slot pieces were unusable anyway. The swastikas came from an Xtradecal
sheet and I must say that Xtradecal are some of the finest decals I have ever
worked with! They stood up for several sessions with water because my attempts
of fixing them made them move on the gloss surface. Despite this treatment they
stood up to it! Upon completing decaling the final details were glued (with CA
glue to speed things up). The antenna mast as well as the pitot probe was
thinned considerably before glued into place then painted in their respective colors.
Green. Well I am not fond of mixing colors and especially not in these
quantities! So I decided going elsewhere to get around this issue. First I had
to decide what the color was. After a little research and considerations I came
to the conclusion that it could only be RLM02 Grau. Well then it was easy
because I recently came across some old Humbrol Authentic Colour tinlets. Among
them was the color ‘RLM Grau 02 HG.6’. It worked fine! After two layers the
model was prepared with Gloss Cote for the decals (actually it were only the
actual places were the decals were supposed to be or else I will soon run out of
Gloss!). The replacement decals themselves worked fine they just had to be
‘helped’ off the base paper. The only snag came when the large crosses on the
underside of the wing should be moved into position; they interfered with the
control linkages for the ailerons which I had left untouched. Cutting a slot in
the decal was necessary, but only with the second I did that before it was
soaked in water! White and Black touch up became necessary also (the linkage is
located in the borderline between the black and white on the cross), because the
cut off slot pieces were unusable anyway. The swastikas came from an Xtradecal
sheet and I must say that Xtradecal are some of the finest decals I have ever
worked with! They stood up for several sessions with water because my attempts
of fixing them made them move on the gloss surface. Despite this treatment they
stood up to it! Upon completing decaling the final details were glued (with CA
glue to speed things up). The antenna mast as well as the pitot probe was
thinned considerably before glued into place then painted in their respective colors.
| CONCLUSIONS |
I can say this is probably one of the finest of the old Airfix Classic kits one
can build without any real obstacles (other than self inflicted ones of course).
It builds fairly easy and I found it absolutely a relaxing job, so if you’re
halfway through a ‘mission impossible’ project grab this one; I can only
strongly recommend it.
| REFERENCES |
February 2013
If you would like your product reviewed fairly and fairly quickly, please contact the editor or see other details in the Note to Contributors.