| KIT #: | D-63454 |
| PRICE: | AUD$5.00 at a swap n sell |
| DECALS: | Generic insignia |
| REVIEWER: | George Oh |
| NOTES: |
| HISTORY |
German
aeronautical engineer, Dr. Alexander Lippisch’s fascination with tail-less
aircraft made him either a far-sighted pioneer, or a dangerous radical who was
messing with a working formula.
One of his projects was the D-33, but its designation
was changed to DM-1 when the contractor was changed due to RAF bombing.
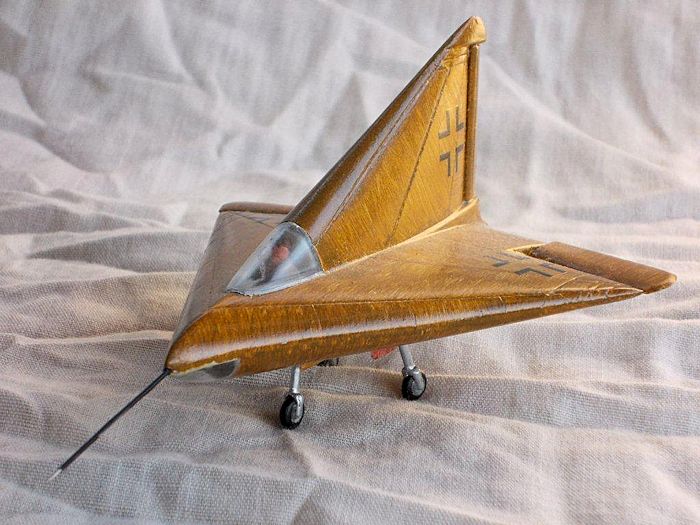
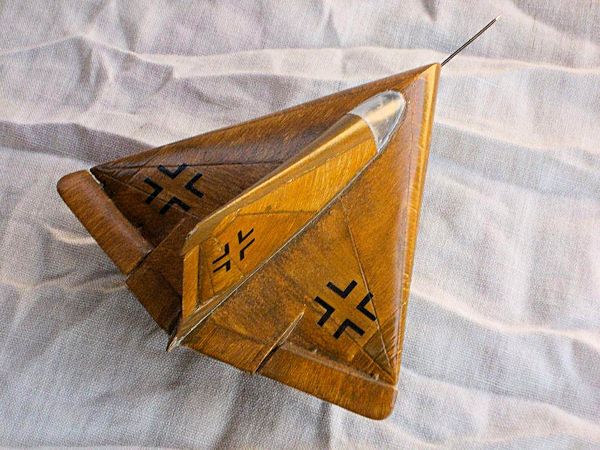
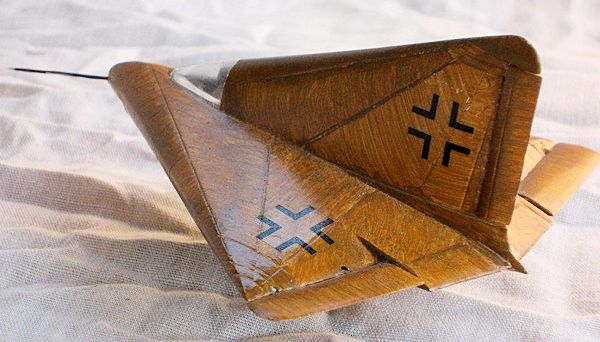
The DM-1 was of all-wooden construction and of an
acute-triangle design.
It was
 to be carried aloft on the back of a carrier
aircraft and released to glide back to earth.
Speed, estimated at 600kmh, was to be bled-off by a
nose-up landing, using the belly as the air-brake.
The DM-1 was captured by the Americans who conducted
further tests, state-side, and discovered that the design was stable at up to
Mach 2.6.
So the Americans tweaked the design and developed it into the
experimental Convair XP.92.
Dr Lippisch was indeed, a pioneer.
The DM-1 was the prototype of the proposed Lippisch
P.13a – an interesting aircraft in itself as it was to be launched by a small
rocket till it had attained speed, then a ram-jet engine, fuelled by a slurry (=
thick runny liquid) of coal particles and a heavy oil, would ignite and
take-over.
But that’s another story.
to be carried aloft on the back of a carrier
aircraft and released to glide back to earth.
Speed, estimated at 600kmh, was to be bled-off by a
nose-up landing, using the belly as the air-brake.
The DM-1 was captured by the Americans who conducted
further tests, state-side, and discovered that the design was stable at up to
Mach 2.6.
So the Americans tweaked the design and developed it into the
experimental Convair XP.92.
Dr Lippisch was indeed, a pioneer.
The DM-1 was the prototype of the proposed Lippisch
P.13a – an interesting aircraft in itself as it was to be launched by a small
rocket till it had attained speed, then a ram-jet engine, fuelled by a slurry (=
thick runny liquid) of coal particles and a heavy oil, would ignite and
take-over.
But that’s another story.
| THE KIT |
This
is a typical Huma kit.
Huma is known for short-run kits of subjects not covered
by larger kit manufacturers.
Their plastic is usually soft, a little flashy, features
large sprue-gates and the details are a little soft.
The panel lines were engraved, and the clear bits were
average.
My 8y-o son collared this model at a Swap n’ Sell, and started it as
soon as we got home.
| CONSTRUCTION |
I watched
my son as he stuck the seat and the wall (aka - bulkhead) to the floor, and
brush-painted them (and the insides too, after I persuaded him) a dark grey.
His paints of choice were my Citadel range of acrylic
colours.
The pilot was painted next, then stuck to the seat, and the floor was
stuck to the base of the fuselage.
Here, he paused to draw breath, which allowed me to
replace the lost control column with a piece of wire, and to attach the (overly
large?) rudder pedals.
Meanwhile, my son decaled the instrument panel, but the
decal refused to stick.
Some Future saw to that problem.
| COLORS & MARKINGS |
After
masking the clear bits with tape, the model got an over-all undercoat of Citadel
Skull white applied from a spray-can.
This, I covered with several applications Future to give
me a smooth glossy surface.
Citadel Leather brown was then applied with a coarse
brush to produce the wood-grain finish.
The darker panels received a second (or third) coat of
the brown.
Each panel was masked-off around i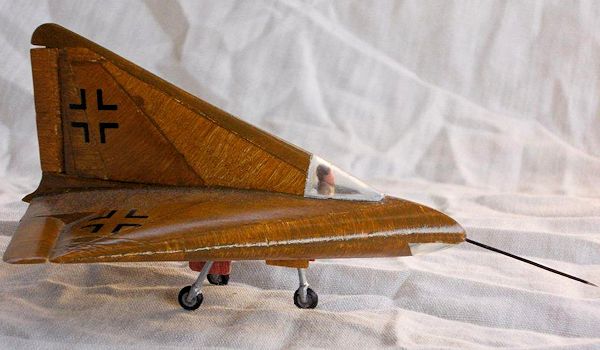 ts edge, prior to painting.
I tried to put the grain of the ‘wood’ perpendicular to
one edge of the panel.
Picky observers may point-out that there are no
imperfections, like knot-holes, in the ‘wood’, but I will counter that a
high-speed wooden aircraft would require a skin of perfect (ply?)wood.
More coats of Future followed to produce the appearance
of polished wood.
ts edge, prior to painting.
I tried to put the grain of the ‘wood’ perpendicular to
one edge of the panel.
Picky observers may point-out that there are no
imperfections, like knot-holes, in the ‘wood’, but I will counter that a
high-speed wooden aircraft would require a skin of perfect (ply?)wood.
More coats of Future followed to produce the appearance
of polished wood.
I hated the decals and they hated me, but it was my fault. There were only six black outline crosses. Two were slightly smaller than the others, and I hadn’t realising that fact. I had a standard one and a small one on the sides of the fin. No wonder I couldn’t get the larger one to line-up with the same panel-lines as the smaller one. Eventually, I realised my mistake, and resorted to sticky tape to remove the standard one. That meant that I didn’t have crosses to place on the underside of the wings. Incidentally, my references (see) photos show the DM-1 without any markings or panel lines.
| CONSTRUCTION CONTINUES |
When he saw
me fitting a sewing pin in-lieu of the kit pitot tube, my son pointed-out that
the kit supplied the ‘spike’.
But when I told him that the metal one wouldn’t break,
he was OK with it.
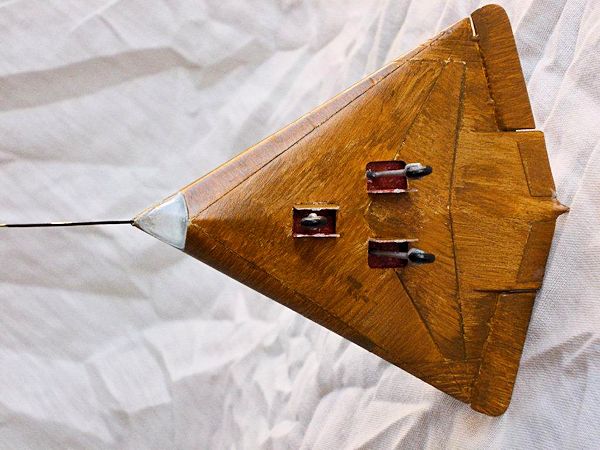
I had to
 drill a hole in the tip of the nose in-which I
fitted the extended pitot tube.
This went deep into the Milliput for a solid
anchor-point.
My son glued-on UC legs and their attached wheels, while I
corrected the angles. I
wanted to add a rod parallel to each UC leg using EZ-Line, as it was as thin as
those depicted in the box-art.
Later.
Finally, I attached the UC doors.
Surprisingly, the kit-supplied doors were quite thin and
fit tightly into position.
I painted the roof of each UC well, and the inside of
the doors a mahogany brown, just to differentiate it from the rest of the belly.
If someone wants to argue, then I’ll declare that it is
a hard-wood to accept the impact of landing.
drill a hole in the tip of the nose in-which I
fitted the extended pitot tube.
This went deep into the Milliput for a solid
anchor-point.
My son glued-on UC legs and their attached wheels, while I
corrected the angles. I
wanted to add a rod parallel to each UC leg using EZ-Line, as it was as thin as
those depicted in the box-art.
Later.
Finally, I attached the UC doors.
Surprisingly, the kit-supplied doors were quite thin and
fit tightly into position.
I painted the roof of each UC well, and the inside of
the doors a mahogany brown, just to differentiate it from the rest of the belly.
If someone wants to argue, then I’ll declare that it is
a hard-wood to accept the impact of landing.
| CONCLUSIONS |
As
previously identified, this is a pretty basic kit, made difficult by the poor
fit of some parts.
I recommend that it be built by someone with some
modelling experience.
OTOH, it is an unusual subject, and doesn’t demand a lot
of shelf space.
| REFERENCES |
George Oh
December 2013
If you would like your product reviewed fairly and fairly quickly, please contact the editor or see other details in the Note to Contributors.