Airfix 1/24 Bf-109E
|
KIT # |
12002 |
|
PRICE: |
$44.00 |
|
DECALS: |
See Review |
|
REVIEW : |
Mark Mallinson |
|
NOTES: |
|
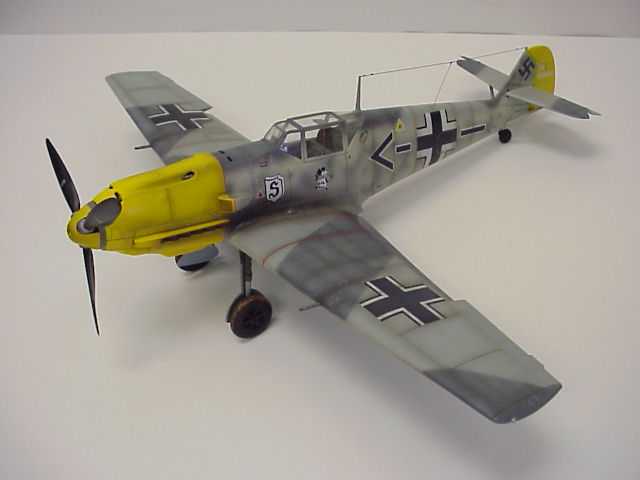
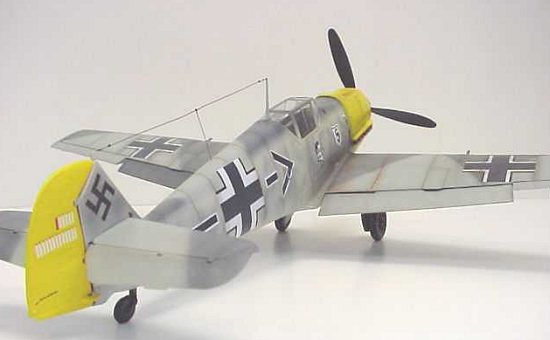
Bf 109 E-3, JG 26, Adolf Galland, Fall 1940
|
HISTORY |
 The
model featured here is an Airfix 1/24 scale Messerschmitt Bf-109E-3. With many
good references on the Emil at my disposal, I decided from the start to make
whatever adjustments the kit required to more accurately represent this mainstay
of the Luftwaffe during the early years of WW 2. To meet this end, I chose early
on the make some important corrections to the wings and little touches here and
there which will be described below. The end result is a BIG hunk of plastic,
which will grab the attention of anyone familiar with the Battle of Britain.
The
model featured here is an Airfix 1/24 scale Messerschmitt Bf-109E-3. With many
good references on the Emil at my disposal, I decided from the start to make
whatever adjustments the kit required to more accurately represent this mainstay
of the Luftwaffe during the early years of WW 2. To meet this end, I chose early
on the make some important corrections to the wings and little touches here and
there which will be described below. The end result is a BIG hunk of plastic,
which will grab the attention of anyone familiar with the Battle of Britain.
|
CONSTRUCTION |
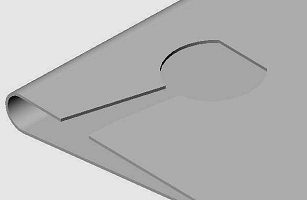
By reviewing many references at my disposal, it was clear from the start that the wings were going to need modification. The Airfix kit has the flaps molded "up", while I wanted them "down". Also, the wheel wells and oleo tunnels were nothing more than open holes in the bottoms of the wings.
You’d think that a model of this size and detail, they could include these features. Well, the only thing to do is get out some new Xacto blades, some Evergreen stock plastic, my Dremel rotary tool and prepare for surgery.
 The
wings were first modified with partially scratch-built lowered flaps. This was
accomplished by cutting out the existing flaps and building up their leading
edges using ¼" diameter plastic tube, cut and shaped to roughly fit. One
difficulty here is that there are four distinct sections with transitions to
their leading edge. But after much puttying and careful shaping, the separated
flaps looked good on their own. To complete this, the gaping holes in the
trailing edges of the wings where these flap were cut were filled and sanded to
match the flaps. A Dremel tool with a fine grinding cylinder was used to thin
the upper wing trailing edge down to the correct thickness.
The
wings were first modified with partially scratch-built lowered flaps. This was
accomplished by cutting out the existing flaps and building up their leading
edges using ¼" diameter plastic tube, cut and shaped to roughly fit. One
difficulty here is that there are four distinct sections with transitions to
their leading edge. But after much puttying and careful shaping, the separated
flaps looked good on their own. To complete this, the gaping holes in the
trailing edges of the wings where these flap were cut were filled and sanded to
match the flaps. A Dremel tool with a fine grinding cylinder was used to thin
the upper wing trailing edge down to the correct thickness.
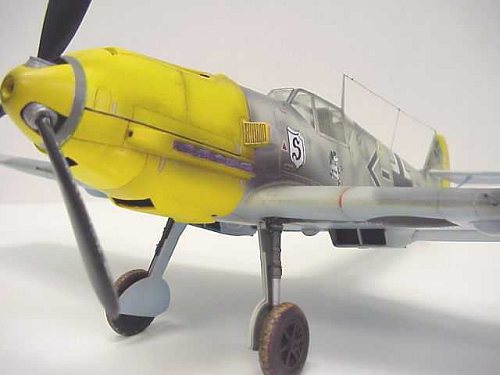
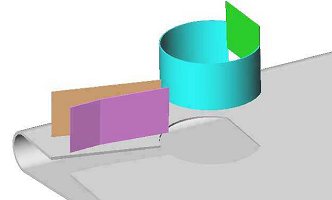
The second major modification of the wings were around the landing gear bays. Being simple openings in the lower wing surface, they needed a lot of help. Using my 1/48th scale Hasegawa Emil as a guide, I used .020" thick sheet styrene to close-out the wheel wells and create walls for the oleo tunnels.
 |
 |
 |
To accurately model the variable contour of these tunnels, I took more ¼" diameter styrene tubes and split them down the middle, tapering the cut outward after a couple inches. A heat gun (OK, a blow dryer) was used to gently soften and smooth these apart to match the oleo tunnel contours.
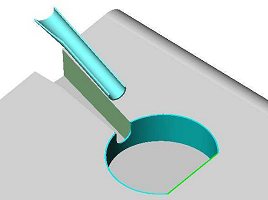
 After
much careful sanding to match the right and left tunnels, they were glued into
place and putty applied to finish the effect. As a check, the
kit landing gear were
periodically placed within the new bays for fit
checking. As a final
last touch to the wings, some thin strips of styrene were added to the wheel
bays to simulate the two stringers visible from underneath.
After
much careful sanding to match the right and left tunnels, they were glued into
place and putty applied to finish the effect. As a check, the
kit landing gear were
periodically placed within the new bays for fit
checking. As a final
last touch to the wings, some thin strips of styrene were added to the wheel
bays to simulate the two stringers visible from underneath.
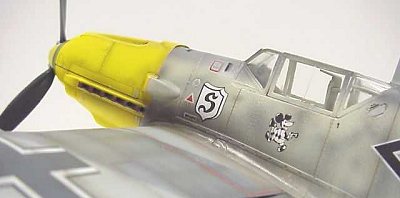
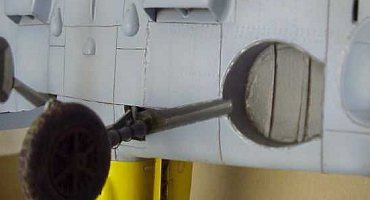
Many other smaller touches were added to the kit based on the level of details I could glean from my reference photos. These included relatively simple, but effective things like hollowed-out gun barrels, opened engine exhausts and air intakes. One place where the Squadron book really came in handy was when I had to re-scribe the panel lines missing from the lower fuselage center section. There, a nice ink drawing of the Emil’s lower surface helped in scribing panels in their proper locations. To add detail to the landing gear, copper wire was painted black and used to simulate hydraulic lines and straps. Last, but not least, Waldron seat belts, dial gages and an oxygen hose were added to the cockpit interior along with some Model Master chrome dry brushing in high wear areas.
|
PAINT & DECALS |
 Painting
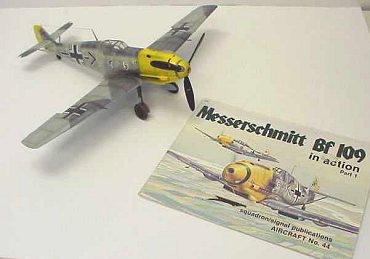
The model exterior features a Battle of Britain paint scheme patterned after Adolf Galland's plane featured on the cover of Squadron/Signal Publication's Messerschmitt Bf 109 in action, part 1. The paint on this war-weary Emil was shaded and over-sprayed to appear weathered and sun-bleached.
The underside was painted with a combination of Model Master aircraft gray and French light blue enamels. Each panel was accented with slightly lighter color in their middle to subtly help the wear effect. The upper surfaces were painted with a combination of Model Master medium and dark gray enamels over AeroMaster light gray acrylic. The pattern on the wings and horizontal empennage surfaces was painted with a "soft splinter" pattern achieved by masking the darker areas with 5-10mm tall stand-offs.
 The fuselage was given an undercoat of light gray acrylic and permitted
to dry a few days. Then the soft splinter pattern on the top of the fuselage was
airbrushed on; first with the medium gray, and then the dark gray on top. The
sides of the fuselage were painted with a mottled combination of dark gray
over-sprayed in spots with the base acrylic. Spraying light gray between the
stringer rivet patterns gave the panels a sun-faded effect. After a few days of
drying, Future floor polish was used to seal the paint. When the decals had been
put on, additional light gray was sprayed onto them to give them a faded
effect.
The fuselage was given an undercoat of light gray acrylic and permitted
to dry a few days. Then the soft splinter pattern on the top of the fuselage was
airbrushed on; first with the medium gray, and then the dark gray on top. The
sides of the fuselage were painted with a mottled combination of dark gray
over-sprayed in spots with the base acrylic. Spraying light gray between the
stringer rivet patterns gave the panels a sun-faded effect. After a few days of
drying, Future floor polish was used to seal the paint. When the decals had been
put on, additional light gray was sprayed onto them to give them a faded
effect.
Decals
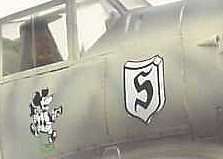
The kit decals were used in a combination, which best-simulated Galland’s plane during the Battle of Britain. Setting solution was used to soften these thick and fairly well printed decals during application. Due to the raised rivet patterns and deep panel lines, a cotton swab was used to gently roll the softened decals flat into and around the surface features. The results were decals that almost look painted-on. Future was thinly brushed on to each decal to seal it and make any transparent films disappear. As noted above, a light dusting of the black crosses with light gray gave them a more realistic appearance.
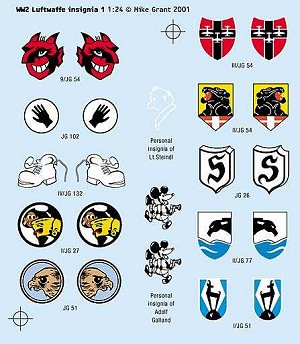 Recently, I had the good luck
of getting in touch with Mike Grant of Mike Grant Decals. He designed an all-new
set of attractive decals for my Airfix 1/24 Stuka kit. During our transaction,
he informed me that he also makes 1/24 scale squadron badges. When I saw his
sheet, I knew that this plane could finally be finished. Mike’s new JG 26
badges and Adolf Galland’s Mickey Mouse insignia were carefully trimmed from
the rest of the decal sheet and applied with water and Future. The results were
excellent and I can highly recommend Mike’s products. You can see the rest of
his line through the link below.
Recently, I had the good luck
of getting in touch with Mike Grant of Mike Grant Decals. He designed an all-new
set of attractive decals for my Airfix 1/24 Stuka kit. During our transaction,
he informed me that he also makes 1/24 scale squadron badges. When I saw his
sheet, I knew that this plane could finally be finished. Mike’s new JG 26
badges and Adolf Galland’s Mickey Mouse insignia were carefully trimmed from
the rest of the decal sheet and applied with water and Future. The results were
excellent and I can highly recommend Mike’s products. You can see the rest of
his line through the link below.
http://www.cadvision.com/mikegrant/MikeGrantDecals/
Final Touches
A few final touches were given the model to help make the battle wear effects complete. Small amounts of tan acrylic were rolled onto the wheels to simulate the mud seen in many photos of the Emil. Engine exhaust and panel lines were all accented with Tamiya "smoke" which went on very thinly, despite several coats behind the engine exhausts. Paint chips and small areas of wear were speckled or dry brushed with chrome enamel. The panel lines were washed with a burnt umber water-soluble paint that was thinned with a tiny amount of liquid soap to reduce its surface tension. And finally, the rudder control rods and the radio antenna were made from stretched sprue, painted and glued in place with crazy glue.
|
CONCLUSIONS |
When finished and parked in my office, this Emil really became an eye catcher. It’s shear size begs to be noticed and if the modeler is inclined, they can "go to town" adding as much detail to this as they want. It’s technically not a difficult model to build, but the level of accuracy one wishes will determine the time spent correcting the many small flaws. The end product will be an enjoyable addition to any collection.

If you would like your product reviewed fairly and fairly quickly, pleasecontact the editor or see other details in the Note to Contributors.