Monogram 1/48 He-111H-3
| KIT #: | 5509 |
| PRICE: | $25-30 on E-Paid |
| DECALS: | Two options |
| REVIEWER: | Scott Lyle |
| NOTES: | Aeromaster #48-589, Best Sellers, Luftwaffe Mediums, Pt. 1 |
| HISTORY |
Two things came together in the past couple of
months that forced me to haul this one out of the stash.
First, a friend loaned me the great old movie “The 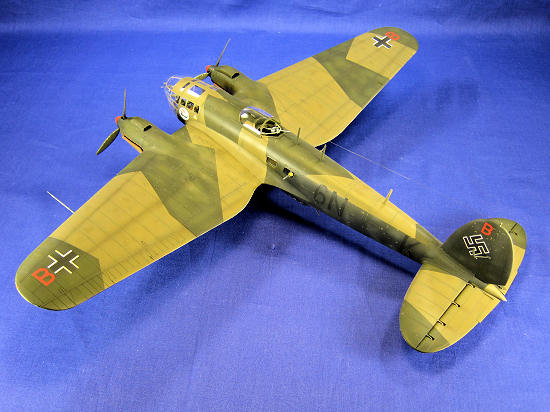 109s, and
Heinkels, watching this movie will motivate anyone to model some BoB hardware.
Second, I started playing a video game called “Blazing Angels”, a flight
simulator type of game where you pilot different Allied aircraft while fighting
your way through different campaigns of the war.
I passed flight training relatively easily (only crashed twice), then
needed a few nights to get past
109s, and
Heinkels, watching this movie will motivate anyone to model some BoB hardware.
Second, I started playing a video game called “Blazing Angels”, a flight
simulator type of game where you pilot different Allied aircraft while fighting
your way through different campaigns of the war.
I passed flight training relatively easily (only crashed twice), then
needed a few nights to get past
| THE KIT |
So what’s in the box?
Monogram’s He 111 is an excellent kit, one of the few recessed panel line
offerings they made before they were absorbed by Revell.
If you didn’t know better, you’d swear you were looking at a Hasegawa
production when you open the box.
While you’re ogling the nice light gray plastic however, be mindful of what
variant it actually represents. The
instructions claim the kit is an H-4 or H-5, however I believe the model truly
represents an H-2, or an early H-3 that has yet to receive the several field
(and later factory) modifications that took place.
While I’m no expert on He 111 variants, the kit has the longer
supercharger intakes that appeared with the H-2 (according
 to my
Squadron/Signal “In Action” reference) as well as only three machine guns; one
in the nose, one in the dorsal position, and one facing rearwards in the ventral
gondola. In addition the props seem
to be the more narrow VDM type and the front of the gondola is a solid, curved
panel. Experience from the Polish
Campaign revealed that the bomber was under-armed, and units in the field
quickly began adding more machine guns for self defense.
Soon there was a second MG in the nose, another one facing forward
through a clear panel on the front of the gondola, and a fifth crew man
responsible for firing new MG’s fitted to the waist windows.
A fixed MG was even sometimes added to the tail.
The Monogram kit gives you none of these additional weapons however,
therefore modeling anything past the late H-3’s or early H-4’s involves some
scratch-building or some forgiveness, or in my case, both.
to my
Squadron/Signal “In Action” reference) as well as only three machine guns; one
in the nose, one in the dorsal position, and one facing rearwards in the ventral
gondola. In addition the props seem
to be the more narrow VDM type and the front of the gondola is a solid, curved
panel. Experience from the Polish
Campaign revealed that the bomber was under-armed, and units in the field
quickly began adding more machine guns for self defense.
Soon there was a second MG in the nose, another one facing forward
through a clear panel on the front of the gondola, and a fifth crew man
responsible for firing new MG’s fitted to the waist windows.
A fixed MG was even sometimes added to the tail.
The Monogram kit gives you none of these additional weapons however,
therefore modeling anything past the late H-3’s or early H-4’s involves some
scratch-building or some forgiveness, or in my case, both.
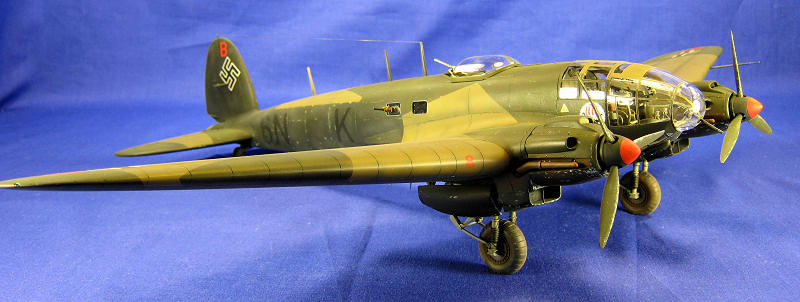
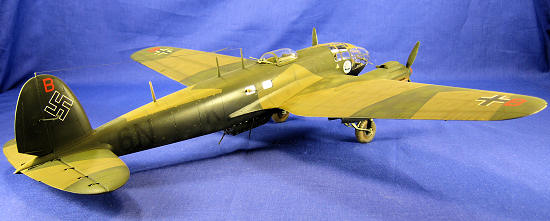
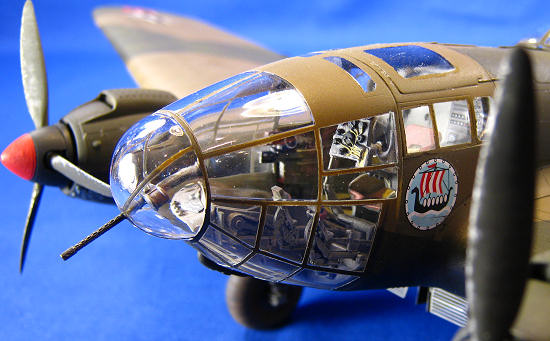
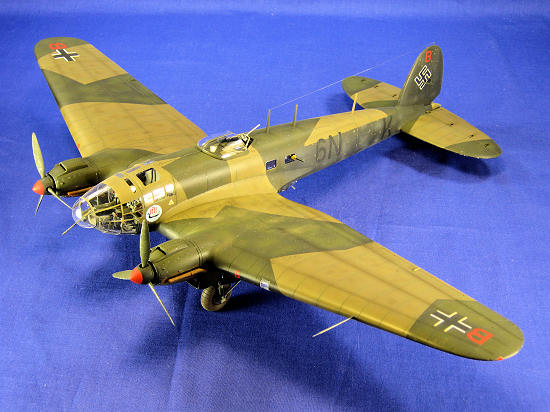
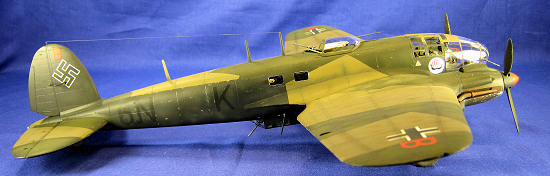
When I build fighters I tend to go for the most popular mounts of the most famous aces, but in the bomber world that’s not as easy to do. While casting about for which He 111 to model, I knew I wanted to build one that had participated in the Battle of Britain, preferably in the Night Blitz portion because of the interesting black paint schemes used during that time. After researching the aftermarket decals I could get my hands on, I settled on 6N+BK, an H-3 from Kampfgruppe 100. Not only did it serve during the Night Blitz, but as part of the Pathfinder Group it was a “three master”, making it a bit more unique. I decided to add scratch-built machine guns to the waist windows, as well as a set of Koster exhausts for the early H variants. I also added an Eduard photo etch set for the bomb bay as well as a set of their window masks – there’s a lot of glass on this one!
| CONSTRUCTION |
Per usual, construction began with the cockpit,
but with a bomber there’s usually more than just a cockpit to deal with.
The kit provides a nicely detailed rendition of the pilot’s area as well
as the bombardier/nose gunner’s area right beside him.
The He 111 had a unique setup in the nose.
The pilot’s instrument panels were arrayed around him instead of directly
in front of him, affording him excellent forward visibility (mind you, if
looking directly forward meant looking directly at a Spitfire or Hurricane
 bearing
down on me, I think I’d rather have an instrument panel in front of me).
This means that many of the rear faces of the instrument panels are
visible once the model is finished, and Monogram had the foresight to detail
those nicely by molding the instruments as small cylinders complete with wiring
on their backsides. Moving over to
the bombardier’s station, in the real He 111 the bombardier would lie prone on a
sliding panel to fire the nose machine gun and then slide backwards to reveal
the bombsight he would use to aim the bombs.
I used my Dremel to open this panel up, and thanks to those who responded
on the Forum about my questions as to how that all worked!
bearing
down on me, I think I’d rather have an instrument panel in front of me).
This means that many of the rear faces of the instrument panels are
visible once the model is finished, and Monogram had the foresight to detail
those nicely by molding the instruments as small cylinders complete with wiring
on their backsides. Moving over to
the bombardier’s station, in the real He 111 the bombardier would lie prone on a
sliding panel to fire the nose machine gun and then slide backwards to reveal
the bombsight he would use to aim the bombs.
I used my Dremel to open this panel up, and thanks to those who responded
on the Forum about my questions as to how that all worked!
I started painting the interior next by spraying a primer coat of Mr.
Surfacer 1200, followed by some pre-shading using Testors Acrylic Panzer Gray.
This was followed by some thin coats of Testors RLM 02 Acrylic Green-Gray
and then an overall wash of
The fuselage seams were fairly minor, and soon I was working on the
wings. Rather than glue them
together and then fit them to the fuselage as the instructions say, I instead
glued the top wing halves to the fuselage by themselves.
Doing it this way
 allowed me
to get a perfect joint at the upper wing root, which is obviously much more
visible than the underside. Next I
glued the bottom wing halves to the top wing halves, and here there was a gap at
the lower wing roots. To solve that
problem I filled the gap with gap-filling CA glue, wiped off any that got on the
plastic parts with a piece of paper towel, pressed down on the wing section so
that it would be flush with the fuselage, and then hit the glue with some CA
accelerator. It worked perfectly.
allowed me
to get a perfect joint at the upper wing root, which is obviously much more
visible than the underside. Next I
glued the bottom wing halves to the top wing halves, and here there was a gap at
the lower wing roots. To solve that
problem I filled the gap with gap-filling CA glue, wiped off any that got on the
plastic parts with a piece of paper towel, pressed down on the wing section so
that it would be flush with the fuselage, and then hit the glue with some CA
accelerator. It worked perfectly.
After I sanded and filled the wing seams, I next attached the horizontal
stabilizers to the fuselage, making sure they were level with each other.
Up next were the engine nacelles, which
are small assemblies in and of themselves.
When these were attached to the wings some work was needed to smooth out
the root areas, followed by some panel line re-scribing in the areas I sanded
over.
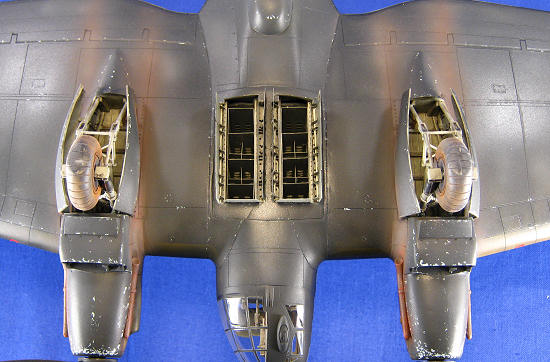
At this point it was time to assemble the Eduard photo etch bomb bay set.
It’s a neat set consisting of several large etched pieces that went
together quickly and easily and while it will only be visible through the open
bomb bay doors below, it accurately portrays the racks that held the bombs
vertically in the early He 111 variants before the external racks came into
vogue. Once it was assembled I
sprayed it Testors Acrylic RLM 02 and then gave it an overall wash of
 door
openings. With that glued in place,
the bomb bay area was finished except for the photo etch bomb bay doors, which I
attached later. Peering into the
bomb bay, I have to say that the ultra thin and precise look of those photo etch
parts warms my cold, unfeeling modeler’s heart.
door
openings. With that glued in place,
the bomb bay area was finished except for the photo etch bomb bay doors, which I
attached later. Peering into the
bomb bay, I have to say that the ultra thin and precise look of those photo etch
parts warms my cold, unfeeling modeler’s heart.
Up next was the ventral gondola.
I attached the forward housing and the rear clear plastic machine gun
station, complete with its machine gun.
I figured I would bump it a million times during the painting process,
but since it attaches from the inside, there’s no other choice.
The last major assembly step was the cockpit greenhouse.
The two large clear pieces require you to glue instrument panels, the
bombsight, and another machine gun inside them before they are attached to the
fuselage. This was done using
Testors Clear Parts cement, and the fit of all parts was good – impressive
considering the shape of the He 111’s nose was fairly complex.
I applied the Eduard Masking Set at this point to provide some protection
to the clear pieces while I handled them.
The dorsal gunner’s station was painted and attached next, and then I attached the three masts using the one provided by the kit as a master for the other two. I know what you’re thinking – whoa, three masts and two machine guns protruding from the model and you haven’t even painted it yet? They’ll never survive! What can I say? I live life on the edge.
| COLORS & MARKINGS |
First
I sprayed Testors RLM 02 Gray over the greenhouse areas to replicate the
interior of the framing, of which there’s a fair amount.
Next I sprayed a primer coat of Mr.
Surfacer 1200 onto the aircraft and then checked all of the various seams.
After I retouched some seams it was time for the color coats.
The He 111 I was modeling was a “Night Blitz” version which had a coat of
black paint hastily applied in the field over its original RLM 65/70/71 splinter
scheme. Photos show that the black
paint tended to wear and chip badly, especially around the engine nacelles,
landing gear areas, and any other leading edge-type areas, and I
 wanted to
show that effect on my model. I
first sprayed a coat of RLM 65 Light Blue onto the undersides, concentrating on
the areas that would have chipped.
I then applied some Mr. Mask with a small brush to those leading edge areas.
A rubber cement-like product, the idea was to paint the black over the
mask and then remove the mask with my fingers to reveal the RLM 65 chips
underneath.
wanted to
show that effect on my model. I
first sprayed a coat of RLM 65 Light Blue onto the undersides, concentrating on
the areas that would have chipped.
I then applied some Mr. Mask with a small brush to those leading edge areas.
A rubber cement-like product, the idea was to paint the black over the
mask and then remove the mask with my fingers to reveal the RLM 65 chips
underneath.
I next pre-shaded all of the panel lines with Tamiya Flat Black XF-1.
I was skeptical as to whether or not pre-shading what was going to end up
being a relatively dark model would have any perceptible effect, but in the end
it did. Next I sprayed a mix of
Tamiya RLM 71 Dark Green (XF62:6 + XF58:2 + XF2:4) onto the upper surfaces,
masked that off and then sprayed a mix of Tamiya RLM 70 Black Green (XF62:1 +
XF49:1 + a few drops of XF1) to finish the upper colors.
I added a couple of drops of white to the RLM 70 mix and sprayed some
“splotches” onto the Black Green areas to break them up a bit.
I then masked off the fuselage in preparation for the final color, Tamiya
XF69, NATO Black. I misted that
onto the sides and the undersides lightly to let the pre-shading show through,
and then also “splotched” on some lightened NATO Black to add some more depth as
well.
Once that was dry it was time for the customary coat of Future, after
which the model was set aside for a few days.
I then applied the Aeromaster decals, which went on just fine with
Walthers Solvaset solution. Once
they had set I sealed them with a coat of Future, and then applied a thin wash
of Mig Productions “Dark Wash” to all of the recessed panel lines on the upper
surfaces. With the lower surfaces
being so dark, I didn’t apply any panel line wash to them.
A coat of Testors Model Master Flat Finish was airbrushed on next, and
then it was time to hand-paint the wheel wells.
For that I used Testors RLM 02, and then I picked out the various hoses
and tubes by hand in Dark Brown.
That was followed by assembling the landing gear, which were then painted RLM 02
and given a dark wash. The tires
were painted Tamiya XF69 NATO
 Black,
with the hubs painted black. I
attached the gear at this stage so they could not only receive some weathering,
but also hold up the model.
Black,
with the hubs painted black. I
attached the gear at this stage so they could not only receive some weathering,
but also hold up the model.
The next weathering step was to airbrush a very
thin mix of 50/50 Tamiya XF1 Black and Tamiya XF64 Red Brown over all of the
panel lines and engine exhaust areas, concentrating on the lighter areas where
the effect is easier to see. To
replicate the engine exhaust stains I first sprayed some Testors Rust, followed
by some Testors Raw Umber, followed finally by just a hint of Testors Neutral
Gray to create streaks on the undersides of the wings and engine nacelles.
At this point it was time to remove all of the window masks, a process
that is always nerve-wracking. It
seems common for the paint to not adhere well to the Futured, glossy clear
plastic, and removing the mask can sometimes result in chips in the paint where
you want a perfectly straight line.
It happened a couple of times on this model, resulting in me having to touch up
the chips by hand with a fine brush.
Next I added some paint chips around the
service areas on the wings using a Silver Berol pencil, and added some more RLM
65 paint chips by hand to the black undersides of the engines nacelles as well.
| FINAL CONSTRUCTION |
 The final
step was to glue on the rest of the fiddly bits.
I replicated canvas gaiters on the two fuselage side window machine guns
using Squadron Green Putty, and then painted them a beige color followed by a
Raw Umber wash. The dorsal
position’s gun, gun bracket, and windshield were added next, followed by the
pitot tube and the antenna near the gondola.
I used thin, flexible rubber line for the antenna leading from the mast
to the tail. Finally I assembled,
painted, and mounted the final part of the Eduard PE Bomb Bay set, the bomb bay
doors. They were fiddly to
assemble, testing my patience frequently, but do add that neat, precise look
that I like so much about photo etch products to the model.
And with that the model was done.
And I only knocked off the masts twice.
One of these models I’ll learn.
The final
step was to glue on the rest of the fiddly bits.
I replicated canvas gaiters on the two fuselage side window machine guns
using Squadron Green Putty, and then painted them a beige color followed by a
Raw Umber wash. The dorsal
position’s gun, gun bracket, and windshield were added next, followed by the
pitot tube and the antenna near the gondola.
I used thin, flexible rubber line for the antenna leading from the mast
to the tail. Finally I assembled,
painted, and mounted the final part of the Eduard PE Bomb Bay set, the bomb bay
doors. They were fiddly to
assemble, testing my patience frequently, but do add that neat, precise look
that I like so much about photo etch products to the model.
And with that the model was done.
And I only knocked off the masts twice.
One of these models I’ll learn.
| CONCLUSIONS |
Revell/Monogram’s He 111 is a fun and easy
build. The quality and fit of the
parts is excellent, and the recessed panel lines are beautifully molded.
The cockpit is very well done, and scratch builders could have a field
day outfitting the rest of the interior.
Like many Luftwaffe aircraft it was used throughout the war and in every
theater, so the number of different painting and weathering schemes one can
choose from are virtually limitless.
I recommend this kit without reservation, and only wish Revell would use
the kit as a base from which to release more versions in the future.
| REFERENCES |
-
GR Morrison, an online friend.
-
Schiffer Military Books, The Luftwaffe Profile Series #9, “Heinkel He 111H”
-
Squadron/Signal Publications, Aircraft in Action #184, “Heinkel He 111 in
Action”
October 2010
Copyright ModelingMadness.com. All rights reserved. No reproduction in part or in whole without express permission. If you would like your product reviewed fairly and fairly quickly, please
contact
the editor or see other details in the
Note to
Contributors. Back to the Review
Index Page 2022