Huma 1/48 Fl-282 'Kolibri'
| KIT #: | 6500 |
| PRICE: | $ |
| DECALS: | Two options |
| REVIEWER: | Randy Lutz |
| NOTES: |
| HISTORY |
Luftwaffe Hummingbird
The Flettner Fl-282 first appeared in 1940 as a direct development of the Fl-265. The Fl-265 was the first helicopter to employ the principle of counter-rotating, intermeshing rotor blades as early as 1938. The machine possessed excellent flying characteristics and the German Air Ministry placed a development order with Flettner for a specific type of spotter aircraft. Even though the same method of propulsion was retained in the Fl-282, its engine was moved to a central position directly under the rotor head. As a result, the plane had a very stable flying attitude (central centre of gravity), and the pilot had very good all-round vision. Following completion, the Fl-282 was thoroughly tested both in the Baltic and the Mediterranean. Take-offs and landings were practiced from ships (mine layers and destroyers) under steam, to which special 5 x 5 metre landing decks had been fitted. As a result of the excellent test results, the German Air Ministry ordered a batch of 1000 machines. Due to the course of the war however, of these, only 24 were built.
 Fuselage: Tubular steel
framework with welded engine block and transmission pylon. Front part of the B-0
and B-2 unglazed, B-1 had plexiglass glazing. Central fuselage of oval
cross-section and sheet metal covering, allowing maintenance and engine removal
to be performed without dismantling primary structure. Rear fuselage of
rectangular cross-section with fabric covering. Engine compartment enclosed by
horizontal fire wall extending upwards to the transmission and a vertical fire
wall stretching backwards to the main fuel tank and the observer's seat
respectively.
Fuselage: Tubular steel
framework with welded engine block and transmission pylon. Front part of the B-0
and B-2 unglazed, B-1 had plexiglass glazing. Central fuselage of oval
cross-section and sheet metal covering, allowing maintenance and engine removal
to be performed without dismantling primary structure. Rear fuselage of
rectangular cross-section with fabric covering. Engine compartment enclosed by
horizontal fire wall extending upwards to the transmission and a vertical fire
wall stretching backwards to the main fuel tank and the observer's seat
respectively.
Rotor blades: Tubular steel spar with riveted wooden ribs, plywood and fabric covering. Connected to the rotor head by means of flapping hinges and drag links.
Transmission Gear: An upper transmission gear connected by double universal joints and a lower transmission gear between engine and cooling airscrew.
Horizontal stabilizer: Horizontal stabilizer two-part and single-spar. Tubular steel spar with riveted wooden ribs. Leading edge fitted with protective plywood covering, remaining surface fabric covered and cantilever. Wooden rudder and fin with fabric covering.
Undercarriage: Strutted rigid main landing gear with oleo legs (length of extension: 120 mm). Strutted rigid nose wheel with oleo leg, directly coupled to rudder pedals (+/- 15° of rotation).
Controls: Flying control about all three axes is effected by changing rotor blade angle through operation of both cyclic and collective pitch levers and the pedal-operated rudder. The change-over from normal powered flight to autorotation and vice versa is realized by means of a hand operated hydraulic governor dependant on the rpm.. In the event of engine failure the governor automatically changes over to autorotation
Engine: 160 hp BMW 314 E, compression 1:6, gear reduction of the rotor 1:12.
The historical background on the Flettner, is as provided by Huma in the instructions and in my opinion is quite comprehensive. It goes a long way towards negating the need for any additional reference books
| THE KIT |
If you were to ask any modeller to think of companies which produce really good models kits, names like Tamiya, Hasegawa and Eduard spring to mind and I would wager the farm, that Huma would not be mentioned. That was how I thought, until I bought Huma's 1/48 Flettner Fl-282 Kolibri. This kit is an absolute gem and sets a new standard in terms of the fidelity and delicacy of the moulding process.
 So, what do you get
that has me raving so? Well, there are two sprues containing a total of 75 finely
moulded parts, 19 of which are located on the smaller secondary sprue and are
the most petite plastic mouldings I have ever seen in a kit. Rounding out the
kit contents is a small decal sheet with markings for two schemes (prototype
V21, which is RLM 71 Dunkelgrun over RLM 65 Hellblau, or prototype V6 which is
overall RLM 63 Lichtgrau). I would have to say that the decals are perhaps the
weakest aspect of the kit and I will touch on this later. The instructions are
printed on A4 size paper and display rather simplistic colour renderings of the
two optional paint schemes and 13 construction steps. I strongly encourage one
to study the instructions carefully and test fit repeatedly, as the location of
some of the parts is vague.
So, what do you get
that has me raving so? Well, there are two sprues containing a total of 75 finely
moulded parts, 19 of which are located on the smaller secondary sprue and are
the most petite plastic mouldings I have ever seen in a kit. Rounding out the
kit contents is a small decal sheet with markings for two schemes (prototype
V21, which is RLM 71 Dunkelgrun over RLM 65 Hellblau, or prototype V6 which is
overall RLM 63 Lichtgrau). I would have to say that the decals are perhaps the
weakest aspect of the kit and I will touch on this later. The instructions are
printed on A4 size paper and display rather simplistic colour renderings of the
two optional paint schemes and 13 construction steps. I strongly encourage one
to study the instructions carefully and test fit repeatedly, as the location of
some of the parts is vague.
| CONSTRUCTION |
The first thing I did was take the time to clean up all the parts. Flash was not a problem, but mould parting lines were a bit of a nuisance, especially on the very finely moulded parts. It was tough to clean them up, without breaking the pieces. Patience and a new #11 blade are the best tools to have. With that tedious chore out of the way, I started searching for locations to hide some lead ballast, as the kit sure looks like it will be a tail-sitter.
I could locate only two areas that would be acceptable for the addition of lead weights and would not be detract from the look of the finished model; inside the upper transmission housing and inside the optional fuel tanks. I classify the fuel tanks as optional, because they are only applicable to the RLM 71 over RLM 65 V21 machine. At this point I was not yet locked into a scheme, so I explored all avenues in an attempt to hide the weights. Once the upper transmission housing was assembled, I further detailed it with the addition of a few bolt heads on the housing end covers and on the pivot points of the steuerbrücke (literal translation is steering bridge). These were fabricated using the Waldron Sub-miniature punch and die set.
At the risk of sounding cliché, the BMW 314E engine is a model in itself, being composed of no less than 16 parts. For the benefit of those who may be lacking in reference material, I offer my selection for the colours used on the various components. Part #1, which is the crankcase and cylinders was first painted Metalizer Steel and given a black India Ink wash. Part #2 is the intake manifold and was finished in Testors Jet Exhaust. The rear crankcase cover is part #3 and was airbrushed with Testors Metalizer Dark Anodized Grey, while the magneto assembly (part #4) and the fuel line (part #6) were both airbrushed with Metalizer Steel. Part #5 is the carburetor assembly and was first airbrushed with Metalizer Brass, followed by a rather heavy dry-brushing of Jet Exhaust. Parts 7-9 are the exhaust manifolds and were finished using Metalizer Burnt Iron and Burnt Metal after first hollowing out the ends. The front transmission assembly (parts 10, 11 and 13) and upper drive shaft, part #36 were finished in Metalizer Steel. The pushrod assemblies are parts 14 and 15 and were painted gloss black. Finally, part #12, which is the cooling fan, was first painted a gloss wood colour, followed by some darker brown streaking to replicate the wood grain. Huma provides the fan as a two-bladed affair, while the Schiffer book on the Flettner states that it was an eight-bladed fan. No matter, as it is practically invisible on the finished model
 The inside of the
engine compartment was airbrushed in RLM 02 and then both halves of the fuselage
were assembled trapping the completed engine inside. It is at this time, you
must decide on the final paint scheme, as prototype V21 was a two-seater, while
V6 was a single seat Flettner. In the case of V21, the second seat occupies the
space usually reserved for the fuel tank, which is why it had the extra fuel
tanks located up front. I finally elected to build the single-seater, for no
other reason than I wanted something in overall grey in my display case. This
means that I used part #67, which is the cover for the rear cockpit and
dispensed with part #30 and part #66, which are the rear seat and headrest
respectively. The instructions are a tad confusing in this regard, as they would
have you install both the rear headrest and rear cockpit cover on the same
airframe, whereas the two parts should be mutually exclusive of one another.
Once part #67 is installed, there will be a seam on the top, at both sides,
which should be eliminated.
The inside of the
engine compartment was airbrushed in RLM 02 and then both halves of the fuselage
were assembled trapping the completed engine inside. It is at this time, you
must decide on the final paint scheme, as prototype V21 was a two-seater, while
V6 was a single seat Flettner. In the case of V21, the second seat occupies the
space usually reserved for the fuel tank, which is why it had the extra fuel
tanks located up front. I finally elected to build the single-seater, for no
other reason than I wanted something in overall grey in my display case. This
means that I used part #67, which is the cover for the rear cockpit and
dispensed with part #30 and part #66, which are the rear seat and headrest
respectively. The instructions are a tad confusing in this regard, as they would
have you install both the rear headrest and rear cockpit cover on the same
airframe, whereas the two parts should be mutually exclusive of one another.
Once part #67 is installed, there will be a seam on the top, at both sides,
which should be eliminated.
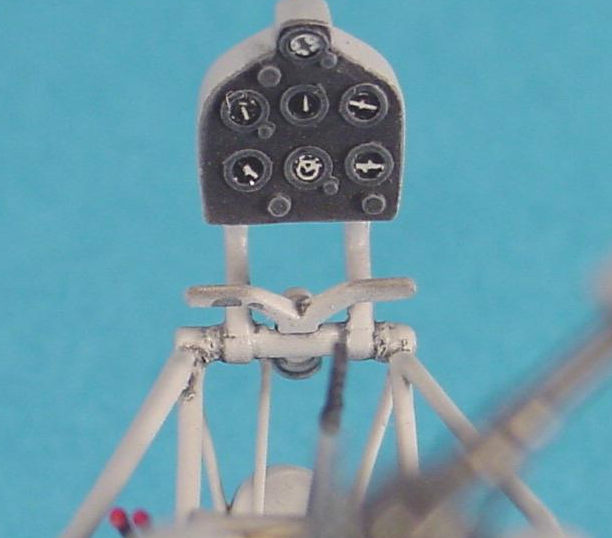
Prior to installing the main instrument panel (part #35), it along with the two auxiliary panels needed a little attention. Huma has moulded them smooth and featureless and would have you install decals to represent all the instrument detail. This was not acceptable to me and was a simple matter to correct. I used some old Hodge Podge generic instrument bezels and a few buttons made out of styrene with the aid of my Waldron Punch and Die set. While not 100% accurate, they go along way towards improving the appearance of the instrument panels. I know well, that I should really have used some bezels, which more closely followed the German style, but I had none on hand and none of my local hobby shops carry much in the line of aftermarket accessories. Actually some stores don’t carry much of anything except puzzles and fake eyeballs. As I do not usually use mail orders, for they will be the death of the local hobby shop, I used what I had on hand.
After receiving a
few coats of Xtracolor X221 RLM 63 Lichtgrau, the decals were next to be applied
and I must say that I was less than impressed with the way they went on. They
are a little on the thick side and seemed to be impervious to Solvaset. In
addition, the decals had what appeared to be a slight weave-like texture. To
further compound the decal woes, no swastikas were provided. I managed to obtain
some swastikas from Aero Master sheet 48-025 and once applied, I thought I was
ready to go on to the next step. However, as I was looking at my references, I
noticed that Huma has provided the wrong style of crosses. The crosses should
not have the extra black outlines. This I realized after the decals had been on
for a few days. Normall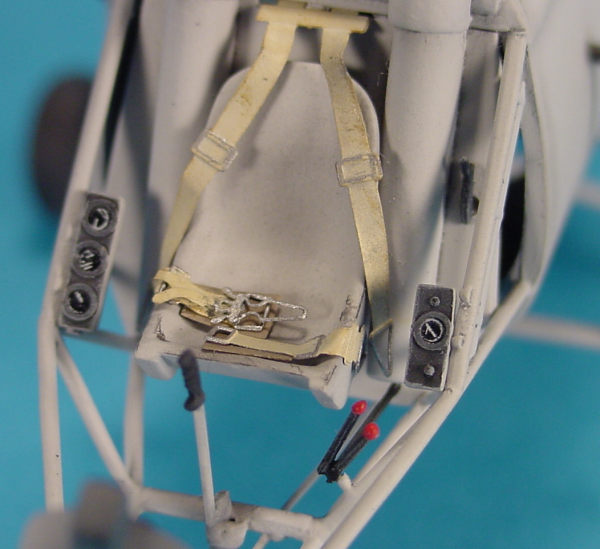 y, a piece of masking tape will lift off a decal in one
piece, but not so with these markings. No amount of tape would lift them off the
model. I was forced to resort to sanding the markings off the kit and in doing
so, managed to sand off the codes and some of the paint. This necessitated a
complete stripping job and repaint. However, I still had to come up with some
national insignia of Lilliputian proportions and new code letters.
y, a piece of masking tape will lift off a decal in one
piece, but not so with these markings. No amount of tape would lift them off the
model. I was forced to resort to sanding the markings off the kit and in doing
so, managed to sand off the codes and some of the paint. This necessitated a
complete stripping job and repaint. However, I still had to come up with some
national insignia of Lilliputian proportions and new code letters.
I was fortunate to pick up a very old, but out of register Micro Scale, 1/72 sheet of German Insignia, (but then again, I have never seen a Micro Scale sheet which was in register) that had the correct style and size of crosses. To come up with the codes, I used an Arial font on my PC and printed the codes on clear decal film. I laid out extras, as my Laserjet printer does not always print well on decal film. With the new codes and crosses in place, I gave the model a medium grey wash in all panel lines and then applied a few coats of Testors Dullcote.
I added a set of seatbelts using the older Eduard unpainted set, part number 48-290. The belts were airbrushed with Xtracolor X21 RFC Doped Linen and dry-brushed with various shades of brown to show signs of wear. I don't like the look of the new pre-painted belts, as I find them too clinical looking and I take exception to using pre-finished parts in my models. It is just a personal choice and is in no way meant to condemn those who opt for the easy way out.
I was on the homestretch now and the little helicopter was starting to take shape. I added the upper transmission housing after it was finished in Metalizer Dark Anodized Grey, given a dark wash and dry-brushed with Steel. The wheels, landing light and flight controls were added, and still the model refused to settle on its nose-wheel. I had to go to my local medical supply centre to obtain some small helium capsules, to be placed in the rear of the fuselage in an attempt to obtain some form of buoyancy. The trick with the capsules is not to open them, or else you will lose the helium.
I added some subtle weathering with medium grey chalk pastels and then set about finishing the rotor blades. The first thing I did with the blades was replace the kit vibration dampers (parts 71, 72, 74 and 75) with new units made from sheet styrene using my trusty Waldron punch and die set. Actually, I made two sets, or eight dampers in total. Four dampers were installed prior to painting and the remaining four were fastened after all the painting steps had been completed. I chose this approach based on photos in the Schiffer book. If you look closely, you will notice that the actual dampers appear to be two layers thick, with one layer being the same colour as the rotor head assembly with the second layer, a lighter colour. With the first layer of dampers in place, the rotor head assemblies were airbrushed with Testors Metalizer Gunmetal, dry brushed with Steel and then rubbed out with graphite powder. Then the second layer of dampers, which were painted Metalizer Steel were fastened. The rotor blades themselves, were airbrushed RLM 63 and glued in place with a small drop of 5-minute epoxy. When attaching the rotor blades, one must be cognizant of two things; first, the blades are handed, with the right blade rotating clockwise, while the left blade rotates counter-clockwise. Second, the only time the two blades are parallel, is when they are at 45° to the centreline of the aircraft. With the installation of the rotor blades the model finally sits on all three wheels.
| CONCLUSIONS |
 This completes my Flettner and I must say that the finished
model is quite diminutive and makes an attractive diversion from my usual
single-engine fighters. I thoroughly enjoyed building this model and can see
myself building another in the RLM 71 over RLM 65 scheme. If I had any complaint
with Huma, it is that they do not offer more subjects in 1/48. Based on the
quality of this kit, I would welcome the opportunity to build another Huma model
down the road.
This completes my Flettner and I must say that the finished
model is quite diminutive and makes an attractive diversion from my usual
single-engine fighters. I thoroughly enjoyed building this model and can see
myself building another in the RLM 71 over RLM 65 scheme. If I had any complaint
with Huma, it is that they do not offer more subjects in 1/48. Based on the
quality of this kit, I would welcome the opportunity to build another Huma model
down the road.
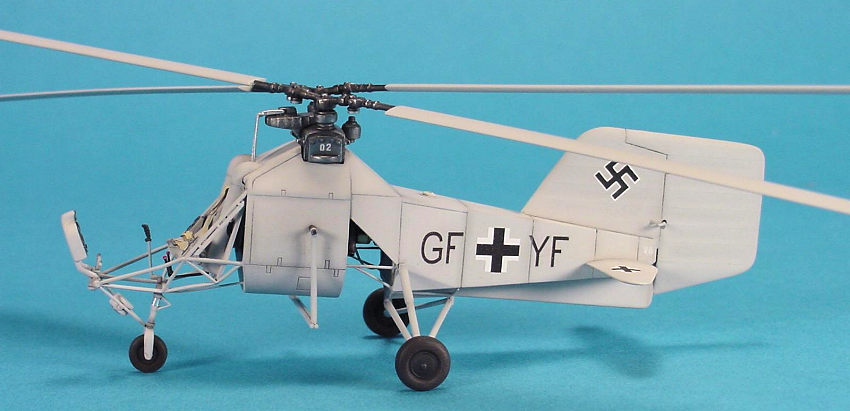
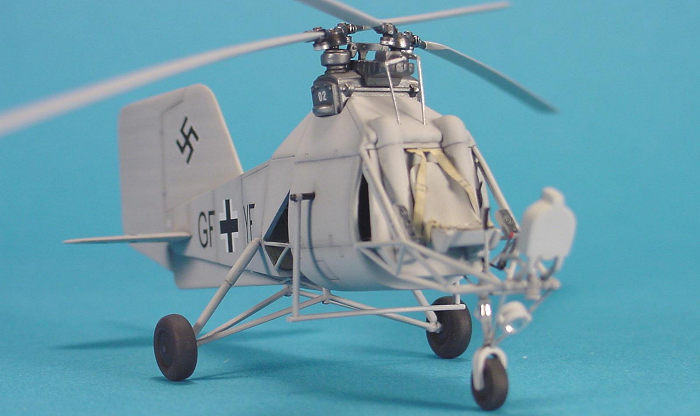
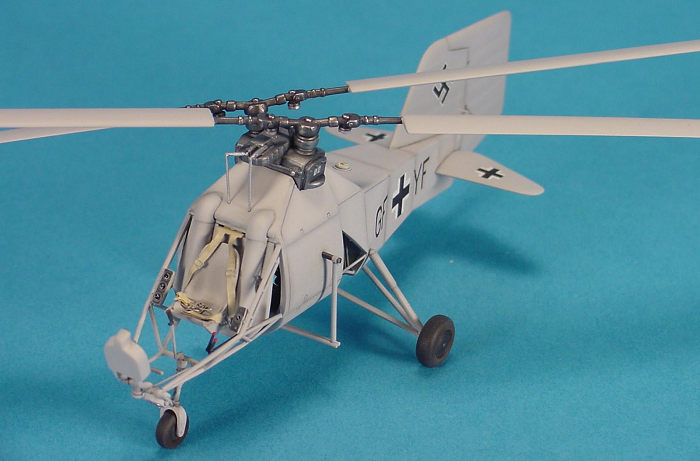
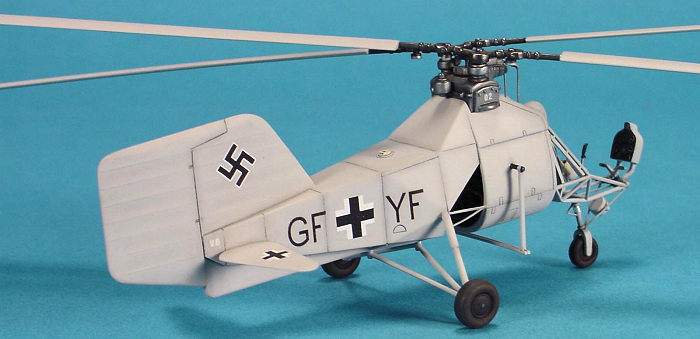
My model represents a Flettner Fl-282 V6, piloted by Hauptmann Claus von Winterfeldt, of Erprobungs-und Lehrkommando 20, while undergoing trials on the Kriegsmarine minelayer 'Drache' in the Agean Sea in early 1943.
| REFERENCES |
My principle source of reference was the Schiffer book, No. 6 in their Luftwaffe Profile Series, with secondary information obtained from various web-sites on the Internet. Subsequent to me building this model, Classic Publications released a book on German Helicopters which is superb and almost renders all other references useless.
Editor's Note: In the decade or so since this article was first written, Huma has gone out of business so finding this or any of their other kits will take a bit of searching.
3 October 2017
Copyright ModelingMadness.com
If you would like your product reviewed fairly and fairly quickly, please contact the editor or see other details in the Note to Contributors.
Back to the Main Page Back to the Review Index Page Back to the Previews Index Page