
Hasegawa 1/32 Bf-109E
| KIT #: | JS-073 |
| PRICE: | approx $20 |
| DECALS: | See review |
| REVIEWER: | Kevin Krueger |
| NOTES: | Cutting Edge bits used |
| HISTORY |
Some time ago, while browsing through this website, I noticed that our beloved editor and administrator (chief cook and bottle washer) did not have a full build review of the Hasegawa 1/32 scale Bf-109E. It's really rather remarkable that in spite of all the reviews of 109's on this website, somehow this one has been overlooked. Since I built this kit not too long ago, I volunteered my services to Scott and offered to remedy the situation, so to speak. So, before you say "Not another 109!" let me say that I am not a complete 109 fanatic. What interested me was the scale and the challenge of the paint scheme. It looked like a fairly easy build, reasonably accurate, and above all, I wanted to do it.
Pardon me if I don't go into the history of the Bf-109 and the adventures of Willie Messerschmitt. Most of us (99%) know it ad nauseum and for those who don't, may I recommend one of the many other 109 reviews on this website.
| THE KIT |
 This kit dates back to
the early 1970's. That's over thirty years old for those of you who had a
difficult time in math class. When this kit was released, I'm sure it was
considered "state of the art". The kit comes in a dark olive green
plastic that is clean and crisp. I also noticed that the plastic was a
little harder than usual and hence a little more fragile. I thought this
may be due to the age of the kit but Scott informed me that this was a
common trait of Hasegawa kits back in the 70's. Consequently, a little
extra care must be observed when removing the parts from the sprues and
when handling because the parts will crack if handled too rough. The kit
has raised panel lines and some riveting. However, the rivets are very
fine and to scale. You will also notice that the kit has, what I would
say.... fewer than the average number of parts for a 1/32 scale kit.
Especially when compared to the 1/32 scale kits released within the
past...say 6 or 7 years.
This kit dates back to
the early 1970's. That's over thirty years old for those of you who had a
difficult time in math class. When this kit was released, I'm sure it was
considered "state of the art". The kit comes in a dark olive green
plastic that is clean and crisp. I also noticed that the plastic was a
little harder than usual and hence a little more fragile. I thought this
may be due to the age of the kit but Scott informed me that this was a
common trait of Hasegawa kits back in the 70's. Consequently, a little
extra care must be observed when removing the parts from the sprues and
when handling because the parts will crack if handled too rough. The kit
has raised panel lines and some riveting. However, the rivets are very
fine and to scale. You will also notice that the kit has, what I would
say.... fewer than the average number of parts for a 1/32 scale kit.
Especially when compared to the 1/32 scale kits released within the
past...say 6 or 7 years.
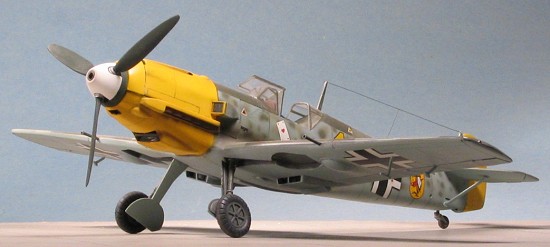
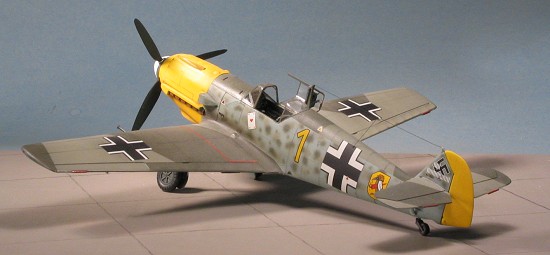
This kit provides the options to build a 109E-3 or E-4, however, if you check out Scott's preview of this kit, you will notice that one has the ability to model most all of the E variants save for the E-1. The kit provides a choice of canopies for the E-3 or E-4 and an optional bomb or belly tank for the other E variants. I decided on an "out-of-the-box" build (with one exception) of the E-3 version and aftermarket decals.
| CONSTRUCTION |
The temptation was there to jazz it up with gobs of aftermarket goodies but the entire purpose of this particular exercise was to keep it simple. Realizing that it is probably as boring to read about an out-of-the-box build as it is to write about, I decided to focus on the nuances of the model, should any of you ever decide to build it.
 Construction began as
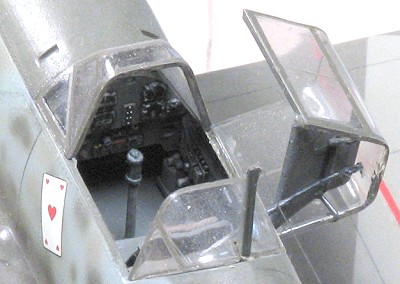
usual, with the engine and cockpit. These all went together very easy and
actually cry out for the super-detailer. Although the cockpit is good as
far as detail is concerned, I would rate it fair on accuracy. The
instrument panel has raised surface detail and it seems to be very accurate
according to the Maru Mechanic. However, it's the seat that leaves
a lot to be desired. This is where I deviated from "out-of-the-box". I
acquired a Cutting Edge (32112)
replacement seat complete with cushion and harness and substituted it for
the kit seat. It (the new seat) fit really well with minimum work and,
after painting, looks superb. The finished instrument panel looks nearly
as good as any aftermarket panel out there as I was able to give attention
to each individual instrument without any trouble. The rest of the cockpit
went together without a hitch. After painting, which included the
obligitory wash and highlight, looks good considering the age of this kit.
Having said that, for those who want to do more than I did, there is the
Cutting Edge
Bf-109E Cockpit set (32088)
which appears to be much more accurate
than the kit supplied cockpit.
Construction began as
usual, with the engine and cockpit. These all went together very easy and
actually cry out for the super-detailer. Although the cockpit is good as
far as detail is concerned, I would rate it fair on accuracy. The
instrument panel has raised surface detail and it seems to be very accurate
according to the Maru Mechanic. However, it's the seat that leaves
a lot to be desired. This is where I deviated from "out-of-the-box". I
acquired a Cutting Edge (32112)
replacement seat complete with cushion and harness and substituted it for
the kit seat. It (the new seat) fit really well with minimum work and,
after painting, looks superb. The finished instrument panel looks nearly
as good as any aftermarket panel out there as I was able to give attention
to each individual instrument without any trouble. The rest of the cockpit
went together without a hitch. After painting, which included the
obligitory wash and highlight, looks good considering the age of this kit.
Having said that, for those who want to do more than I did, there is the
Cutting Edge
Bf-109E Cockpit set (32088)
which appears to be much more accurate
than the kit supplied cockpit.
Actually, the rest of the aircraft went
together with only a couple of glitches. Everything was straight-forward
and fairly easy. One small problem arose when attaching the wings to the
fuselage. When spreading the wing assembly apart to mate it up with the
fuselage, a stress crack (remember the brittle plastic?) formed on the
bottom side of the wing assembly just abou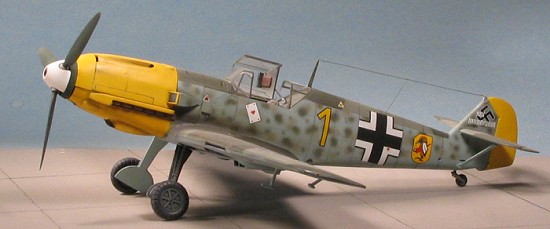 t
where you would attach the drop tank or bomb if you were to use them. It
was of the hair-line type and after the wings were fixed into place, the
crack was easily repaired. Another small area of concern on my model was
the engine cowling. It fit well enough but there was a small fit/mating
problem on the left front where the upper and lower cowling meet next to
the prop spinner. This may have been due to a slight warpage problem on my
particular model. It is hard to say. Nonetheless, it was not difficult to
remedy with the help of a sanding stick to the inside edge of the cowling.
t
where you would attach the drop tank or bomb if you were to use them. It
was of the hair-line type and after the wings were fixed into place, the
crack was easily repaired. Another small area of concern on my model was
the engine cowling. It fit well enough but there was a small fit/mating
problem on the left front where the upper and lower cowling meet next to
the prop spinner. This may have been due to a slight warpage problem on my
particular model. It is hard to say. Nonetheless, it was not difficult to
remedy with the help of a sanding stick to the inside edge of the cowling.
The landing gear went together with no real problems. The angle and alignment looked correct using the simple calibrated eyeball method. It is a wheels down only kit so if you want to build yours wheels up and hang it from the ceiling, you will have more of a challenge. For you will notice right away that the wheel wells on this kit are way too shallow. This is another area of the kit that begs for detailing. Once again, I did not do any extra detailing here but for those of you who want to, the Cutting Edge Bf-109E Wheel Well set (32113) should be just what you are looking for.
| COLORS & MARKINGS |
A while back, I
asked a question on the forum about how each of us chooses our next
modeling project. I had always wanted to build this kit but I kept putting
it off...for years. Then, what really got me motivated into doing this
model was when I saw an
 aftermarket
decal sheet. Smack...it hit me (euphemistically speaking of course). How
many of you have had that experience? Probably most. The decal sheet that
caused this reaction was
Eagle Strike 32-040.
Anyway, I was interested in the scheme of Josef "Pips" Priller without
really knowing anything about him. Also, I had no photographic references
so the only source for my paint scheme were the illustrations from the
reference page of the decal sheet. Oh, there are lots of great pics of
Priller's FW-190s but it's slim pickin's if you are looking for images of
his 109E-3. The only photo I was able to find was long after I completed
the model and even that pic was dark and grainy.
aftermarket
decal sheet. Smack...it hit me (euphemistically speaking of course). How
many of you have had that experience? Probably most. The decal sheet that
caused this reaction was
Eagle Strike 32-040.
Anyway, I was interested in the scheme of Josef "Pips" Priller without
really knowing anything about him. Also, I had no photographic references
so the only source for my paint scheme were the illustrations from the
reference page of the decal sheet. Oh, there are lots of great pics of
Priller's FW-190s but it's slim pickin's if you are looking for images of
his 109E-3. The only photo I was able to find was long after I completed
the model and even that pic was dark and grainy.
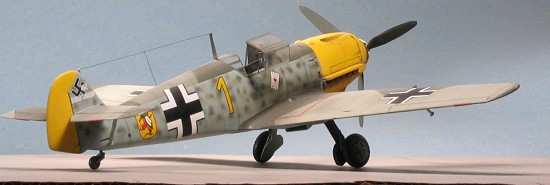
The paint scheme for this particular model was RLM 71/02/65; the standard...or should I say common colors used during the summer of 1940. I used Gunze acrylics for almost the entire project including Gunze Yellow 04 for the cowling and rudder. The exception was the cockpit and wheel wells (RLM 02) where I used an old tin of Humbrol enamel. The reason being is that the Humbrol RLM 02 is slightly darker than the Gunze acrylic or even Testors RLM 02 for that matter. When laid out next to each other, you can see the difference and I make the difference work to my advantage. The difference in the two shades contrast nicely with each other. Since it stands to reason that the cockpit and wheel wells would be less subject to the effects of weather (i.e. fading) a little difference in shades works fine. Call it "artistic license" if you please.
The reference page
of the decal sheet called for the standard scheme on the upper surfaces
with some fairly heavy mottling along the sides of the fuselage. I painted
the upper surface scheme (upper wings, stabs, and upper fuselage) without
 breaking a sweat.
What remained was the sides of the fuselage and this is where my challenges
began. In attempt number one, I tried to duplicate the heavier mottling as
depicted in the illustration. The results weren't a complete disaster but
it was close. So, I stripped off the old paint, remasked, and painted it a
second time. How many of you have experienced that? Probably most. This
time I really reduced the air pressure through my airbrush to about
8 psi. This time the results were much more pleasing. This is one
instance where, at least in my case, less turned out to be more. This came
at a price however for my mottling doesn't appear to be as heavy as the
reference or the grainy black and white photo shows it should be.
breaking a sweat.
What remained was the sides of the fuselage and this is where my challenges
began. In attempt number one, I tried to duplicate the heavier mottling as
depicted in the illustration. The results weren't a complete disaster but
it was close. So, I stripped off the old paint, remasked, and painted it a
second time. How many of you have experienced that? Probably most. This
time I really reduced the air pressure through my airbrush to about
8 psi. This time the results were much more pleasing. This is one
instance where, at least in my case, less turned out to be more. This came
at a price however for my mottling doesn't appear to be as heavy as the
reference or the grainy black and white photo shows it should be.
The Eagle Strike decal sheet was easy to work with. The decals all laid down with minimum effort and a little help from Micro Sol/Micro Set setting solutions. The panel lines were then accented (I did not pre-shade) with a very fine no. 2 lead pencil and the clear pieces all fit great. The finishing touch was the very, very fine brass wire (I forget the gauge) painted and used for the antenna wire.
| CONCLUSIONS |
 I can sum up this build
in two words.....no complaints! This is a kit pushing 35 years old and it
was a joy to work with. I would recommend this kit to beginners as well as
experienced builders. It can still be had at a reasonable, if not, a
bargain price. It looks good straight from the box or, if you want to
improve on it, the aftermarket goodies are available. Yes, I've heard
that the rivet counters have an issue with the kit (not sure what it is)
but to me, my finished model looks like a 109E-3 and nothing else. I was
pleased with the finished model and really, that's all that counts. I have
another one of these in my stash and someday I'll build it again. Probably
do the E-4 in North Africa colors and add the aftermarket parts. In the
meantime, I'll be reviewing another 1/32 scale Bf-109 in the near future.
Like this one, the next one has not yet been reviewed on this website.
Guesses anyone? Stay tuned!!
I can sum up this build
in two words.....no complaints! This is a kit pushing 35 years old and it
was a joy to work with. I would recommend this kit to beginners as well as
experienced builders. It can still be had at a reasonable, if not, a
bargain price. It looks good straight from the box or, if you want to
improve on it, the aftermarket goodies are available. Yes, I've heard
that the rivet counters have an issue with the kit (not sure what it is)
but to me, my finished model looks like a 109E-3 and nothing else. I was
pleased with the finished model and really, that's all that counts. I have
another one of these in my stash and someday I'll build it again. Probably
do the E-4 in North Africa colors and add the aftermarket parts. In the
meantime, I'll be reviewing another 1/32 scale Bf-109 in the near future.
Like this one, the next one has not yet been reviewed on this website.
Guesses anyone? Stay tuned!!
| REFERENCES |
Bf-109 In Action Pt 1 Squadron Signals Publication
Maru Mechanic Bf-109/Fw-190
Official Monogram Luftwaffe Painting Guide
November 2005
Copyright ModelingMadness.com
A special thank you goes out to Scott for his contributions toward making this review possible.
If you would like your product reviewed fairly and fairly quickly, please contact the editor or see other details in the Note to Contributors.