AMT 1/72 JU-88C-4/6
|
KIT # |
8898 |
|
PRICE: |
$12.00 MSRP |
|
DECALS: |
Three aircraft |
|
REVIEWER: |
Ralph Koziarski |
|
NOTES: |
Similar to the G-6 kit but with different decals and a few different parts. |
|
HISTORY |
Before the development of dedicated night fighters durring the
middle of the war, the Luftwaffe often pressed converted fighters and schnell
bombers into the night-fighter roll. The speedy German bombers made especially
good night fighters as is evident in the various types of Ju 88s Do 217s and Bf
110s filling the role. The reason being simple; they made a good stable
platform for the heavy armament required to knock out bombers, good speed, and
most important, you can fit the complicated radar arrays on board a
bomber. The Ju 88 C series were employed as night fighters from 1942 after
slight
modifications. The C-4 served as a zerstorer attack aircraft with the
replacement of the glazed nose with a solid one packing guns and cannon. The C
series really came into play when fitted with radar masts on said solid gun
nose along with a variety of other modifications to armament and powerplants.
|
THE KIT |
Upon opening up the box I must say I was initially disappointed. The parts look
very toy-like and some of them are (see the Ju88 G-6 review on this site).
However upon closer inspection the kit looks promising. The parts are
AMT's usual soft plastic in several light gray sprues along with one clear
sprue. Flash is minimal but present on some parts, and sink holes and
injection pin marks are almost non-existent. The majority of clean-up which
you will need to do will be the scraping off of seems on some of the finer
parts (radar aerials, gear legs etc.). There are recessed panel lines but some
might consider them to be slightly heavy; nothing like Matchbox, but no
Hasegawa either. The clear parts are nice and there is minimal distortion,
even on the gun bulges for the C-4 version.
 The instructions could have been better. You get two fold out sheets;
one with blow up views of assembly, and a separate painting guide. Some of the
parts placement areas are difficult to find, and a few steps seem
questionable. Color callouts are generic for interior components and FS
numbers for the overall schemes. Do note that a lot of the color call outs are
The instructions could have been better. You get two fold out sheets;
one with blow up views of assembly, and a separate painting guide. Some of the
parts placement areas are difficult to find, and a few steps seem
questionable. Color callouts are generic for interior components and FS
numbers for the overall schemes. Do note that a lot of the color call outs are
wrong. Err on the side of caution and get yourself the RLM colors from model
master. The decals are spartan, but more on this later.
|
CONSTRUCTION |
Show of hands from all who've experienced this. You begin a kit and things are
going really well, you're even tackling the problem areas with a minimum of
hair pulling. Then as you approach the end of construction things begin to go
terribly wrong. Anybody? Anybody? Bueller? Well that's what happens here. So
sit right back and let me recount to the best of my memory on how things went
and didn't go.
I began construction by gluing together the
vertical tail and wing
halves. Remember to fill in the bomb rack holes. Make holes for the wing
antennae and shave off the dive brake stubs if you're not building the C-4. I
believe the instructions do not mention this. Next I assembled the engine
nacelles consisting of two halves and an insert with a nicely done radiator on
it. The instructions tell you to remove sections of the radiator depending on
which version you build ( and I forgot to do this). So far so good. The next
step is to assemble the wheel wells/engine housings under the wings. Two
halves and a wheel well floor. No detail on the floor, so you may want to add
in some ribs and wiring here (although they'll be barely visible once the
gear goes in). Make sure you fill the seem between the two halves here, since
it is not the natural seem of where the gear doors meet.
The next step
presents problem number one. The engine nacelles attach to the wing at a really
weird angle. They point up at about a 25 degree angle. I had no reference
material, but I can assure you that its wrong. Here is a simple solution for
this problem. You don't even need to bother yourself with making a shim from
card stock. Simply shave some plastic off of the parts tree, so you get thin
curly bits. Glue on the engines to the bottom of the joint and align them so
they straight stick forward. Then insert the plastic shavings into the gaping
hole on top and soak them with liquid cement. Let dry and then fill in the
remainder of the gap (if any - I only had one on the left engine) with super
glue. Next come the bulges to the bottoms of the engines and exhaust shrouds.
Keep in mind to either work on one engine at a time or to mark them left and
right since they look identical.
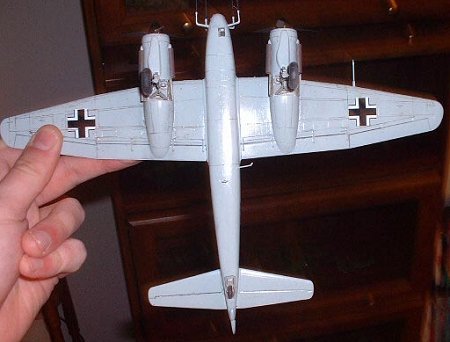
While these sub-assemblies were drying I decided to work on the cockpit. Nothing to spectacular here, but it is quite nice. The three seats and two part control column were glued onto the floor and the whole thing was painted a home-brewed approximation of RLM 02 (a mix of duck egg blue and several shades of gray and green) along with the cockpit side walls, radar operators panel, and pilots panel. The various dials on both panels were then painted black and some red. Seat belts were then painted a shade of tan mixed with white and the head-rest, and gunner's seat (???) were pained a mixture of tan and wood. All this was then washed in dark watercolors and dry-brushed first in white and then aluminum. various buttons were painted red and yellow just to add a bit more color. The completed cockpit components were then stuck into the fuselage half, along with the wing spar and the fuselage was closed. The fit here isn't perfect but nothing we aircraft people aren't used to dealing with. Whip out the old putty and sand paper.
After the fuselage halves had dried the nose windows were glued in and
puttied over since they were not present on the 88c. The horizontal
stabilizers went on without a hitch, and the wing/fuselage joint was almost
prefect. I decided to glue on the tail wheel gear doors at this point since it
is a but joint and I didn't want to botch up my finish later on with glue. The
vertical tail needed some coaxing to fit. It would not sit at a proper angle
to the fuselage and the front kept pointing slightly to the left. I ended up
widening the hole into which it fits and had no more problems ( notice that I
also sanded down the thickness of the two halves before gluing them). To
finish off the main construction I glued on the nose cone (there were two on
my kit. One with guns and one without. I wasn't sure which one to use, but I
opted for the gun nose, since the C-6 didn't possess a belly pack or shrage
musik like later versions. Finally since I decided to build the night fighter
I glued on the main holding arms for the forward radar array. The joints for
these are weak and arbitrary, so make sure you have a good bond and proper
alignment before moving on. It was these arms that were the beginning of my
problems, but before that lets paint!
|
PAINT & DECALS |
 Here is where I wish I had references. The paint guide for the C-6
suggests a light blue underside (RLM 76) with a light gray top with darker
gray splotches. Now I've heard of 74/75/76 schemes on night fighters, but it
seemed odd to me here since 74 and 75 are both darker than the crosses
provided in the decals. OH and the mottle in the instructions is not a mottle
but more like random dribbles and spots. It just looked wrong to me, so I
decided to go with overall RLM 76 with 74 or 75 ( i forget which it was i
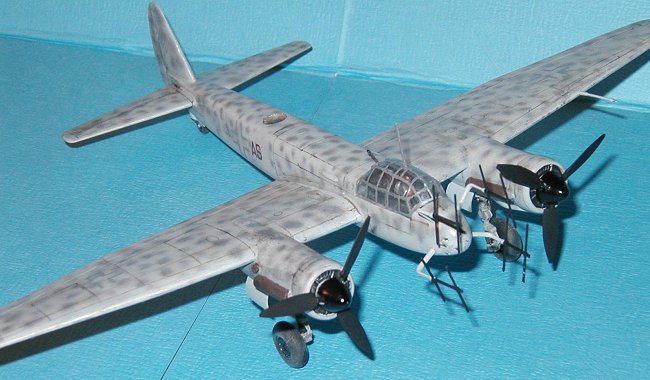
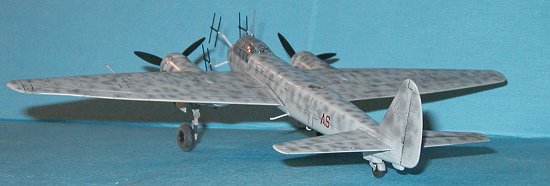
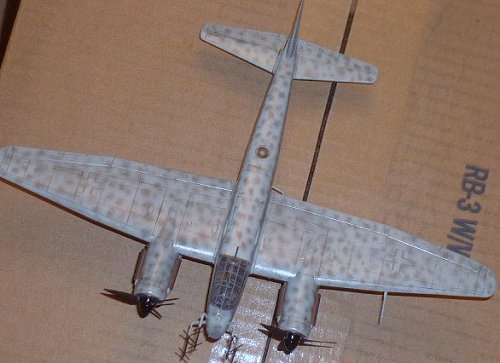
used) for a more standard looking mottle on the upper surfaces. Now I suck at
mottle schemes as you can see on the photos, but I think this time it turned
out pretty much ok.....maybe. I followed this up with a light coat of future
and a wash in burnt umber and black watercolors. Your other options are an
overall black (too dull) and a standard green splinter daytime scheme for the
C-4.
Here is where I wish I had references. The paint guide for the C-6
suggests a light blue underside (RLM 76) with a light gray top with darker
gray splotches. Now I've heard of 74/75/76 schemes on night fighters, but it
seemed odd to me here since 74 and 75 are both darker than the crosses
provided in the decals. OH and the mottle in the instructions is not a mottle
but more like random dribbles and spots. It just looked wrong to me, so I
decided to go with overall RLM 76 with 74 or 75 ( i forget which it was i
used) for a more standard looking mottle on the upper surfaces. Now I suck at
mottle schemes as you can see on the photos, but I think this time it turned
out pretty much ok.....maybe. I followed this up with a light coat of future
and a wash in burnt umber and black watercolors. Your other options are an
overall black (too dull) and a standard green splinter daytime scheme for the
C-4.
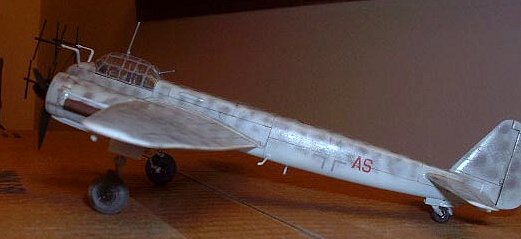
Now a word about the decals. That word is crap. These were really piss-poor decals. Ok they included swastikas at least, but they were out of register, thick, and too light in color; so much so that they all but disappeared on my model, and they didn't want to stick once applied. A day of drying and setting solution helped these thick monsters finally stay down. They were then burnished into the panel lines and followed with a second coat of future. There are no stencils or "nose art". A quick aside here, the decals were the main reason I decided to build the night fighter. The C-4 attack version has decals for a false glass nose, but they look so hokey and toy like that I decided to just avoid them altogether ( I can only imagine trying to get them to stay down on the compound curves of the nose UGH! ).
|
CONSTRUCTION CONTINUES |
 After the Future dried the next step was to assemble the landing gear
and paint it. Nothing interesting or complicated here, although the tail wheel
seems a bit too robust, and the main gear appears to be a bit on the long side
(maybe its just me). The gear being done its time to finish up with the
antenna arrays and the canopy. Here is where things really began to go wrong.
After the Future dried the next step was to assemble the landing gear
and paint it. Nothing interesting or complicated here, although the tail wheel
seems a bit too robust, and the main gear appears to be a bit on the long side
(maybe its just me). The gear being done its time to finish up with the
antenna arrays and the canopy. Here is where things really began to go wrong.
First - The framing on the canopy is really thing and very lightly raised on
certain parts, and then when it is raised high enough to paint it sticks out
at weird angles. I tried masking with tape and white glue, but I lost my
patience after paint leaks with both results so I freehanded it with a spike
made of stretched sprue (that was a fun hour and a half...). Delaying the
scary forward array I decided to put on all the other antennae and aerials,
put the rear gun into the canopy and glued that on with white glue. The fit
here could be better, much better actually. Then came the props and spinners.
Careful here and don't stick the prop too far in or it'll rub up against the
nacelle.
Finally the moment I had been dreading since the start, that tangle of
masts in the front. I painted the antennae flat black and let them dry for a
day. I attached the buggers to their arms with super glue one at a time,
aligning the others relative to the position of the first one (I think my
arrangement is a bit off, but it looks cool this way). Imagine trying to glue
two pieces of stretched sprue to one another end to end. That is what this
last step is like, AMT really blew it here. It would be so much simpler by
splitting a part of the arm lengthwise so you had a larger surface of
adhesive. Oh well though. Things were going so so until it came time to glue
on the last array. My hand was shaking and I must have been pushing too hard
since I snapped off the holding arm and broke off two other antennas in the
process. Two shots of Blackhaus and a cigarette later I had it finally done.
My first night fighter. PHEW!
|
CONCLUSIONS |
While this kit is pretty nice and actually not that hard to build I
would certainly not recommend it to a beginner. The problems with the radar
arrays and some poor parts fit (especially the gondola which I left off) make
this kit problematic. I'll make two suggestions. Go out and get good
references and a set of aftermarket decals. In the hands of an expert, which I
do not claim to be, you can get a really nice Ju 88 C out of this kit,
otherwise buy it only if there is nothing else interesting at the hobby shop.
On a scale of 1 to 10 I give the kit a 7 and the decals a 3.
Copyright ModelingMadness.com. All rights reserved. No reproduction in part or in whole without express permission from the editor.
If you would like your product reviewed fairly and quickly, please contact the editor or see other details in the Note to Contributors.